
Product Manual
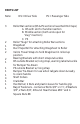


MAIN ASSEMBLY
1.
2.
3.
4.
5.
6.
7.
8.
9.
10.
11.
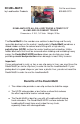
2
Assemble the Roller Bar. Screw in Slugs as far as they will go into
either end of the Middle Roller Bar section. Screw in DS & PS Roller
sections as far as they will go. The Roller sections will meet in the
middle of each Slug.
NOTE: It is not necessary to overly tighten the Roller sections.
The first time you unload with the Loadhandler®, the torque will
tighten them the rest of the way.
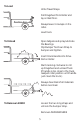
Also note that DS of Roller has slot for handle. Have the DS of
Roller to your left for rest of assembly, as if you were approaching
rear of truck to install the Loadhandler®. A lowered truck tailgate
makes a good assembly tabletop.
Unfold Dragsheet and attach to Roller with Duct Tape. Align the
edge of the 15' length of Dragsheet to marker on DS of Roller.
Apply tape in horizontal line across 50" width of Dragsheet (42"
width on Mid-Size unit) and affix to Roller.
Roll Dragsheet onto Roller. The direction of the roll is clockwise
when facing DS Roller end from driver side. When roll-up is
complete, Dragsheet unfurls counter-clockwise from top of Roller
to unroll, and rolls clockwise back over the top of Roller when
rewinding (un-loading).
Remove Red End Caps from each end of the Roller.
Slide one Shaft Collar onto each end of the Roller.
Slide a Bearing Bracket onto each end. The strap side of the
Bracket goes on inside of tailgate (towards front of truck), and the
rubber side makes contact with the inside of the tailgate.
Slide a second Shaft Collar on each end of Roller. Insert 1"
Screws and Square Nuts but do not tighten all the way yet.
Put Red End Caps back on each end of Roller.
Slide the DS Rear Bracket onto DS Bearing Bracket and loosely affix
Bolts, Washers and Nuts as shown. (The DS Rear Bracket has
Warning Label and extra buckle to accommodate the Bumper Tie-
Down.) Tailgate thickness will dictate which of 4 holes is best fit for
your truck. Do not tighten yet.
Attach PS Rear Bracket same way as above.
Put together Handle Assembly as in diagram.