
Installation Guide


+1 850 296 2377 Working hours : Mon - Fri 9:00 a.m. - 16:00 p.m. EST support@ihomeangel.com
www.ihomeangel.com Page: - 4 - / 4
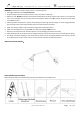
4) Unscrew the preassembled studs from the decorative ring(J), position the
decorative ring(J)and the shade (I) over the socket (G),
then gently adjust the shade if it is slant from the socket (G).
Hand tighten the socket ring (M) to secure the decorative ring (J)and
shade(I) in place .Put back the previously removed studs and thread till the
studs snug against the glass surface .
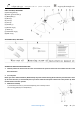
5) Install bulb (Not included. Please do not exceed the maximum
capacity recommended on the socket.)
Adjust the fixture to desired direction through unscrewing the
stud (D)and then adjusting the arms(F). Once the desired direction achieved,
tighten the stud (D).
6) Check everything is already installed properly, then you could turn on the light. Enjoy!
CLEANING
To clean, wipe fixture with a soft cloth. Do not use abrasive materials such as scouring pads or powders, steel wool
or abrasive paper.
ORDERING PARTS
Keep this sheet for future reference, and in case you need to order replacement parts. All parts for this fixture can
be ordered from place of purchase. Be sure to use exact wording from illustration when ordering parts.