
Instructions / Assembly
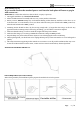
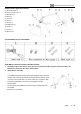

Table Of Contents

homecustomercare@outlook.com
Page: - 4 - / 4
Note :the preassembled screws of mounting plate(A)should be horizontal
direction after the mounting plate mounted.If not, rotate carefully the
mounting plate side to side until the angle is achieved ,
tighten the wood screws(o).
3) Put the back plate (C)onto the screws of mounting plate (A)and secure
with ball nuts (K)
4) Unscrew the preassembled studs from the shade base(H),
Position the shade (I) over the socket (G), thread the previously
removed screws(J) till the screws(J) snug against the surface
of shade (I).
5)Install bulb (Not included. Please do not exceed the maximum
capacity recommended on the socket.)
Adjust the fixture to desired direction through unscrewing the
stud s(D)and adjusting the arms(F). Once the desired direction achieved,
tighten the studs (D).
Plug the power cord into a outlet and turn on at switch.
CLEANING
To clean, wipe fixture with a soft cloth. Clean glass with a mild soap. Do not use abrasive materials such as
scouring pads or powders, steel wool or abrasive paper.
ORDERING PARTS
Keep this sheet for future reference, and in case you need to order replacement parts. All parts for this fixture can
be ordered from place of purchase. Be sure to use exact wording from illustration when ordering parts.