
Installation Guide


an aquarium pump to a receptacle. The “drip loop” is that
part of the cord below the level of the receptacle or the
connector if an extension cord is used, to prevent water
traveling along the cord and coming in contact with the
receptacle. If the plug or receptacle does get wet, DON’T
unplug the cord. Disconnect the fuse or circuit breaker that
supplies power to the pump. Then unplug and examine for
presence of water in the receptacle.
7. Close supervision is necessary when any pump is used by or
near children.
8. Always unplug the pump from the outlet when not in use,
before putting on or taking off parts, and before cleaning.
Never yank cord to pull plug from outlet. Grasp the plug and
pull to disconnect.
9. Do not use the pump for other than intended use.
10. Do not install or store the pump where it will be exposed to the
weather or to temperatures below freezing.
11. Make sure the pump is securely installed before operating it.
12. Read and observe all the important notices on the pump.
13. If an extension cord is necessary, a cord with a proper rating
should be used. A cord rating for less amperes or watts than
the pump rating may overheat. Care should be taken to
arrange the cord so that it will not be tripped over or pulled.
ELECTRICAL CONNECTIONS
Check the pump label for proper voltage required. Do not connect
to voltage other than that shown.
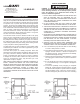
GROUNDING INSTRUCTIONS
This appliance should be grounded to minimize the possibility of
electric shock. This appliance is equipped with an electric cord
having an equipment grounding conductor and a grounding type
plug. The plug must be plugged into an outlet that is installed
and grounded in accordance with all appropriate codes and
ordinances. This appliance is for use on a normal 120 volt circuit
and has a grounding plug that looks like the plug illustrated
in Figure 2. This pump should not be used with a three to two
grounding adaptor.
AQUARIUM APPLICATIONS
When using this pump for aquarium filter applications, refer
to the instructions and owner’s manual supplied by the filter
manufacturer.
OPERATION
1. The pump is supplied completely preassembled and pretested
from the factory.
2. Use a thread sealer on all pipe connections and hand-tighten
only.
3. The pump is not self priming. It must be operated with the
volute intake below the liquid level.
4. This pump is not submersible. Operate the pump only in the
in-line mode. DO NOT put the unit in liquid. Pump should
be located in a well ventilated area and away from where
accidental water spillage would cause wetting of the pump.
5. The weight of the pump must be supported adequately.
DO NOT support the pump by the intake and discharge
connections alone.
6. Do not allow the pump to run dry (without liquid). Heat buildup
caused by friction will damage the pump parts when dry.
7. Do not attempt to restrict the intake side of these pumps.
Restricting the intake may cause damage to the pump head.
If you require reduced flow rates, then place a valve on the
discharge side of the pump or if flexible vinyl tubing is used, a
clamp can be used on the tubing to restrict the flow.
8. If the unit is to be idle for a period of time, follow the cleaning
instructions outlined in the next section. Do not let the unit
freeze in the wintertime. This may cause cracking or distortion
that may destroy the unit.
SERVICE INSTRUCTIONS
MAKE CERTAIN THAT THE UNIT IS DISCONNECTED FROM THE
POWER SOURCE BEFORE ATTEMPTING TO SERVICE OR REMOVE
ANY COMPONENT!
1. The motor’s sleeve bearings should be lubricated every six
months with two to three drops of S.A.E. 20 weight non-detergent
oil. The oil holes are located on top at each end of the motor.
2. All wetted parts can be serviced by removing the (4) screws
(Figure 3, item 12) which hold the volute to the housing. The
pump head components can easily be replaced in the field if
necessary.
3. Lightly clean any corrosion or debris which may clog the
impeller.
4. If pump is tripping circuit breakers, GFCI, or not operating
properly after cleaning, return to Little Giant or its authorized
service center. DO NOT attempt repairs yourself.
2
Figure 2