
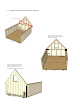
Installation Guide
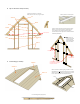

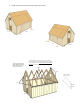


Fastener locations for attaching shingles (not
included in kit) to roof. Apply fasteners (as shown).
These instructions are the same for both sides.
Fastener locations indicated by dashed lines.
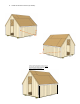
Fastener locations for attaching shingles (not
included in kit) to roof. Apply fasteners (as shown).
These instructions are the same for both sides.
Fastener locations indicated by dashed lines.
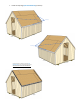
Fastener locations for attaching shingles (not
included in kit) to roof. Apply fasteners (as shown).
These instructions are the same for both sides.
Fastener locations indicated by dashed lines.
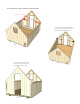
Continued from previous page.
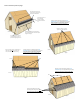
Measure the width of the roof and add 1/4”
for each end. Divide that measurement by the
length of the shingle.
Start and end the “starter row”
with a partial shingle (as shown)
based on the measurement.
Overlay the “starter row” with a
“regular” row – tabs facing down.
Note: the shingle “grooves” and the seams are
offset, they should not be in line with each
other, this reduces the chance of leaking.
Seam
Grooves
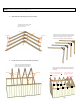
This shingle has been cut
from a full-length
shingle to create the
partial at the end of the
run.
* Front *
* Front *
* Front *
* Front *
Continue this pattern to the peak,
alternating seams and grooves. These
instructions are the same for both sides.
* Right *
* Right *
* Right *
* Right *
This shingle has been cut from a
full-length shingle to create the
partial at the beginning of the run.
Peak