Stop! Call Us First DO NOT RETURN TO STORE For immediate help with assembly or product information call: 1-330-893-4212 Or email: sales@cottagekits.
(This page intentionally left blank.
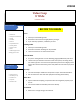
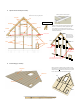
VC0810 Value Coop 8’ Wide Includes: 8’x10’ Required tools - BEFORE YOU BEGIN • Hammer • Philips Screwdriver • Level • Ladder • Pencil • Tape Measure • Utility Knife • Paint Tools • Saw • OSHA approved safety glasses etc. First… • • • Check your local building codes. Read these instructions thoroughly before you begin. If you have any questions, call before you start. Building Codes • • • Check your local building codes. General construction drawings can be provided.
Glossary Of Terms VC0810 Term Description LL Long point to long point The given dimension is measured at the two longest points of the part. LS Long point to short point The given dimension is measured from the longest point to the shortest point of the part (at the opposite end). SQ to L Square to long point The given dimension is measured from the square end of the part to the longest point.
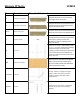
Missing From Shipment Part ID Quantity Description Included/Optional RJ24 RJ96 JO93 OFS24-96 OFS48-96 ST36 PL24 PL96 SS24-42 SS48-42 TP96 TP24 TR72.125 GU GST38.375 GST24.5 WP18.25 CESF13 CETF11 PL91 SS24-70.25 SS48-94.5 SS24.75-71.25 DH24.5 DST73 PL31.75 PL33.25 SS48-94.5 SS24.75-71.25 ORS24-24 ORS24-96 ORS24-48 ORS48-96 RA72.125 FA74 FA49.875 AC42 WT18-23 WT26 WT23.25 CED8-13 CET13.75 CET14.75 DT32 DT71 DO2468 RO96 NBF5-48 NBBO13-48 NBBA12-48 NBD12-12 BDL5 DS24.
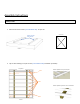
Assembly Instructions 1. Find or make a level spot for the assembly. a. The assembly of this structure will be easier and look the best if done on a hard, flat, and level surface! i. Example: Concrete slab. Concrete Slab (not included ii. Example: Leveled ground Important Assembly Tip: For the best-looking, finished product we recommend that you lay out all the parts prior to assembly, inspect, sort, and group them.
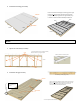
Assembly Instructions Base/Floor 1. Place the PT 4”x4” runners (not included in kit) - 67 1/2” OC. 4x4 End Profile Pressure Treated 4”x4” Runners. * Front * 2. Lay out floor framing on top of runners (not included in kit) and fasten (as shown). * Top View * Fastener pattern for rim joists to joists. RJ24 JO93 Fastener pattern for joists to runners “toenailed”.
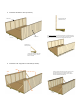
3. Install floor sheeting (as shown). Fastener locations for attaching floor sheeting to joists. Apply fasteners on all edges/seams and where lines indicate rim joist/joists (as shown). Apply fasteners approximately every 8-10 inches. Fastener locations indicated by dashed lines. OFS24-96 Seam Seam OFS48-96 * Front * * Front * Walls 1. Layout the side walls (as shown). ST36 * Layout should be done on a flat level surface; the floor of the coop is a good option. Fastener pattern for studs to plates.
3. Install the side walls to floor (as shown). Side Wall End Profile (mounted to floor). * Side Wall * * Side Wall * * Front * Fastener locations for attaching side walls to floor. Apply fasteners on the inside and outside (as shown). Apply fasteners approximately every 8-10 inches on the outside (into the rim joist) and a least three between studs on the inside. Fastener locations indicated by dashed lines. Side Wall End Profile (braced).
5. Layout the back wall (as shown). * Layout should be done on a flat level surface; the floor of the coop is a good option. TR72.125 Fastener pattern for studs to plates. GU GST38.375 Example: Angled fasteners WP18.25 Fastener locations for attaching all back wall parts. Apply fasteners in all locations (as shown). Angled parts may require fasteners to be angled so that they properly penetrate the part that is opposite of it. Fastener locations indicated by dashed lines. GST24.5 GST24.
7. Install the back wall to the floor and the side walls. * Remove temporary blocks. Fastener locations for attaching the back wall to the side walls and floor. Apply fasteners (as shown). Fastener locations indicated by dashed lines. * Front * Fastener locations for attaching the back wall to the side walls and floor, from the outside. Apply fasteners (as shown). Fastener locations indicated by dashed lines. * Front * Fastener locations for attaching the back wall to the side walls and the joist.
8. Lay out the front wall (as shown). * Layout should be done on a flat level surface; the floor of the coop is a good option. Fastener pattern for studs to plates. GU TR72.125 Example: Angled fasteners DH24.5 DST73 GST24.5 * Temporary block Fastener locations for attaching all back wall parts. Apply fasteners in all locations (as shown). Angled parts may require fasteners to be angled so that they properly penetrate the part that is opposite of it. Fastener locations indicated by dashed lines.
10. Install the front wall to the floor and the side walls. * Remove temporary blocks. * Fastener locations for attaching the front wall to the side walls and floor. Apply fasteners (as shown). Fastener locations indicated by dashed lines. * Back * Fastener locations for attaching the back wall to the side walls and floor, from the outside. Apply fasteners (as shown).
Roof (shingles and drip edge not included in kit) 1. Assemble the remaining trusses (as shown). * Assembly should be done on a flat level surface, also note there is a gusset on both sides. GU GU GU TR72.125 TR72.125 GU Fastener locations for assembling the remaining trusses. Apply fasteners at the peak to hold the trusses together and then into the gusset for structural rigidity (as shown). Fastener locations indicated by dashed lines. GU GU 2. Install the trusses to the side walls (as shown).
3. Install the roof sheeting to the trusses (as shown). Fastener locations for attaching roofing to trusses. Apply fasteners on edges/seams and where lines indicate trusses (as shown). Apply fasteners approximately every 6-8 inches. These instructions are the same for both sides of the roof. Fastener locations indicated by dashed lines. ORS24-96 ORS24-24 * Remove temporary brace just prior to installing the roof sheeting.
5. Install the fascia to the top plate and the rakes (as shown). FA49.875 * Right * * Front * FA74 FA49.875 * Left * * Front * FA74 * Note: the roof sheeting has been hidden in this illustration to better visualize where the top plate is in relation to the to the fascia. * Fastener locations for attaching fascia to rakes and 2x6 top plate. Apply fasteners at each rake and 6 to 8 inches in between into top plate (as shown). These instructions are the same for both sides.
6. Install the aluminum corners (as shown). * Front * * Right * AC42 AC42 * Left * Fastener locations for attaching aluminum corners to coop siding. Apply fasteners (as shown). These instructions are the same for both sides. Fastener locations indicated by dashed lines.
7. Install the drip-edge (not included in kit) (as shown). Drip Edge * Right * * Front * Drip Edge * Left * * Front * Fastener locations for attaching drip edge (not included in kit) to roof. Apply fasteners (as shown). These instructions are the same for both sides. Fastener locations indicated by dashed lines.
8. Install shingles (not included in kit) (as shown). Shingles * Right * * Front * Shingles Fastener locations for attaching shingles (not included in kit) to roof. Apply fasteners (as shown). These instructions are the same for both sides. Fastener locations indicated by dashed lines. * Left * * Front * Drawn/chalked guideline. * Measure the shingle width and calculate in the ¼” overhang and place the guideline at that measurement.
Continued from previous page. Start and end the “starter row” with a partial shingle (as shown) based on the measurement. This shingle has been cut from a full-length shingle to create the partial at the end of the run. Fastener locations for attaching shingles (not included in kit) to roof. Apply fasteners (as shown). These instructions are the same for both sides. Fastener locations indicated by dashed lines. Overlay the “starter row” with a “regular” row – tabs facing down.
9. Install shingle ridge cap (not included in kit – made by installer from shingles) (as shown). Shingle tab - ridge cap profile (top view). Note: These angles (not a specific angle) need to be cut by the installer. Note: This is a single shingle tab cut and turned to lay over the peak. Continue this pattern to the end. Place fasteners in the non-colored area (as shown). These instructions are the same for both sides. Fastener locations for attaching shingle ridge caps (not included in kit) to roof.
Door, Windows, Trim and Misc. Parts 1. Install window and trim (as shown). Center the window vertically and horizontally in the opening and apply fasteners through the flange. Fastener locations indicated by dashed lines. WT26 WT18-23 WT23.25 WT23.25 WT26 Fastener locations for attaching trim. Apply fasteners (as shown). Fastener locations indicated by dashed lines. * Back * 2. Install chicken entrance door and trim (as shown). CED8-13 * Back * CET13.
3. Install front door and trim (as shown). * Door Frame. * Door Frame. Fastener locations for attaching door stop. Apply fasteners (as shown). Fastener locations indicated by dashed lines. DT32 DT71 DS24.5 DS67 * Front * Fastener locations for attaching door trim. Apply fasteners (as shown). Fastener locations indicated by dashed lines. * Front * DO2468 * Front * Apply Fastener through the holes into the trim/siding. Fastener locations for attaching door and latch. Apply fasteners (as shown).
4. Install roost (as shown). * Note: the siding and back walls have been hidden in this illustration to better visualize how the roost should be installed. Fastener locations for attaching roost to studs. Apply fasteners (as shown). Fastener locations indicated by dashed lines. RO96 * Back * 5. Install nest box (as shown). * Back * NBBO13-48 NBBA12-48 Fastener locations for assembling nest box. Apply fasteners (as shown). Fastener locations indicated by dashed lines.
6. Install chicken entrance ramp and relevant hardware (as shown). CER23 Install hooks and eyelets to secure the chicken entrance door (open and closed) and the ramp in place (as shown). Apply fasteners through the three holes into the trim/siding. Hinge comes pre-install to the ramp.