
Installation Instructions


I
M
PO
R
T
AN
T S
A
FETY I
N
ST
RUC
TIO
N
S STEP
B
Y STEP G
U
I
D
E
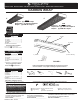
Figu
re
1
7
/
32
”
D
i
ameter
H
ol
e
2
’ Fi
xt
u
re
=
23
1
/
8
”
4
’ Fi
xt
u
re
=
47
1
/
8
”
Reta
ining T
a
b
s
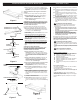
Figu
re
2
W
as
h
er
Fi
xt
u
re
H
ou
s
ing
S
cre
w
Toggl
e
N
u
t
W
as
h
er
Fi
xt
u
re
H
ou
s
ing
S
cre
w
Figu
re
3
Figu
re
4
1
.
Remo
v
e
f
i
xt
ure
c
omponen
ts
and
par
ts
pa
ck
(
s
)
.
Che
ck t
ha
t
all
par
ts
are
in
c
luded
. S
ee
P
a
g
e
1
,
Fig.
1
.
Remo
v
e
pro
t
e
ct
i
v
e
f
ilm
on
f
i
xt
ure
end
s.
W
ar
ning
:
S
afe
l
y
di
s
po
se
o
f
p
acka
ging
mater
i
a
l
s
.
No
t
e
: T
urn
o
ff
power
in
c
ir
c
ui
t
brea
k
er
bo
x!
2
. Slid
e
D
i
ff
u
ser
(4)
t
oward
one
end
o
f t
he
f
i
xt
ure
,
ma
k
ing
s
ure
end
o
f
Di
ff
u
s
er
i
s
under
Di
ff
u
s
er
s
pa
c
er
. S
ee
Fig.
1
.
3
. Li
ft
D
i
ff
u
ser
ou
t
o
f
f
i
xt
u
re
f
rom
oppo
s
i
t
e
end
.
S
ee
Fig.
1
.
W
ARN
I
N
G
:
Bef
o
re
wi
r
ing
f
i
xt
u
re
t
o
t
h
e
pow
er
s
uppl
y
,
t
u
r
n o
ff
e
l
ectr
i
c
i
ty
at
f
u
se
o
r
c
i
rc
ui
t
b
reaker
bo
x
. Fi
xt
u
re
m
u
st
b
e
g
r
ound
e
d
t
o
av
oid
po
te
n
t
i
a
l
e
l
ectr
i
ca
l
s
ho
ck
a
nd
t
o
e
n
s
u
re
re
li
a
bl
e
l
am
p
start
ing.
No
t
e
: T
hi
s f
i
xt
ure
i
s
de
s
igned
t
o
be
s
ur
f
a
c
e
moun
t
ed
on
c
eiling
dr
y
wall
c
en
t
ered
o
v
er
jun
ct
ion
bo
x.
4
. P
o
s
i
t
ion
f
i
xt
ure
wi
t
h
2”
hole
diame
t
er
o
v
er
jun
ct
ion
bo
x
and
Mar
k
lo
c
a
t
ion
o
f
7
/
32”
moun
t
ing
hole
s. S
ee
Fig.
2
.
5
.
Dr
ill
1
/
8
” di
ameter
pilo
t
hole
s
where
pre
v
iou
s
l
y
mar
k
ed
.
I
f
d
r
ill
e
n
c
oun
ters
ce
iling joi
st
,
hold
f
i
xt
ure
up
t
o
ou
t
le
t
bo
x
and
pull
ele
ct
ri
c
al
s
uppl
y
wire
s
in
t
o
f
i
xt
ure
t
hrough
t
he
hole
,
u
s
e
wood
sc
rew
a
t
ea
c
h
end
o
f t
he
f
i
xt
ure
bod
y t
o
s
e
c
ure
t
o
c
eiling
joi
st.
S
ee
Fig.
3
.
I
f
d
r
ill do
es
no
t
e
n
c
oun
ter
ce
iling joi
st
,
enlarge
hold
in
c
eiling
t
o
a
cc
ommoda
t
e
t
oggle
bol
t.
Hold
f
i
xt
ure
up
t
o
ou
t
le
t
bo
x
and
pull
ele
ct
ri
c
al
s
uppl
y
wire
s
in
t
o
t
he
f
i
xt
ure
t
hrough
t
he
hole
,
in
s
er
t
and
t
igh
t
en
t
oggle
bol
ts. S
ee
Fig.
3
.
W
ARN
I
N
G
:
R
IS
K
OF FI
R
E
I
f
s
uppl
y
wi
res
are
lo
cate
d wi
t
hin
t
h
ree
in
c
h
es
o
f
b
a
ll
ast
, wi
re
m
u
st
b
e
s
ui
ta
bl
e
f
o
r
at
l
east
90
°
C
(194
°F
)
.
C
on
s
ul
t
a
qu
a
li
f
i
e
d
e
l
ectr
i
c
i
a
n b
ef
o
re
in
sta
lling.
6
. G
r
ound
f
i
xt
u
re
as
f
ollow
s
. S
e
c
ure
t
he
green
or
bare
c
opper
ground
wire
f
rom
t
he
ou
t
le
t
bo
x
under
t
he
green
s
c
rew
. If
hou
s
e
wiring
in
c
lude
s
no
ground
wire
,
con
s
ul
t
ele
ct
ri
c
ian
. S
ee
Fig.
4
.
7
.
C
onn
ect
whi
te
f
i
xt
u
re
wi
re
t
o
whi
t
e
power
s
uppl
y
wire
wi
t
hwirenu
t.
Conne
ct
bla
ck f
i
xt
ure
wire(
s
)
t
o
bla
ck
power
s
uppl
y
wire
wi
t
h
wirenu
t.
S
ee
Fig.
4
.
Fo
r
p
r
op
er
c
onn
ect
ion, pl
ace
wi
re
nu
t
o
ver
wi
res
,
t
wi
st
c
lo
ck
wi
se
un
t
il
t
igh
t
. P
u
s
h
wirenu
ts
and
e
xc
e
ss
wiring
in
t
o
jun
ct
ion
bo
x.
8
.
Slide the included tabbed plate
over the 2”
hole. Insert the included screw to secure in
place. See Fig. 5.
9
.
A
ngl
e
l
am
p in
t
o
f
i
xt
u
re
t
h
e
n in
sta
ll on
e
e
nd
o
f
l
am
p in
t
o
s
o
cket
. G
uide
o
t
her
end
o
f
lamp
in
t
o
oppo
s
i
t
e
s
oc
k
e
t.
Ro
t
a
t
e
lamp
1
/
4
t
urn
in
ei
t
her
dire
ct
ion
un
t
il
s
ea
t
ed
.
10
. Tu
r
n on
e
l
ectr
i
c
i
ty
at
f
u
se
or
c
ir
c
ui
t
brea
k
er
bo
x
and
v
eri
fy s
u
cc
e
ss
o
f
in
st
alla
t
ion
.
11
. In
sta
ll
D
i
ff
u
ser
b
y
in
s
er
t
ing
one
end
in
t
o
end
pla
t
e
o
v
er
di
ff
u
s
er
s
pa
c
er
,
li
ft
oppo
s
i
t
e
end
in
t
o
f
i
xt
ure
and
s
hi
ft
in
t
o
po
s
i
t
ion
. S
ee
Fig.
6
.
�
F
i
xt
ure
c
anno
t
be
u
s
ed
wi
t
h
a
dimmer
s
wi
tc
h
.
�
T
hi
s f
i
xt
ure
i
s
de
s
igned
f
or
indoor
u
s
e
O
N
LY
and
s
hould
no
t
be
u
s
ed
in
area
s
wi
t
h
limi
t
ed
v
en
t
ila
t
ion
or
high
ambien
t t
empera
t
ure
s.
�
F
i
xt
ure
mu
st
be
c
onne
ct
ed
t
o
a
nominal
120
V
ol
t,
60
H
z
power
s
our
c
e
. A
n
y
o
t
her
c
onne
ct
ion
v
oid
s
warran
ty.
�
A
lwa
ys
u
s
e
t
he
s
ame
wa
tt
age
and
ty
pe
o
f
lamp
in
c
luded
or
s
pe
c
i
f
ied
f
or
t
he
f
i
xt
ure
. F
ailure
t
o
do
s
o
will
v
oid
warran
ty.
�
T
hi
s f
i
xt
ure
i
s
in
t
ended
t
o
be
c
onne
ct
ed
t
o
a
properl
y
in
st
alled
and
grounded
UL
li
st
ed
jun
ct
ion
bo
x
(no
t
pro
v
ided)
and
s
hould
be
in
st
alled
a
cc
ording
t
o
N
E
C
and
lo
c
al
building
c
ode
s.
W
ARN
I
N
G
:
R
IS
K
OF S
H
O
CK
E
le
ct
ri
c c
urren
t c
an
c
au
s
e
pain
f
ul
s
ho
ck
or
s
eriou
s
injur
y
unle
ss
handled
properl
y. F
or
y
our
s
a
f
e
ty,
alwa
ys:
•
Tu
r
n o
ff
e
l
ectr
i
ca
l pow
er
at
f
u
se
o
r
c
i
rc
ui
t
b
reaker
bo
x
b
ef
o
re
wi
r
ing
f
i
xt
u
re
t
o
t
h
e
pow
er
s
uppl
y
.
•
Tu
r
n o
ff
t
h
e
pow
er
wh
e
n
y
ou
c
h
a
ng
e
l
am
p
s
o
r
p
erf
o
rm
o
t
h
er
ma
in
te
n
a
n
ce
.
•
G
r
ound
t
h
e
f
i
xt
u
re
t
o
av
oid po
te
n
t
i
a
l
e
l
ectr
i
c
s
ho
cks
a
nd
t
o
e
n
s
u
re
re
li
a
bl
e
start
ing.
•
D
oubl
e-c
h
eck
a
ll
c
onn
ect
ion
s
t
o b
e
s
u
re
t
h
ey
are
t
igh
t
a
nd
c
o
rrect
.
T
hi
s f
i
xt
ure
i
s
de
s
igned
f
or
u
s
e
in
a
c
ir
c
ui
t
pro
t
e
ct
ed
b
y
a
f
u
s
e
or
c
ir
c
ui
t
brea
k
er
and
t
o
be
in
st
alled
in
a
cc
ordan
c
e
wi
t
h
na
t
ional
and
lo
c
al
ele
ct
ri
c
al
c
ode
s.
If y
ou
are
un
s
ure
abou
t y
our
wiring
, c
on
s
ul
t
a
quali-
f
ied
ele
ct
ri
c
ian
or
lo
c
al
elec
t
ri
c
al
in
s
pe
ct
or
,
and
c
he
ck y
our
lo
c
al
ele
ct
ri
c
al
c
ode
.
W
ARN
I
N
G
:
R
IS
K
OF I
NJUR
Y
•
S
ome
me
t
al
par
ts
in
t
he
f
ix
t
ure
ma
y
ha
v
e
s
harp
edge
s. T
o
pre
v
en
t c
u
ts
and
sc
rape
s,
wear
glo
v
e
s
when
handling
t
he
par
ts.
�
Acc
oun
t f
or
s
mall
par
ts
and
de
st
ro
y
pa
ck
ing
ma
t
erial
,
a
s t
he
s
e
ma
y
be
ha
z
ardou
s t
o
c
hildren
.
CAU
TIO
N:
R
IS
K
OF FI
R
E
Minimum
90
°
C
s
uppl
y c
ondu
ct
or
s.
T
r
oubl
e
Shoo
t
ing Guid
e
If t
hi
s f
i
xt
ure
f
ail
s t
o
opera
t
e
properl
y,
u
s
e
t
he
guide
below
t
o
diagno
s
e
and
c
orrec
t t
he
problem
.
�
V
eri
fy t
ha
t c
orre
ct
lamp
i
s
u
s
ed
.
�
Ma
k
e
s
ure
lamp
i
s
properl
y s
ea
t
ed
in
s
o
ck
e
t.
�
Repla
c
e
de
f
e
ct
i
v
e
lamp(
s
)
.
�
V
eri
fy t
ha
t f
i
xt
ure
i
s
wired
properl
y.
�
V
eri
fy t
ha
t f
i
xt
ure
i
s
grounded
c
orre
ct
l
y.
�
T
he
line
v
ol
t
age
a
t t
he
f
i
xt
ure
i
s c
orre
ct.
To
re
pl
ace
Ba
ll
ast:
B
alla
st
repla
c
emen
t,
i
f
required
, t
o
be
c
omple
t
ed
b
y
a
quali
f
ied
ele
ct
ri
c
ian
.
If f
ur
t
her
a
ss
i
st
an
c
e
i
s
required
, c
on
t
a
ct:
C
on
s
u
mer
P
r
odu
cts
T
ec
hni
ca
l Suppo
rt
at:
(800)
748-5070
C
l
ea
ning
D
i
ff
u
ser:
F
or
be
st
re
s
ul
ts,
di
ff
u
s
er
s s
hould
be
wa
s
hed
wi
t
h
s
oap
or
mild
de
t
ergen
t.
Rin
s
e
wi
t
h
c
lear
wa
t
er
and
allow
t
o
air
dr
y.
F
or
a
v
ailabili
ty
o
f
repla
c
emen
t
par
ts c
on
t
a
ct
T
e
c
hni
c
al
S
uppor
t.
Screw
Figu
re
5
Plate
Figu
re
6
P
age
4