
Installation Guide

INSTALLATION INSTRUCTIONS - ENGLISH
STEP-BY-STEP GUIDE
Page 5Page 4
GUÍA DE PASO-A-PASO
Page 2
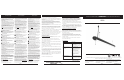
Description Quantité
1) Boîtier du luminaire ....................................... 1
2) Ensemble de câble aéronautique* ................ 2
3)
Cordon électrique..........................................1
4) Haut-parleur ................................................. 2
5)
Chaînette à tirage .......................................... 1
6) Rallonge d’interrupteur à chaînette et
faîteau* ..........................................................1
7) Bouton Téléphone/Lecture/Pause ................. 1
8) Microphone ...................................................1
*Compris dans les sacs d’emballage
LISTE DES PIECES
Description Quantity
1) Fixture Housing ................................... 1
2) Aircraft cable assembly* ...................... 2
3) Power Cord ......................................... 1
4) Speaker ............................................... 2
5) Pull Chain Switch Assembly ................ 1
6) Pull Chain extension and fi nial* ........... 1
7) Phone/Play/Pause Button ................... 1
8) Microphone ......................................... 1
*Contained in Part Packs
FIXTURE PARTS LIST
Descripción Cantidad
1) Carcasa del Luminario ..................................1
2) Montaje de cable de avión ............................2
3) Cordón Eléctrico ........................................... 1
4) Parlante ......................................................... 2
5) Ensamblaje de la Cadena de Tirón ............... 1
6) Extensión de cadena de extracción
y terminal* .....................................................1
7) Botón de Teléfono/Reproducción/Pausa ......1
8) Micrófono ..................................................... 1
*Contenido en el Paquete de Piezas
LISTA DE EMBALAJE
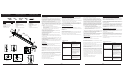
INSTALLATION FIGURES FIGURAS DE LA INSTALACIÓN FIGURES D’INSTALLATION
REQUIRED TOOLS HERRAMIENTAS REQUERIDAS OUTILS REQUIS
Figure 2
5
3
1
4
Not supplied
No incluidos
Non founis
2
7
8
Figure 3
Warning: Changes or modifi cations to this unit not expressly approved
by the party responsible for compliance could void the user’s authority to
operate the equipment.
NOTE: This equipment has been tested and found to comply with the limits for
a Class B digital device, pursuant to Part 15 of the FCC Rules. These limits
are designed to provide reasonable protection against harmful interference in a
residential installation. This equipment generates, uses and can radiate radio fre-
quency energy and, if not installed and used in accordance with the instructions,
may cause harmful interference to radio communications.
However, there is no guarantee that interference will not occur in a particular in-
stallation. If this equipment does cause harmful interference to radio or television
reception, which can be determined by turning the equipment off and on, the user
is encouraged to try to correct the interference by one or more of the following
measures:
• Reorient or relocate the receiving antenna.
• Increase the separation between the equipment and receiver.
• Connect the equipment into an outlet on a circuit different from that to which
the receiver is connected.
• Consult the dealer or an experienced radio/TV technician for help.
Canada IC instruction manual requirements
This device complies with Industry Canada license-exempt RSS standard(s).
Operation is subject to the following two conditions:
(1) This device may not cause interference, and
(2) This device must accept any interference, including interference that may
cause undesired operation of the device.
Radiation Exposure Statement:
This equipment complies with Canada radiation exposure limits set forth for
uncontrolled environments.
This transmitter must not be co-located or operating in conjunction with any other
antenna or transmitter.
• This fi xture is designed for indoor use ONLY and should not be used in areas
with limited ventilation or high ambient temperatures.
• Fixture must be connected to a nominal 120Volt, 60 Hz power source. Any other
connection voids warranty.
• This fi xture is intended to be connected to a properly installed and grounded UL
listed outlet (not provided) and should be installed according to NEC and local
building codes.
Fixture Installation
1. Remove fi xture components and parts pack(s). Check that all parts are in-
cluded. See Page 2.
2. Install two hooks (not supplied) into ceiling 30” apart.
Note: Maximum distance to electrical outlet is determined by the length of
the power cord provided.
If using open style hook-Place adjustable end of cable assemblies onto ceiling
hooks- (see Fig. 2).
If using closed style hook-Slightly loosen screw on short cable side (do not
remove screw) and remove cable from locking ferrel and thread through hook
opening.
Re-insert cable back into locking ferrel and tighten screw securely. (see Fig. 3)
3. While supporting fi xture assembly, secure looped end of cable assembly to
fi xture. Place cable loop into slot opening and maneuver cable until positioned at
back of slot- See Fig. 4 and 5.- (repeat for opposite end).
4. To adjust fi xture height- locate screw on long cable side. (See Fig. 6). Slightly
loosen screw- (do not remove screw). Adjust cable to desired fi xture height.
Tighten screw securely and repeat for opposite end.
5. Attach pull chain to beaded chain.
6. Plug power cord into properly rated 120V outlet.
4
Figure 4 Figure 5
Figure 6
Figure 7
Pairing and operation with Bluetooth® device
Stream music from your Bluetooth® device up to 32 ft (9.7M)- with no obstruction
between fi xture and device
Note: Bluetooth® and speakers will only function when light fi xture is plugged into
120v outlet, but does not require fi xture to be on for speaker function (the pull
switch only operates the light portion of the fi xture).
If Bluetooth® enabled device is currently paired to another device, you must un-pair
from that device prior to pairing with the Lithonia SPSL device.
1. To pair from Bluetooth® enabled device (smartphone, tablet, computer, music
player, etc)- place device in Search Mode through the Bluetooth® settings, then
select device noted Lithonia SPSL. (when pairing completed- an audible tone from
light fi xture will
confi rm device is paired).
Lithonia SPSL Bluetooth® device functions
Audio operation
Use your favorite music streaming app on your Bluetooth® device. To pause or
resume audio from your Bluetooth® device, press and release the control button on
Lithonia SPSL fi xture
(see Fig 7)
Hands-Free Speakerphone operation
To answer Incoming calls- Press and release the control button on Lithonia SPSL
fi xture (see Fig 7). The conversation can be communicated through the Lithonia
SPSL fi xture- (the microphone is located next to pull switch).
To End call- Press and release control button on Lithonia SPSL fi xture (see Fig. 7)
ADVERTENCIA: Los cambios o las modifi caciones en esta unidad no
aprobadas expresamente por la parte responsable del cumplimiento podrían
anular la autoridad del usuario para operar el equipo.
NOTA: Este equipo se ha probado y se comprobó que cumple con los
límites de un dispositivo digital Clase B, de conformidad con la Parte 15 de
las reglas de la FCC. Estos límites se elaboraron para proporcionar protec-
ción razonable contra interferencia perjudicial al utilizarse en una instalación
residencial. Este equipo genera, utiliza y puede irradiar energía de radio-
frecuencia y, de no instalarse y utilizarse de acuerdo con las instrucciones,
puede provocar interferencia perjudicial en las comunicaciones de radio. Sin
embargo, no se puede garantizar que no se produzcan interferencias en una
instalación en particular. Si este equipo ocasionara interferencias perjudicia-
les para la recepción de las señales de radio o televisión, las que pueden
detectarse al encender y apagar el equipo, el usuario debe intentar corregir-
las por medio de una o más de las siguientes medidas:
• Orientar la antena receptora en otra dirección o ubicarla en otro sitio.
• Aumentar la separación entre el equipo y el receptor.
• Conectar el equipo a una toma de corriente de un circuito diferente de
aquel al que esté conectado el receptor.
• Solicitar ayuda al comerciante o a un técnico experto en radio/TV.
•
• Este luminario esta diseñado para uso al interior SOLAMENTE y no debe
ser utilizado en áreas con ventilación limitada ni temperaturas altas.
• Luminario debe ser conectado a una fuente eléctrica nominal de 120 Voltios,
60 Hz. Cualquier otra conexión invalidara la garantía.
• Este luminario esta destinado para ser conectado a una caja de ensambladura
(no proporcionada) correctamente instalada, listada UL, puesta a tierra y
debe ser instalada según códigos del NEC y locales de construcción.
Instalación de luminarias
1. Remueva los componentes del luminario de piezas. Asequre que todas las
piezas estén incluidas. Vea Página 1.
2. Instale dos ganchos (no proveídos) en el techo apartados a x”.
Nota: La distancia máxima a la toma eléctrica es determinada por la longitud
del cordón eléctrico proporcionado.
Usando gancho de estilo abierto- Coloque el extremo ajustable de los ensam-
blajes de cable a los ganchos al techo - (vea el Fig. 2).
Usando gancho de estilo abierto-Ligeramente suelte el tornillo en el lado del
cable corto (no quite el tornillo) y quite el cable del ferel de cierre y encamine
por la apertura del gancho. Inserte el cable de nuevo en el ferrel y apriete el
tornillo bien asegurado. (vea Fig. 3)
3. Mientras este sosteniendo el ensamblaje del luminario, asegure el extremo
del cable con lazo del ensamblaje al luminario. Coloque el lazo del cable dentro
de la apertura de la ranura y maniobre el cable hasta que este colocado en la
parte trasera de la ranura -Vea Fig. 4 y 5.- (repita para el extremo opuesto).
4. Para ajustar altura del luminario -localice el tornillo en el lado de cable largo.
(Vea Fig. 7) Ligeramente suelte el tornillo - (no quite el tornillo) Ajuste el cable a
la altura del luminario deseada. Apriete el tornillo bien asegurado y repita para
el extremo opuesto.
5. Una la cadena de tirón a la cadena con cuentas.
6. Enchufe el cordón eléctrico a la toma eléctrica.
Troubleshooting Guide
Problem Corrective Action
Fixture will not illuminate 1. Verify line voltage is correct.
2. Verify power supply is on at
breaker.
3. Verify fi xture is plugged into
properly rated 120v outlet.
Bluetooth® enabled device can-
not fi nd LITHONIA SPSL while in
search mode.
1. Confi rm your Device is within 30
ft. of the fi xture. Any object or body
between the speaker and the Blue-
tooth® enabled device may act as a
block and cause signal interference.
2. Confi rm that two pairing devices
are not trying to connect at the
same time- Can only connect one
device to the fi xture.
3. Turn off other pairing devices
during pairing mode.
Speaker will not play music or
react.
To prevent signal interference, do
not place the fi xture close to heavy
electromagnetic emission devices
or equipment such as household
appliances or ceiling fans.
Emparejamiento y funcionamiento con dispositivo Bluetooth®
Transmita música desde su dispositivo Bluetooth® hasta 32 pies (9.7 M), sin
obstrucción entre el accesorio y el dispositivo
Nota: El Bluetooth® y los parlantes solo funcionarán cuando el accesorio de
iluminación esté enchufado a un tomacorriente de 120v, pero no requiere que el
accesorio esté encendido para la función de parlante (el interruptor de tirón solo
opera la porción de iluminación del accesorio).
Si el dispositivo habilitado para Bluetooth® está emparejado actualmente con otro
dispositivo, debe desconectarse de ese dispositivo antes de emparejarlo con el
dispositivo Lithonia SPSL.
1. Para emparejar desde un dispositivo habilitado para Bluetooth® (teléfono inteli-
gente, tableta, computadora, reproductor de música, etc.): coloque el dispositivo
en el Modo de Búsqueda a través de la confi guración Bluetooth®, luego selec-
cione el dispositivo indicado Lithonia SPSL. (cuando se completa el empareja-
miento, un tono audible del accesorio de iluminación confi rmará que el dispositivo
está emparejado).
Funciones del dispositivo Bluetooth® Lithonia SPSL
Funcionamiento del audio
Use su aplicación de transmisión de música favorita en su dispositivo Bluetooth®.
Para pausar o reanudar el audio de su dispositivo Bluetooth®, presione y suelte
el botón de control en el dispositivo Lithonia SPSL
(consulte la Figura 7)
Funcionamiento de manos libres con altavoz
Para responder llamadas entrantes: presione y suelte el botón de control en el
dispositivo Lithonia SPSL (consulte la Figura 7). La conversación se puede comu-
nicar a través del accesorio Lithonia SPSL (el micrófono está ubicado al lado del
interruptor de tirón).
Para fi nalizar la llamada: presione y suelte el botón de control en el dispositivo
Lithonia SPSL (vea la Fig. 7)
Problema: Acción correctiva:
El accesorio no ilumina. 1. Verifi que que la línea de voltaje sea
correcta.
2. Compruebe que el suministro de
energía esté conectado al disyuntor.
3. Verifi que que el accesorio esté
enchufado en un tomacorriente con una
clasifi cación de 120v.
El dispositivo habilitado para Bluetooth®
no puede encontrar LITHONIA SPSL
mientras está en modo de búsqueda.
1. Confi rme que su dispositivo esté den-
tro de 30 pies del accesorio. Cualquier
objeto o cuerpo entre el altavoz y el
dispositivo habilitado para Bluetooth®
puede actuar como un bloqueo y provo-
car interferencia de la señal.
2. Confi rme que dos dispositivos de
emparejamiento no intenten conectarse
al mismo tiempo: solo puede conectar un
dispositivo al accesorio.
3. Apague otros dispositivos de empare-
jamiento durante el modo de empareja-
miento.
El parlante no reproduce música ni
responde.
Para evitar la interferencia de la señal,
no coloque el accesorio cerca de dis-
positivoscon emisión electromagnética
pesada o equipos como electrodomésti-
cos o ventiladores de techo.
Guía de Localización de Averías