
Installation Guide


INSTALLATION INSTRUCTIONS
RV6 LED (6” Non-IC Commercial LED Remodel Frame-In and Reflector)
Prior to installing the fixture, disconnect ALL power supplies to the unit. TYPE NON-IC INSTALLATION ONLY: No
insulation may be placed over the top of/or within 3” (76mm) of the fixture. Do not make or alter any open holes
in an enclosure of wiring or electrical components during kit installation.
RV6 is suitable for installation in mounting frames with minimum 5.75” (146 mm) and maximum
6.875” (175 mm) aperture. The complete remodel fixture is accepted as a component of a
luminaire where the suitability of the combination shall be determined by CSA or authorities
have jurisdiction. The contents of the remodel fixture include: RV6 (LED remodel frame) and
RO6/RW6 (reflector).
1. Remove existing lamp and reflector from socket cup assembly and return assembly to the plenum space. Open
junction box door and disconnect the existing power connections. Remove reflector retention clips or yoke.
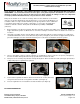
2. Hang RV6 retrofit assembly to existing frame by safety cable (see Figure 1) and snap flexible conduit into an open
hole in the junction box (see Figure 2). Make 2 wiring connections bypassing any thermal protection device and re-
install junction box door.
3. With both hands, grasp the vertical supports compressing two of the springs with your thumbs (see Figure 3). Insert
the fixture assembly as far into the frame aperture as possible.
4. Then push upward to allow fixture to settle into frame opening (see Figure 4). Push fixture up until flush with ceiling.
5. To install finishing trim, Attach safety bead chain (from housing) to bead chain
receptacle on finishing trim (see Figure 5).
6. Push the trim up into the housing opening (see Figure 6).
PATENTS PENDING
Figure 1
Figure 4
Figure 3
Figure 2
Figure 5
RV6
RO6/RW6
Figure 6
Lithonia Downlighting Part No. CJ520901 REV. A
One Lithonia Way / Conyers, GA 30012
©2014 Acuity Brands Lighting, Inc., 2/14
800-315-4935 / www.lithonia.com/ 2-2-14 Page 2 of 5