
Installation Instructions


Installation Instructions
RSX LED
©2016 Acuity Brands Lighting, Inc.
All Rights Reserved.
Lithonia Lighting Outdoor
One Lithonia Way, Conyers, GA 30012
Phone: 800-279-8041 Fax: 770-918-1209
www.lithonia.com
Part Number: IM-459 Rev A
Revision Date: 8/29/19
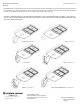
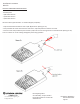
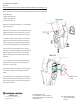
4. The luminaire is supplied with a variety of slots to
align with exisng pole mounng drill paerns. The top
hole of the luminaire arm has a key hole slot.
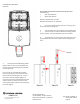
Place the luminaire onto the top bolt by passing the
head through the key slot and resng the luminaire
down securely in place (See Fig 3).
WARNING: THE LUMINAIRE IS NOT COMPLETELY
LOCKED DOWN YET. SPECIAL CARE MUST BE TAKEN TO
AVOID JARRING THE LUMINAIRE FROM ITS RESTING
POINT
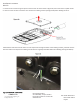
Ensure the luminaire is resng securely on the top bolt
and snug the bolt but do not completely ghten yet.
Thread the second bolt through the arm slot and into
the available threaded hole of the mounng bar (See
Fig 4).
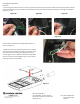
5. The luminaire is supplied with a clearance slot in the
back to allow wires to be pulled into the pole on exist-
ing hole paerns. Insert the wires through the clear-
ance slot shown in Figure 5 and pull them into the pole.
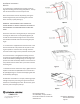
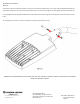
6. Ensure luminaire is straight/level making sure that
no wires are pinched, ghten the two bolts with a 3/8
socket to 20-30-lbs (overghtening can damage com-
ponents and void warranes). Make sure that wires are
not pinched and tuck excess wire up into the luminaire
mounng area.
7. Reinstall the cover removed in step 1, ghten the two
capve screws with the 9/64 Allen wrench to 18-20 in-
lbs (overghtening can cause thread stripping and void
all warranes) (See Fig 6).
8. Make wire connecons in the pole, observing proper
voltage and polarity. Connect green ground wire from
the xture to the eld ground wire. Secure wires; push
back into pole and replace pole cap.
Page #3