
Installation Instructions


©2016 Acuity Brands Lighting, Inc.
All Rights Reserved.
Lithonia Lighting Outdoor
One Lithonia Way, Conyers, GA 30012
Phone: 800-279-8041 Fax: 770-918-1209
www.lithonia.com
Part Number: IM-459 Rev A
Revision Date: 8/29/19
Installation Instructions
RSX LED
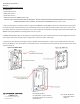
3. While one person supports the luminaire, route the
supply wires through the mounng plate and into the arm
cavity. Make all electrical connecons in accordance with
NEC and local codes. Ensure that wires coming out of the
luminaire have some slack, this will make aiming the lumi-
naire easier and will ensure no wires are pinched or strained
when aiming.
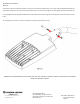
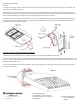
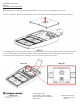
4. Place the enre luminaire assembly onto the base plate
(gures 22) and have the second person ghten the top two
(2) 3/8” x 1-1/4” stainless steel recessed hex set screws (See
gure 19) unl 3/8” to 1/4” if the screw threads are sll vis-
ible, ghten the boom set screws to the same length.
5. Now alternang between the top and boom sets of
set screws, gently ghten unl snug. If the base plate was
installed level, approximately 1 threads should be visible on
each set screw aer all screws have been fully ghtened.
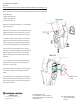
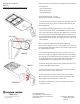
6. If the luminaire aiming angle will not be adjusted, skip
to the next step, otherwise loosen the 7/16-14 adjustment
bolt, reorient luminaire as desired, up to 90° from horizon-
tal, and reghten the adjustment bolt to 35-40 -lbs (See
gure 21).
For units with photocontrol receptacle, the xture mounng
angle must be restricted per ANSI C136.10 and it is recom-
mended to not install beyond 45° from horizontal.
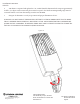
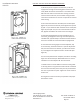
7. Reaach the arm cover. Make sure that the cover gasket
is securely placed in its groove and that all wires and tethers
are move out of the way so that they are not pinched when
the cover is put back into place. Tighten the cover screws to
18-20 in-lbs.
8. Energize the luminaire to verify its operaon and proper
illuminaon of area.
CAUTION: THE NEXT STEPS WILL REQUIRE ASSISTANCE
Page #14