
Installation Instructions


Installation Instructions
RSX LED
©2016 Acuity Brands Lighting, Inc.
All Rights Reserved.
Lithonia Lighting Outdoor
One Lithonia Way, Conyers, GA 30012
Phone: 800-279-8041 Fax: 770-918-1209
www.lithonia.com
Part Number: IM-459 Rev A
Revision Date: 8/29/19
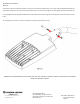
AAWB/AAWSC INSTALLATION INSTRUCTIONS
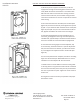
NOTE: Luminaire can be lted up to 90 degrees above horizontal
Tools Required:
• 9/64” Allen Wrench
• 5/32” Allen Wrench
• 3/16” Allen Wrench
• Flathead Screwdriver (AAWSC only)
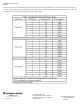
Minimum Square Pole: 3.5” Face
Minimum Round Pole: 3.2” Diameter
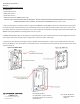
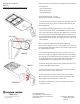
CAUTION: APPLY A CONTINUOUS BEAD OF WEATHER – PROOF CAULKING BETWEEN MOUNTING BASE PLATE AND WALL TO
ENSURE WEATHER–TIGHT INTEGRITY OF ELECTRICAL COMPONENTS (See Fig 15a & 15b)
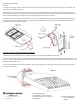
1. Install the wall-mount base plate, refer to steps 1-3 outlined in the WBA/WBASC installaon instrucons on sheet 9. Note
that the image above shows the AAWSC opon.
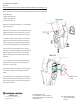
2. Before mounng the luminaire, remove the arm cover (See gure 20 on the previous page) and unpack the luminaire input
wires, if necessary, to make roung supply wires into the arm cavity easier.
Page #13