
Installation Instructions


Installation Instructions
RSX LED
©2016 Acuity Brands Lighting, Inc.
All Rights Reserved.
Lithonia Lighting Outdoor
One Lithonia Way, Conyers, GA 30012
Phone: 800-279-8041 Fax: 770-918-1209
www.lithonia.com
Part Number: IM-459 Rev A
Revision Date: 8/29/19
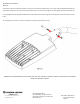
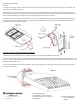
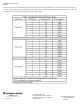
4. Loosen the two cover screws of the SPA to access the pole mounng area (See Fig 17) and route supply wires through the
clearance slot and WBA cover hole.
5. Making sure that no wires are pinched, insert the 3/8” bolts (included with luminaire) through the mounng arm of the
xture housing, through the cover plate, and then thread into the threaded steel bar (See Fig 18). Tighten the two bolts with a
9/16” socket to 20-30 -lbs (overghtening can damage components and void warranes).
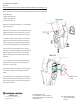
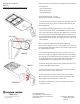
6. Make sure no wires are pinched and tuck excess wire up into the luminaire mounng area and reinstall the SPA Cover that
was removed in step 3. Tighten the two cover screws with the 9/64 Allen wrench to 18-20 in-lbs (overghtening can cause
thread stripping and void all warranes).
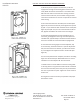
CAUTION: THE NEXT STEPS WILL REQUIRE ASSISTANCE
7. Make all wiring connecons via the supplied wire leads in accordance with NEC and local codes.
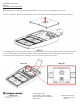
8. Place the enre light xture/cover plate assembly onto the base plate (installed in step 1) and have someone ghten the top
(2) 3/8” x 1-1/4” stainless steel recessed hex set screws (See Fig 19) unl 3/8” to 1/4” of the screw threads are sll visible, then
ghten the boom set screws.
9. Now, alternang between the top and boom set screws, gently ghten unl snug (approximately one thread will remain
showing on each screw).
Page #11