
Installation Instructions


Installation Instructions
RSX LED
©2016 Acuity Brands Lighting, Inc.
All Rights Reserved.
Lithonia Lighting Outdoor
One Lithonia Way, Conyers, GA 30012
Phone: 800-279-8041 Fax: 770-918-1209
www.lithonia.com
Part Number: IM-459 Rev A
Revision Date: 8/29/19
RSX WBA & WBASC INSTALLATION
Tools Required:
• 9/16" Socket wrench
• 9/64" Allen wrench
• 3/16" Allen wrench
• Flathead Screwdriver (WBASC opon only)
CAUTION: APPLY A CONTINUOUS BEAD OF WEATHER – PROOF CAULKING BETWEEN MOUNTING BASE PLATE AND WALL TO
ENSURE WEATHER–TIGHT INTEGRITY OF ELECTRICAL COMPONENTS (See Fig 13a or 13b)
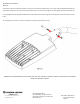
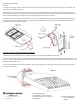
1. Place the base plate in orientaon shown in Figures 15a (WBASC) and 15b (WBA) and secure to wall with secure base plate
to wall with (4) 1/4” diameter fasteners (not included with luminaire) using the (4) holes located on the outer corners of the
base plate. Check the base plate to conrm that it is level and plumb in all direcons (See Figure 15b). Note that the WBA and
WBASC have slightly dierent mounng paerns for the ¼” bolts.
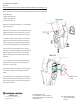
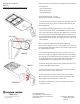
2. WBASC OPTION ONLY: With the base plate securely fastened to the wall, remove the desired conduit plug(s) from the base
plate using a at head screwdriver, feed in supply wires, and aach ¾ NPT conduit pipe.
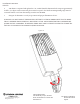
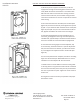
3. Prepare the cover plate by ensuring the factory-installed, black foam gasket is in place on the backside of the cover plate
(See Fig 16) NOTE: For the next steps the curved poron of the cover plate should point upwards when mounted to the wall as
shown in gure 18.
Page #10