
Installation Instructions


Installation Instructions
RSX LED
©2016 Acuity Brands Lighting, Inc.
All Rights Reserved.
Lithonia Lighting Outdoor
One Lithonia Way, Conyers, GA 30012
Phone: 800-279-8041 Fax: 770-918-1209
www.lithonia.com
Part Number: IM-459 Rev A
Revision Date: 8/29/19
Tools Required:
• 9/64” Allen Wrench
• 5/16” Allen Wrench
• 3/8” Allen Wrench
Maximum tenon/pole diameter: 2” schedule 40
pipe (2-3/8” OD)
NOTE: This luminaire is pre-wired with UL listed
supply wire leads. It is not necessary to access
xture housing to install or wire the luminaire.
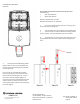
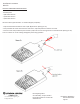
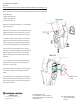
1. Remove the two (2) 8-32 splice access cover
fasteners from knuckle assembly, remove the
splice access cover, and pull supply wire leads
from knuckle cavity (See gures 13a and 13b)
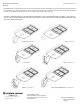
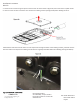
2. Slip luminaire knuckle er over 2-3/8” Ø
pole tenon and evenly ghten the six (6) 3/8-16
UNC knuckle tenon set screws to 23-27 -lbs,
while maintaining the correct posion of the
luminaire
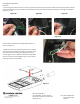
3. Cut and splice the wires. Recommended cut
length is 6" for wires for ease of splicing and
securing in the knuckle
4. Make all wiring connecons via the supplied
wire leads in accordance with NEC and local
codes.
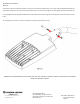
5. Push all xture and supply wires completely
within the knuckle cavity and replace the splice
access cover, gasket, and two (2) 8-32 splice ac-
cess cover fasteners.
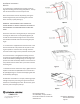
RSXF INTEGRAL SLIPFITTER (IS) INSTALLATION ON VERTICAL TENONS (+/- 5 °)
Note: Luminaire can be lted up to 90 degrees (maximum) above horizontal.
Page #8