
Large Flush / Semi-Flush Mount Installation Sheet
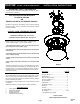

page 1
U21236T
9/03
IMPORTANT SAFETY INFORMATION
(Protect yourself. Read these instructions carefully and save
them for future reference.)
THIS FIXTURE CAN BE MOUNTED
FLUSH TO CEILING
OR
SEMI-FLUSH WITH THE SPACER CANOPY
Hardware requirements will depend on the mounting method.
Determine fixture location, orientation and mounting method,
before proceeding.
CHOOSE YOUR PREFERRED OPTION
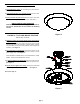
TO MOUNT FIXTURE FLUSH - See Figure 2.
TO MOUNT FIXTURE SEMI-FLUSH - See Figure 4.
WARNING: RISK OF SHOCK
Electric current can cause painful shock or serious injury
unless handled properly. For your safety, always:
• Turn off electrical power at fuse or circuit breaker box be-
fore wiring fixture to the power supply.
• Turn off the power when you change lamps or perform other
maintenance.
• Ground the fixture to avoid potential electric shocks and to
ensure reliable starting.
• Double-check all connections to be sure they are tight and
correct.
• Wear rubber-soled shoes and work on a sturdy wooden
ladder.
This fixture is designed for use in a circuit protected by a fuse
or circuit breaker and to be installed in accordance with local
electrical codes. If you are unsure about your wiring, consult a
qualified electrician or local electrical inspector, and check your
local electrical code.
WARNING: RISK OF INJURY
Some metal parts in the fixture may have sharp edges. To pre-
vent cuts and scrapes, wear gloves when handling the parts.
Account for small parts and destroy packing material, as these
may be hazardous to children.
Use flashlight or alternate light source to light work area during
installation.
Additional assistance may be required during installation.
REQUIRED TOOLS
• Safety glasses
• Ruler/Tape measure
• Phillips screwdriver
• Adjustable wrench
• Straight blade screwdriver
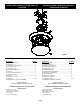
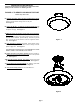
FIXTURE PACKING LIST
Description Quantity
1) Crossbar * .....................................................1
2) Screw #8-32 x 1" * .........................................4
3) Wire Nuts * .....................................................2
4) Green ground screw *.................................... 1
5) Screw #8-32 x 1½" * .....................................2
6) Lock Washer *................................................ 2
7) Ball Finial * .................................................... 4
8) Spacer Canopy .............................................. 1
9) Hexnut * .........................................................2
10) Pan............................................................... 1
11) Glass Diffuser .............................................. 1
12) Lamp(s) .................................................... 1or 2
* Contained in Parts Packs
INSTALLATION INSTRUCTIONS
PRISTINE FLUSH / SEMI-FLUSH MOUNT
Lamps Included.
All Mounting Hardware Included.
Figure 1