
Installation Guide


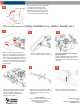


Bend (4) bar hangers per fixture at right
angles at the row of (3) holes 2 inches from
one end of the bar hangers to attach to
ceiling joists.
1
Mount to ceiling structure with flanges on
channel bars resting against the bottom faces
of the joists. Drive included nail into joist to
secure. Move vertical adjustment to lowest
point. For WALLWASH applications, ensure the
junction box is oriented either directly toward
or away from the washed wall. Trim rotates
only 180 degrees.
D) Non-accessible Ceiling Installation (e.g. plaster, drywall, etc.)
5
4
3
Alternate bar hangers used for Emergency
Batter Pack Fixtures:
Attach the adjustable brackets to the fixture
using the hardware provided. Wing nuts
should face inward for adjustment through
the ceiling.
Place (2) hanger bars together so that the
formed tabs engage the slots to form one
long rigid hanger bar. Aligning the ”V”
cutouts in the hanger bar will set the
spacing for a 24” ceiling.
6
Secure channel bars to Hat Channel by
means of a fastener (wire ties, screws, etc.)
2
Secure channel bars to Hat Channel by
means of a fastener (wire ties, screws, etc.)
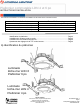
Align the opening in the trim with the tabs
on the light engine. Rotate the trim
clockwise until trim slot aligns with the
hole in the trim holder. Secure trim with
provided screw. Push the light engine up
to position the trim flush with the ceiling.
Hole
Tab on Light Engine
Trim Slot
16
912-00205-001 Rev. A
Page 5
© Acuity Brands Lighting, Inc. 2020
All Rights Reserved.
Lithonia Lighting
1400 Lester Road Conyers Georgia 30012
P 800 315 4935 F 770 860 3129
Technical Support P 800-705-7378
www.Lithonia.com