
Installation Guide


C) Lay-in Panel T-bar Ceiling Installation (Cont.)
10
11
Re-tighten both vertical adjustment nuts.
12
Re-tighten both channel bar clamping
screws.
13
Remove knockouts on junction box to feed
power supply to fixture. Supply wire must
meet applicable electrical codes and be
rated for a minimum of 90°C. Junction box
is thru-wire rated for 8-No. 12 AWG
conductors (4in-4out).
14
Complete necessary splices. Snap the
door/driver assembly onto the junction box.
15
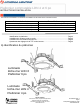
Squeeze wire springs on the light engine and
insert each leg of the spring into the slots on
the brackets on either side of the opening in
the mounting frame. Pull the light engine
down so the looped end of the wire spring
rests on the top of the bracket.
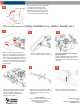
8
9
Position mounting frame through opening
in ceiling.
Ceiling Line
Mounting Frame
Draw-down
Adjust the mounting frame vertically to align
the bottom edge of the draw-down to either
flush or slightly above the ceiling line.
7
Locate the T-bar slots near the ends of the
bar hangers, bend the tabs out at 45 degree
angle from the bar hanger at each end.
Snap the bar hangers over the ceiling T-bars
for a secure fit. Or the use of a fastener
(wire tie, screw, etc.) is acceptable as well.
Place (2) hanger bars together so that the
formed tabs engage the slots to form one
long rigid hanger bar. Aligning the ”V”
cutouts in the hanger bar will set the
spacing for a 24” ceiling.
912-00205-001 Rev. A
Page 4
© Acuity Brands Lighting, Inc. 2020
All Rights Reserved.
Lithonia Lighting
1400 Lester Road Conyers Georgia 30012
P 800 315 4935 F 770 860 3129
Technical Support P 800-705-7378
www.Lithonia.com