
Installation Instructions

Page3of4
LEDIMPORTANTSAFETYINSTRUCTIONS
SECTION1:INSTALLATIONIBHLED(ReadLEDsafetyinstructionsonpage1)
1) Disconnectallpowertotheexistingluminaireandremovetheexistingluminairefromtheceiling.Inspecttheexisting
mountinglocationfordamagebeforeinstallthenewIBHLEDhighbayinthislocation.
2) RemovethenewIBHLEDfrompackagingandinspectforanydamages.HandlenewLED
fixturewithcare.Ifdamageddonot
use;callyourlocalrepforreplacement.
3) IfLEDfixturedoesnothavelensoption,donottouchtheLEDsduringinstallationprocess.Leavetheprotectivelineronthe
fixtureuntilfinalstageofinstallation.RemovetheprotectiveplasticaroundtheLEDfixture
beforeturningthemON.
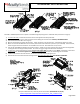
4) OptionalChainmount(HC36):Installthechainintothewirehanger(ex.HC36isonepair36inchain).Clipthewirehanger
intothesideholesontheIBHdriverchannel.Securetheotherendofthechaintoastructureusinghardwareratedforthe
load.Contactfactoryoragencyforareasthathavevibration,overheadcranesand/orhighvelocity.SEEFIGURE2,DIA.A.
Makesurethewiringhangersarefullyengagedintothesideholesonthetopchannel.Ifusing"S"hooks,makesure
allloopsarecrimpedclosedifpossible.Makesurewirehangerfitsnugglyintosideholeofdriverchannel.
OptionalTHUNmount:MounttheTHUNbracketstostructure.
Install/snapthefixtureintothebracketsandsecurethe
LEDfixtureinplaceusingtheprovidedcarriageboltsandnuts.Makesureallscrewsaresecurelytighten!Donotover
torquethenutstowherethebracketsdefor.LEDfixtureshouldnotslideorbepulledlooseifinstallationisdonecorrectly.
SEEFIGURE2,DIAGRAMBfortorque
specification.
OptionalIBLPMPmount:MounttheIBLPMPbrackettotheexistingthreadedrod/pipe.Followallthreadedrod/pipe
installationinstruction.MakesureallpartsaresecurelytightenbeforehangingtheLEDfixture.Slidethecenteroffixture
alongthelengthofthebracketandsnapitintothesideslotsonce“centerweight”isdetermined.Makesurethetwotabs
ontheIBLPMPbracketengagestheslotsinthe
sideofthechannel.Securetheprovidedcarriagebolt.Donotover‐tighten
bolt.Installtheprovidedsidecovers1screw/partoncealllinewiringiscompleted.SEEFIGURE2,DIAGRAMC.
**ThisoptionisnotavailableiftheIBHfixturehasabackpackunitmountedontop.
OptionalIBLPMPHB(HUB)kitmount:MounttheHUBkittotheIBLPMPbracket.Makesurethethreadedpartisplace
outsidethepart.MakesurethenuttotheHUBissecurelytightentothebracket.Installtheassemblytotheexisting
threadrod/pipe.Follow“IBLPMPmount”LEDfixturehanginginstructionabove.
**ThisoptionisnotavailableiftheIBHfixturehasabackpackunitmountedontop.
5)
ConnecttheLEDhighbaywiringtolinewire,black‐to‐black,white‐to‐whiteandgreen‐to‐green.UseonlyULlistedwiring
connectors90C(orgreater)andULlistedwiring90C(orgreater).UseonlyULlistedcordandplug.
**NOTE:Purpleandgrayleadinsidethedriver
compartmentare0‐10V(lowvoltage)dimmingleads.Connecttodimming
lowvoltagewiringonly.IBH2FTwithbackpack,theaccessplateisnotremovable.Allpowerwiringwillbepulledout
accessplatehole.***IfEMERGENCYPACKOPTION,theun‐switchedELLeadwillbelabeled.***
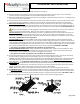
6) Ifsensoroption,removetheblackwireprotectionbushingfromtheholeonthefixtureend.Thisisusedtoprotectsensor
wiringfrombeingcutduringtransit.Pushthesensorwiringintothechannelcompartmentandsnapthesensorintothe
holeontheendcover.Alignthesensorheadtowhereitfacesthefloor.SEEFIGURE1.
**NOTE:Makesurethesensorispushtightlyintotheholeon
theendcover!Donottouchthesensorlensarea.
7) TheEMERGENCYoptionmountontopoftheLEDfixturewithtwobrackets.PowerfromtheEMpackfeedthroughawhip
andconnecttothedriverchannel.Connectthetwoconnectorstoenergizethebatterypacks.Pushtheconnectorsback
intothechannelandcovertheholewiththeprovidedhole‐plug.Un‐switchedleadwillbelabeled.SEEFIGURE1,DIA.A.
8) Cleanallresidues/fingerprintsfromthenewLED
highbayandlens.Doublecheckallhanginghardware.