
Installation Sheet


U02301 Rev. B
Page 6 of 8
LED IMPORTANT SAFETY INSTRUCTIONS
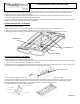
3) Remove access plate screw as shown above. Input wires will be attached to the access plate. Remove the necessary knockout(s)
and connect input wires black to black, white to white and green to green. Use only UL listed connectors rated 90C or greater.
Purple and Gray wires are low voltage dimming leads.
4) Make any necessary electrical connections. Supply wire must meet applicable electrical codes and be rated for a minimum of
90⁰C. Purple and gray leads are 0-10V (low voltage) dimming leads.
5) Push wires inside center channel, ensure electrical connections are not located above vent holes as shown in the Section B image.
FAILURE TO DO SO WILL VOID CERTIFICATION AND WARRANTY.
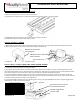
SECTION E: INSTALLATION – THUN MOUNT
1) Follow Steps 3-5 from Section D
2) Attach THUN brackets to structure (not supplied). Two THUN brackets MUST be used on all configurations.
3) Support fixture while snapping fixture into THUN brackets. Ensure fixture is balanced.
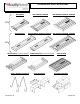
4) Use supplied hardware to tighten THUN brackets around center channel as shown below. Tighten bolts to 13 in/lbs.
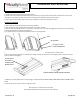
SECTION F: INSTALLATION – PMP MOUNT
1) PMP Mounting is not available with BPK or PS30250
2) Attach PMP Hub to threaded pendant/conduit (not supplied) using 3/4"- 14 NPT THREAD HUB and Nut (supplied) as shown below.
3) If luminaire is 2FT install plastic bushing (supplied) in center hole.
4) Support fixture while snapping fixture into PMP Bracket. PMP bracket may need to be shifted off center in order for the fixture to
remain balanced. Ensure PMP Bracket Teeth fit inside center channel as shown below.
5) Use supplied carriage bolt, washer, and nut to tighten PMP Hub around center channel. Tighten to 13 in/lbs
6) Input wires will be pulled out of the center of the fixture. Make any necessary electrical connections. Supply wire must meet
applicable electrical codes and be rated for a minimum of 90⁰C. Purple and gray leads are 0-10V (low voltage) dimming leads.
7) Attach PMP Bracket sides with screws, one each as shown below. Ensure wires are not pinched.
8) DO NOT LEAN ON FIXTURE ONCE PMP IS ATTACHED.
THUN BRACKETS
NUT
LOCK WASHER
CARRIAGE BOLT
PMP Bracket Teeth