
Installation Instructions

Page 6 of 9
U4118 Rev A
LED IMPORTANT SAFETY INSTRUCTIONS
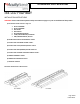
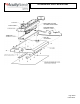
SECTION E: INSTALLATION – THUN MOUNT
1) Follow Steps 3-4 from Section D
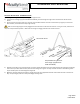
2) Attach THUN brackets to structure (not supplied). Two THUN brackets MUST be used on all configurations.
3) Support fixture while snapping fixture into THUN brackets. Ensure fixture is balanced.
4) Use supplied hardware to tighten THUN brackets around center channel as shown below. Tighten bolts to 13 in/lbs.
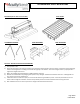
SECTION F: INSTALLATION – PMP MOUNT
Optional IBLPMP mount:
1) This option is not available with BPK option.
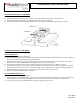
2) Mount the IBLPMP bracket to the existing threaded rod/pipe. Follow all threaded rod/pipe installation instructions. Make sure
all parts are securely tightened before hanging the LED fixture.
3) Slide the center of fixture along the length of the bracket and snap it into the side slots once “center weight” is determined.
Make sure the two tabs on the IBLPMP bracket engage the slots in the side of the channel.
4) Use supplied carriage bolt, washer, and nut to tighten PMP mount around center channel. Tighten to 13 in/lbs.
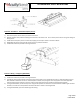
5) Input wires will be pulled out of the center of the fixture. Make any necessary electrical connections. Supply wire must meet
applicable electrical codes and be rated for a minimum of 90⁰C. Purple and gray leads are 0-10V (low voltage) dimming leads.
6) Attach PMP Bracket sides with screws, one each as shown below. Ensure wires are not pinched.
7) DO NOT LEAN ON FIXTURE ONCE PMP IS ATTACHED.
Optional IBLPMPHB (HUB) kit mount:
1) This option is not available with BPK option.
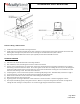
2) Attach the HUB kit to the IBLPMP bracket using 3/4"- 14 NPT THREAD HUB and Nut (supplied) as shown below. Make sure the
threaded nipple is inserted through the HUB from above. Then, ensure the HUB is securely tightened to the bracket.
3) Follow steps 2-7 from “Optional IBLPMP mount” LED fixture hanging instruction above.