
Installation Guide


Page 4 of 8
912-00235-001 Rev. B
LED IMPORTANT SAFETY INSTRUCTIONS
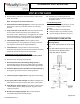
DIMENSIONS
CSVT INSTALLATION INSTRUCTIONS
INSTALLATION OF THIS FIXTURE IN ANY OTHER MANNER THAN WHAT IS INDICATED WITHIN
THE SUPPLIED INSTRUCTIONS WILL VOID ALL WARRANTIES.
These instructions are for NORMAL On/Off operations.
Ensure proper voltage will be supplied to the fixture. Check the fixture label on the carton for fixture
voltage. Fixture must be grounded before use. Remove fixture from packaging and check for damage. If
present remove plastic film from lens prior to installation.
GENERAL INSTALLATION
This luminaire is suitable for wet locations when labeled accordingly. This luminaire may be surface
mounted or suspended by cable or chain (provided by others). For all mounting methods make sure the
facility mounting points and mounting hardware (provided by others) is rated for 4X the fixture load.
DRIVER AND WIRING ACCESS
Once the fixture is mounted:
1. Remove the lens by supporting the lens with one hand and releasing the latches with the other
hand. Number of latches vary by fixture length; L48 has 10 and L96 has 20.
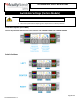
2. To open the LED tray, squeeze in on the channel below the led tray in the three places shown
in figure 1 and the tray snaps will disengage releasing the LED tray. Slowly lower the LED tray
until supported by the safety tethers.
3. Make the electrical connection to the fixture in accordance with your local electrical code. Make
all necessary wiring connections, observing proper voltage and polarity.
4. When closing the LED tray ensure that the LED tray is not pinching/catching wires or lens
latches. Once closed verify the LED tray is fully engaged.
5. Replace the lens by reversing the procedure outlined in Step 1.
FIGURE 1