
Instructions / Assembly


INSTALLATION INSTRUCTIONS - ENGLISH
STEP-BY-STEP GUIDE
Page 5Page 4
GUÍA DE PASO-A-PASO
1. Remove fixture components and parts pack(s). Check that all parts are included. See page 2.
Trouble Shooting Guide
If this fixture fails to operate properly, use the guide below to diagnose and correct the problem.
• Verify that correct lamp is used.
• Make sure lamp is properly seated in socket.
• Replace defective lamp(s).
• Verify that fixture is grounded correctly.
• The line voltage at the fixture is correct.
If further assistance is required, contact:
Technical Support at: (800) 748-5070
To replace Ballast:
Ballast replacement, if required, to be completed by a
qualified electrician.
To clean, wipe fixture with a soft cloth. Clean diffuser with a mild soap and water. Do not use abra-
sive materials such as scouring pads or powders, steel wool or abrasive paper.
Quincaillerie de Montage
Incluses
Warning: Safely dispose of packaging materials.
Assistance may be required to support fixture during installation.
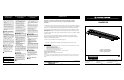
2. Install two hooks (not supplied) in ceiling. Attach “S” hooks (9) to chain (6). Slide hook through
opening on top of Housing (1) and crimp both ends of hook.-See Fig.1 Note: Maximum distance to
electrical outlet is determined by the length of the cord provided.
3. To open Wireguard (2) - locate and unscrew center latch finial (5) and disengage latch (4). Disengage
remaining two latches (4) and allow guard to hang freely.
4. Install fluorescent bulbs (3) into sockets. Rotate 1/4 turn to secure.-See Fig.2. Plug in.
5. Raise Wireguard (2) up to installed position, engage center latch (4) over screw and install finial
(5) to secure latch. Re-engage two outer latches.
6. Attach pull string to beaded chain on Pull Chain Switch Assembly (10).
Note- do not exceed the max. amperage noted for Convenience Outlet (8).
Page 2
Description Quantité
1)Boîtier du luminaire ..................... 1
2)
Wireguard .................................... 1
3)
Lampes (vendues séparément) ....... 4
4)
Verrouillage ......................................... 3
5)
Faîteau ............................................... 1
6)Chaînes* ..................................... 2
7)Cordon électrique ...................... 1
8)La prise de courant .................... 1
9)
“S” Crochets* ............................ 2
10)
Chaînette à tirage ........................... 1
*Compris dans les sacs d’emballage
LISTE DES PIECES
Mounting Hardware
Included
Description Quantity
1)Fixture Housing ........................... 1
2)Wireguard ................................... 1
3)Bulbs (sold separately) .............. 4
4)Latch ........................................... 3
5)Finial ........................................... 1
6)Chain* ......................................... 2
7)Power Cord ................................. 1
8)Convenience Outlet ................... 1
9)S-Hook* ...................................... 2
10) Pull Chain Switch Assembly ... 1
*Contained in Part Packs
FIXTURE PARTS LIST
Descripción Cantidad
1) Carcasa del Luminario ........................ 1
2) Rejilla de protección ...........................1
3)Lámparas (vendidas por separado) ...4
4) Pestillo .................................................3
5)Remate ................................................ 1
6) Cadenas* .............................................2
7) Cordón Eléctrico .................................1
8)La toma de corriente ........................... 1
9) “S” Ganchos* ...................................... 2
10) Ensamblaje de la Cadena de Tirón .. 1
*Contenido en el Paquete de Piezas
Herraje para Montaje
Incluidas
LISTA DE EMBALAJE
INSTALLATION FIGURES FIGURES D’INSTALLATION FIGURAS DE LA INSTALACIÓN
Figure 1
REQUIRED TOOLS
HERRAMIENTAS REQUERIDAS
OUTILS REQUIS
1. Remueva los componentes del luminario y paquete(s) de pieza(s). Asegure que todas las
piezas estén incluidas. Vea la Pagina 2.
Advertencia: Para seguridad deseche los materiales de embalaje.
2. Instalar dos ganchos (no incluidos) en el techo. Anexar el gancho ‘S’ (9) a la cadena (6). Deslizar
el gancho por la entrada en la parte superior del canal y cierre los dos extremos del gancho.-Vea
Fig.1. Nota: La distancia máxima a una salida eléctrica es determinada por la longitud del cordón
proporcionado.
3. Para abrir la rejilla de protección (2), localice y desatornille el remate del pestillo (4) central y
luego retire el pestillo (4). Retire ambos pestillos restantes de modo tal que se libere la rejilla.
4. Instalar lámparas fluorescentes (3) en los sockets.
Gire ¼”para asegurarlas.-Vea Fig.2. Conecte a la corriente.
5. Lleve la rejilla de protección (2) hacia arriba a la posición de instalación, introduzca el pestillo
central en el tornillo y coloque el remate a fin de sujetar el pestillo. Vuelva a colocar los dos
pestillos externos.
6. Anexar la cuerda a la cadena en Ensamblaje de la Cadena de Tirón (10).
Nota: No exceda el máximo. amperaje destaca por La toma de corriente
Guía de Localización de Averías
Si este luminario falla de operar apropiadamente, use la siguiente guía para diagnosticar y corregir el problema.
• Verifique que la Lámpara usada es la correcta.
• Asegure que la lámpara es correctamente conectado.
• Reemplace la(s) lámpara(s) defectiva(s)
• Verifique que el luminario este conectado tierra correctamente.
• El voltaje de la línea en el luminario este correcto
Si requere ayuda adicional, contacte:
Technical Support al: (800) 748-5070
Reemplazo dl alastro tiene que ser hecho por un electricista
calificado.
Para limpiar, limpie el luminario con un paño suave. Limpie el difusor de cristal con un jabón suave y agua. No use
materiales abrasivos como cojines del fregado o polvos, virutas de acero o papel abrasivo.
2
1
3
4
5
5
6
7
8
9
6
Figure 2