
Installation Guide


ASSEMBLY INSTRUCTIONS
6
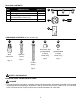
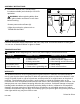
Adjust fixture screws (CC) to proper length by
screwing fixture screws (CC) completely into
mounting plate (B). Temporarily place fixture (A)
over mounting plate (B) to determine amount of
adjustment necessary for fixture screws (CC) --
fixture screws (CC) should come through holes
in fixture (A) just enough so decorative nuts (DD)
will fit flush against fixture (A) when mounted.
Once fixture screws (CC) are adjusted, attach
nuts (EE) previously removed (Step 3A, page 5).
Use pliers (not included) to tighten nuts (EE) on
fixture screws (CC) until nuts (EE) touch
mounting plate (B).
Set fixture (A) aside.
Outlet
Box
5.
Hardware Used
Fixture Screw
x 2
CC
Decorative Nut
x 2
DD
Nut
x 2
EE
5
A
B
CC
EE
DD
DD