
Installation Guide


page 6
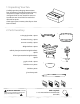
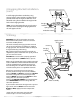
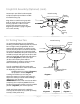
8. Blade Assembly.
WARNING: To reduce the risk of serious bodily
injury, DO NOT use power tools to assemble the
blades. If overtightened, blades may crack and
break.
Locate 15 blade attachment screws/washers in
one of the hardware packs. Hold blade arm up to
blade and align holes. Insert 3 blade attachment
screws/washers with fingers first and then tighten
screws securely with a Phillips screwdriver. Repeat
procedure for the remaining blades.
Remove blade arm screws and lock washers from
underside of motor. If plastic motor locks are
installed with blade arm screws, discard plastic
motor locks (save blade arm screws and lock
washers to secure blade arms). Align blade arm
holes with motor screw holes and attach blade
arm with lock washers and blade arm screws.
Before securing screws permanently, repeat this
procedure with remaining blade arms. Secure all
screws.
NOTE: Tighten blade arm screws twice a year.
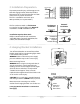
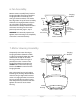
Remove 3 screws and star washers from switch
housing cap at top of light kit fitter--save for
later use.
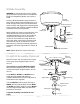
If you wish to use your fan WITH the light kit,
remove finial, finial plate, hex nut and rubber
washer from bottom of light kit fitter--save for
later use.
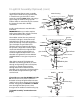
Locate BLUE (or BLACK) and WHITE wires in
switch housing labeled FOR LIGHT KIT
CONNECTION. Remove and discard plastic that
holds these 2 wires together.
Connect WHITE wire from switch housing to
WHITE wire from light kit fitter. Connect BLUE
(or BLACK) wire from switch housing to BLACK
wire from light kit fitter. Make sure that molex
connections are secure.
["Light Kit Assembly" continued on next
page.]
9. Light Kit Assembly (Optional).
motor
housing
plastic
motor lock
blade
blade attachment
screws/washers
blade arm
lock washers
blade arm screws
switch housing
motor
housing
molex connections
light kit fitter
switch housing
cap
rubber washer
finial plate
finial
hex nut