
Installation Guide


6
ASSEMBLY INSTRUCTIONS
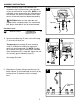
6.
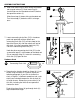
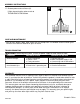
Slide small metal ring (K) down wiring to threaded
rod at top of column (I). Small metal ring (K)
should slide over the threaded rod until it touches
the top of the column (I).
Slide fixture loop (L) down wiring to threaded rod.
Turn fixture loop (L) clockwise until it no longer
turns.
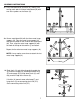
8.
Determine the hanging length for fixture (A). If you
will be using the chain as is, please skip to the
following paragraph. If you wish to shorten the
chain, use pliers, a flathead screwdriver and a soft
cloth (none included) to open the link of chain (H)
at length chosen. Remove any extra chain (H) at
this time, including the link that was opened to
shorten the chain.
Feed wiring from fixture (A) up through chain (H)
to pre-determined length.
48
Soft Cloth
Pliers
Screwdriver
Wiring
H
H
(extra)
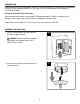
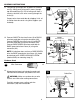
7.
Locate connecting chain links (CC) in hardware
pack and open both of them. Attach one
connecting chain link (CC) to fixture loop (at the
top of the fixture (A)) and then attach one end of
the chain (H) to the connecting chain link (CC).
Close this connecting chain link (CC).
Hook the other connecting chain link (CC) to the
screw collar loop (F) at the bottom of threaded rod
(D) on mounting strap (C)--leave this connecting
chain link (CC) open for now.
47
F
C
D
CC
CC
I
Hardware Used
Connecting Chain Link
x 2
CC
L
H
46
K
I
Threaded
Rod
L