
Installation Guide


14
FINAL INSTALLATION
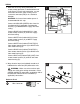
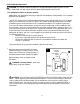
If you wish to use the fan with the light kit, remove
the three preassembled switch housing cap screws
(N) from switch housing cap (M) located at top of
light kit fitter (F).
Locate the BLUE (or BLACK) and WHITE molex
wires in the switch housing preassembled on motor
housing (D) that are labeled FOR LIGHT and
remove plastic from these two wires.
4.
5.
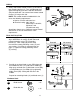
Connect WHITE molex wire from switch housing to
WHITE molex wire from light kit fitter (F). Connect
BLUE (or BLACK) molex wire from switch housing
to BLACK molex wire from light kit fitter (F). Make
sure molex connections are secure.
Then, align holes in switch housing cap (M) with
holes in switch housing. Note: Make sure to align
notch on top edge of the switch housing cap (M)
with the reverse switch on switch housing for the
correct fit.
Re-insert the switch housing screws (N) previously
removed (Step 4 above), then tighten all switch
housing cap screws (N) with a Phillips screwdriver
(not included).
N
M
F
N
N
N
M
Notch
5
Molex
Connections
D
Switch
Housing
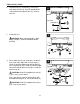
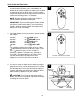
Attach blade arms (J) to the bottom of motor
housing (D) with motor screws (S) and washers (T)
previously removed (Step 5, page 7). Tighten motor
screws (S) securely.
Note: Make sure to completely secure each blade
arm (J) before proceeding to the next.
3.
3
D
G
J
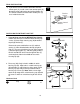
If you do NOT wish to use the light kit, skip
to INSTALLING FAN WITHOUT LIGHT KIT on
page 16.
If you DO wish to use the light kit, proceed to
Step 4.
4
D
Switch
Housing
White
Blue (or Black)
J
T
S
Reverse
Switch