
Installation Guide


1
13
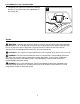
WIRING
1.
Lift canopy (B) to mounting bracket (C) and
align slotted holes in canopy (B) with loosened
canopy mounting screws (Z) in mounting
bracket (C). Twist canopy (B) to lock, then
insert the two canopy mounting screws (Z) and
star washers (Y) previously removed (Step 4a,
page 7). Tighten all canopy mounting screws
(Z) securely.
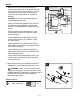
2.
2
Partially insert three blade screws (BB) along with
three blade washers (CC) into holes in blade (G).
Align pegs on blade arm (J) with blade screws (BB),
securing blade arm (J) to blade (G) by tightening
blade screws (BB) starting with the one in the
middle.
Repeat for remaining blades (G) and blade arms (J).
Hardware Used
Blade Screw
x 15
BB
Blade Washer
x 15
CC
CC
BB
G
J
Downrod
Closemount
B
B
A
D
D
Z
Y
FINAL INSTALLATION
3
Gently slide remote control receiver (V) flat-side up
into mounting bracket (C). Turn spliced/taped wires
upward and gently push wires and wire connectors
(DD) into outlet box. Let antenna from remote control
receiver (V) hang to the side.
NOTE: The remote control included with this fan
meets the following requirements:
a. Not for use with solid state fans.
b. Electrical rating: 120V / 60 Hz;
motor amps:1.25 MAX.;
light watts: 190
(Incandescent only)
Should you choose to use a different remote control
with this fan, it must also meet these same
requirements.
3.
Antenna
A
V
C