
Installation Guide


page 6
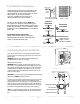
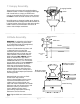
7. Canopy Assembly.
Temporarily raise canopy to hanging bracket to
determine which 2 screws in hanging bracket align
with slotted holes in canopy, and then lower
canopy and partially loosen these 2 screws. Remove
the other 2 screws and lock washers and set aside.
Now, lift canopy to hanging bracket again, aligning
slotted holes in the canopy with loosened screws in
hanging bracket. Twist canopy to lock. Re-insert the
other 2 screws and lock washers and secure all
screws with a Phillips screwdriver.
screw
hanging bracket
canopy
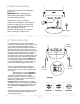
8. Blade Assembly.
WARNING: To reduce the risk of serious
bodily injury, DO NOT use power tools
to assemble the blades. If overtightened,
blades may crack and break.
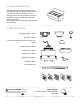
Locate 12 blade attachment screws and
12 decorative nuts in one of the
hardware packs. Place blade arm over
blade aligning holes in blade arm with
holes in blade as shown [Note label on
blade indicating THIS SIDE UP and turn
blade so that label faces up]. Insert 3
decorative nuts into holes in blade from
UNDERSIDE of blade (i.e., the side that will
face the floor), making sure to completely
insert each decorative nut so that the
blade arm can be attached correctly.
Insert 3 blade attachment screws from
TOPSIDE of blade arm with fingers first
and then tighten screws securely with a
Phillips screwdriver. Repeat procedure for
remaining blades.
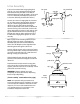
Remove blade arm screws and lock
washers from top of motor
housing--leave rubber cushions intact.
Lower one of the blade arms over a
rubber cushion, aligning blade arm
holes with motor screw holes and attach
blade arm with two of lock washers and
blade arm screws just removed, as
shown. Before securing screws
permanently, repeat with remaining
blade arms. Secure all screws.
Note: Tighten blade arm screws twice a
year.
blade arm
blade arm
blade arm screws
and lock washers
blade
motor housing
rubber cushion
blade arm screws
and lock washers
blade attachment
screws
decorative
nuts