Installation Instructions Ordering Code: RF16UQT1XXC RF32UQT1XXC RF32UHT1XX RF45UQT1XXC RF45UHT1XX PLEASE READ THESE INSTRUCTIONS BEFORE INSTALLATION OF THE FOLLOWING: 4’ STRIP FIXTURES WRAP FIXTURES 8’ STRIP FIXTURES TROFFER FIXTURES HARDWIRE 4’ STRIP FIXTURES STANDALONE
INTRODUCTION & TABLE OF CONTENTS Congratulations on the purchase of your 1x4 Retrofit. It is usable for a range of installations. Some of the most popular ones are included here.
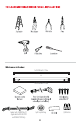
13 12 What comes in the box: 1x4 LED RetroFit- 1 Tube or 1x4 LED RetroFit- 2 Tube Conduit with 14AWG Wire (1’) (Applicable for RF32UHT1XX and RF45UHT1XX Only) Split Snap Bushing 3 (2)Wire Nuts
1X4 ACCESSORIES Not included but available for purchase 4’ Lamp to lamp extension cable (RFAC-4FT) 8” Lamp to lamp extension cable (RFAC-8IN) Wire cable accessories for stand alone installations (RFAXPVL5) 20mm bi-metal hole saw (RFAHS-20) 4 Direct dual connector (RFAC)
Section 1 RF16UQT1XXC, RF32UQT1XXC, RF45UQT1XXC 4’ & 8’ STRIP FIXTURE INSTALL Before After 1x4 Strip Fixture with T8 Tubes 1x4 Strip Fixture with LED Retrofit 1. Retrofit must be installed to a grounded luminaire. 2. 1x4 strip install does not require the use of a junction box. 3. Ballast cover should be mechanically secured to physically support the Retrofit. 1. Turn off the power to the fixture from the circuit breaker. 2. Remove the existing fluorescent tubes.
RF16UQT1XXC, RF32UQT1XXC, RF45UQT1XXC 4’ & 8’ STRIP FIXTURE INSTALL 5. Connect incoming electrical line to the included female disconnect by pushing the wires into the corresponding color coded black and white holes. 6. Punch hole through side knockout of strip fixture or drill a hole through the center of the cover (that was set aside in step 3) near the incoming electrical wires with 20mm bi-metal hole saw (sold separately ordering code RFAHS-20). 7.
RF16UQT1XXC, RF32UQT1XXC, RF45UQT1XXC 4’ & 8’ STRIP FIXTURE INSTALL 10. Place power cord between the two tubes of the LED RetroFit. Attach the LED RetroFit to the fixture cover using the powerful rare earth magnets. Position the LED RetroFit to preferred alignment. Secure to the fixture with 2 of the included self-tapping screws. Route and position Retrofit wiring within luminaire enclosure away from mounting hole where screws will be inserted. 11. Plug the power cord into the power socket. 12.
HOW TO USE TWO 1’X4’ RETROFITS TO CREATE 8’ STRIP For 8’ install. Do not restore power until you complete steps 1a-1e below. 1a. Place and align the second 1’ x 4’ LED RetroFit with the C14 socket or Litetronics logo as close to the first LED Retrofit as needed to allow the use of RetroFit accessory. 1b. Place the dual connector (RFAC) in the sockets to connect both LED RetroFits together. 1c. Align the second fixture and secure with the 2 included self-tapping screws.
HOW TO USE TWO 1’X4’ RETROFITS TO CREATE 8’ STRIP 1e. Restore the power and you’re done! You have combined two 1’x4’ Retrofits into an 8’ fixture. Our 1x4’s can be assembled into long chains off one power source depending on Retrofit wattage. You can connect 2 retrofits together when less than or equal to 4’ apart using 4ft lamp to lamp extension (RFAC-4FT). Or connect 2 retrofits together when less than or equal to 8” apart using 8in lamp to lamp extension (RFAC-8IN). Shown on page 4.
Section 2 RF32UHT1XX, RF45UHT1XX, RF32UQT1XXC AND RF45UQT1XXC HARDWIRE STRIP FIXTURE INSTALL Before After 1x4 Hardwire Strip Fixture with T8 Tubes 1x4 Hardwire Strip Fixture with LED Retrofit 1. Retrofit must be installed to a grounded luminaire. 2. Hardwire install does not use a junction box. 3. Ballast cover should be mechanically secured to physically support the Retrofit. 1. Turn off power to the fixture from the circuit breaker. 2. Remove existing fluorescent tubes.
RF32UHT1XX, RF45UHT1XX, RF32UQT1XXC AND RF45UQT1XXC HARDWIRE STRIP FIXTURE INSTALL 5. On the LED RetroFit RF32UHT1XX and RF45UHT1XX open the end cover with the Litetronics logo by removing both screws. 6. Once open, the internal black, white and green/yellow wires to the LED tubes are visible. 7. Strip the black, white and green/yellow wires coming from the tubes of the LED Retrofit to expose about ¼” of wire. 8.
RF32UHT1XX, RF45UHT1XX, RF32UQT1XXC AND RF45UQT1XXC HARDWIRE STRIP FIXTURE INSTALL 10. Insert the three conduit wires (black, white & green) through the hole of end cover. Then place the conduit nuts over the three conduit wires. After that, push conduit end into knockout hole and secure with conduit nut. 11. Connect conduit wires to LED RetroFit using wire nuts (included). See below chart: a. black to black b. white to white c. green to green/yellow 12.
RF32UHT1XX, RF45UHT1XX, RF32UQT1XXC AND RF45UQT1XXC HARDWIRE STRIP FIXTURE INSTALL 14. Replace fixture cover. 15. Mount your LED RetroFit which attaches to housing with powerful rare earth magnets. Position LED RetroFit to preferred alignment. Secure it to the fixture with the 2 included selftapping screws. 16. Apply both included labels to fixture. WARNING: IF RETROFITTING 8’ STRIP, DO NOT RESTORE POWER YET. CONTINUE WITH 8’ INSTALL STEPS 1A-1E BELOW. 17.
RF32UHT1XX, RF45UHT1XX, RF32UQT1XXC AND RF45UQT1XXC HARDWIRE STRIP FIXTURE INSTALL For 8’ install. Do not restore power until you complete steps 1a-1e below. 1a. Place and align the second 1’ x 4’ LED RetroFit RF32UQT1XXC or RF45UQT1XXC with the C14 socket (or Litetronics logo) as close to the first LED Retrofit as needed to allow use of RetroFit accessory. 1b. Place the dual connector (RFAC) into the sockets to connect both the LED RetroFits together. 1c.
Section 3 RF32UQT1XXC AND RF45UQT1XXC TROFFER OR WRAP INSTALL Before After 1x4 Troffer Fixture with T8 Tubes 1x4 Troffer Fixture with LED Retrofit 1. Troffer or wrap install requires the use of a junction box. 1. Turn off power to the fixture from the circuit breaker. 2. Open and remove fixture cover that applies to the Retrofit model number specified.
RF32UQT1XXC AND RF45UQT1XXC TROFFER OR WRAP INSTALL 4. Disconnect ballast wires from the incoming electrical line. (black and white wires) 5. Remove lamp holders and mounting bracket. 6. Unscrew and remove ballast from fixture. If you are installing LED retrofit into a wrap fixture, instead of removing the lamp holders, just cut the remaining ballast wires as close to the lamp holders as possible. 7. Connect the incoming electrical wires to the included female disconnect. 8.
RF32UQT1XXC AND RF45UQT1XXC TROFFER OR WRAP INSTALL 9. Fully cover the attached disconnect and incoming electrical wires using the provided magnetic junction box cover. Make sure the power cord is coming out the direction that allows connection to the LED RetroFit. 10. Secure junction box with 2 of the included self-tapping screws. 11. Place power cord between the two tubes of the LED RetroFit. Attach the LED RetroFit to the fixture cover using the powerful rare earth magnets.
RF32UQT1XXC AND RF45UQT1XXC TROFFER OR WRAP INSTALL 13. Apply both included labels to the fixture. 14. Replace the fixture cover that applies to the Retrofit model number specified. RF32UQT1XXC Shown RF45UQT1XXC Shown 15.
Section 4 RF32UHT1XX, RF45UHT1XX, RF32UQT1XXC AND RF45UQT1XXC STANDALONE USE 1. Turn off the power to the fixture from the circuit breaker. 2. Open the end cover with Litetronics logo by removing both screws of the LED RetroFit. 3. Cut the black, white and green/yellow wires close to the power I/O of the LED Retrofit. 4. Strip the black, white and green/yellow wires to expose about ¼” of wire.
RF32UHT1XX, RF45UHT1XX, RF32UQT1XXC AND RF45UQT1XXC STANDALONE USE 5. Remove the preferred knockout from end cover to make the preferred hole you want to connect conduit. 6. Unscrew the conduit nut from the conduit. 7. Insert the three conduit wires (black, white & green) through the hole. 8. Then place the conduit nut over the three conduit wires. After that, place conduit through knockout hole and secure with conduit’s nut.
RF32UHT1XX, RF45UHT1XX, RF32UQT1XXC AND RF45UQT1XXC STANDALONE USE 9. Connect conduit wires to the LED RetroFit using wire nuts (not included). See below chart: a. black to black b. white to white c. green to green/yellow CAUTION: To avoid risk of an electric shock, do not connect wires from conduit directly to the socket. 10. Replace the end cover you removed earlier and secure it with 2 screws. Once the LED retrofit is wired, it is time to hang the light using the wire cable accessory. 11.
RF32UHT1XX, RF45UHT1XX, RF32UQT1XXC AND RF45UQT1XXC STANDALONE USE 12. Loop cable around ceiling or service attachment point and pass tail end of cable through the other hole of the cable lock. 13. Pull the tail end of the cable through the cable lock so the LED RetroFit hangs at desired height. 14. Repeat steps 12-14 with the second wire cable and lock. 15. Put both V hooks in the loops of the cables.
RF32UHT1XX, RF45UHT1XX, RF32UQT1XXC AND RF45UQT1XXC STANDALONE USE 16. Locate the holes on the back of the mounting bracket of both ends of the LED RetroFit. 17. Insert both V hooks into the holes on the mounting bracket (both sides of LED RetroFit). 18. Put a level on the LED Retrofit for final leveling, and adjust the cable length to level the LED RetroFit. 19. Restore the power and you’re done! Enjoy your new energy saving LED Light.
RF32UHT1XX, RF45UHT1XX, RF32UQT1XXC AND RF45UQT1XXC INTERCONNECTING STANDALONE USE For interconnecting install. Do not restore power before you complete steps 1a-1c below. 1a. Place and align the second 1’ x 4’ LED RetroFit RF32UQT1XXC or RF45UQT1XXC with the C14 socket or Litetronics logo as close to the first LED Retrofit as needed to allow use of RetroFit accessory (RFAC, RFAC-8IN or RFAC-4FT) by repeating the wire cable accessory steps 11-18 in this section. 1b.
Thank you for choosing 6969 W. 73rd Street Bedford Park, IL 60638 WWW.LITETRONICS.COM CustomerService@Litetronics.com or 1-800-860-3392 vol.