
User's Manual


Activate & Pair
Activate Battery
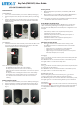
1. Use a coin to rotate the battery cover to the “OPEN” position (g. 1).
2. Remove the plastic tab , then place the battery back in position (g.
2).
3. Replace the battery cover and then rotate to the “CLOSE” position.
(g.6). The Key Fob will start to scan for the network and the LED
will ash 3 times.
Pair & Register
1. Follow the instructions that came with your Touchstone Hub to add
the new Key Fob (CHK-001). During pairing mode, the status LED
will ash until the Key Fob is connected (g. 4).
Notes: A scan is performed every 5 seconds.
The LED ashes 3 times when each scan is initiated.
The Key Fob sleeps between scans to conserve battery.
If after 20 scans a network is not found, the sensor enters sleep mode
indenitely.
The Key Fob resumes scanning the next time a zone status change
occurs (fault, restore, tamper, tamper restore, test button pressed,
etc.). This allows user interaction to cause the sensor to resume
scanning.
Battery Replacement
1. Use a coin to rotate the battery cover to the “OPEN” position (g. 5).
2. Remove old battery and replace with CR2032 type battery (g. 6).
3. Replace the battery cover and then rotate to the “CLOSE” position.
(g. 7).
Factory Reset
1. While holding down any 2 buttons, install battery. LED should
illuminate.
2. Release buttons prior to the LED turning o. The LED will blink to
indicate that unit Has been restored to factory defaults.
Note: If more than one button is pressed and they are NOT released before
the LED turns o, the device will turn on as usual.
Panic Button Conguration
On boot with no buttons pressed, the LED lights for 2 seconds, then
either starts blinking indicating it is looking for a network or if it is
already paired, the LED just turns o and the panic conguration is not
changed.
• If the “arm stay” button is the only button pressed, panic is
congured to send a police panic.
• If the “arm away” button is the only button pressed, panic is
congured to send a re panic.
• If the “disarm” button is the only button pressed, panic is
congured to send a medical panic.
Checking System Status
1 Press to show the current status of the security system.
The LED ashes red once to indicate that it has contacted the
system, then:
• Lights green for 3 seconds if the system is disarmed
• Lights red for 3 seconds if the system is armed
• Lights orange for 3 seconds if the system is not ready to be
armed (for example, a door is open)
Arm Away
Press for about 2 seconds to arm the system in Arm Away mode (the
home is unoccupied).
The LED ashes red once to indicate that it has contacted the system,
then lights red for 1 second. The exit delay starts.
Arm Stay
Press for about 2 seconds to arm the system in Arm Stay mode (there
are still people on the premises).
The LED ashes red once to indicate that it has contacted the system,
then lights red for 1 second. The exit delay starts.
Disarming the System
Before entering the premises in armed state, press for about 2
seconds to disarm the system without entering the premises.
The LED ashes green once to indicate that it has contacted the system,
then lights green for 1 second indicating that the system is disarmed
Panic Button
Press and hold for 3 seconds to send an alarm to central monitoring,
the actual type of alarm, police, re, depends on how the panic button
is congured. The LED ashes orange to indicate that the alarm has
been sent.
Key Fob (CHK-001) User Guide
g. 4
g. 1
g. 2
g. 3
g. 5 g. 6 g. 7