
Installation Guide

ST LIT LOGOSST LIT LOGOS
INSTALLATION GUIDE
13+ Focus and Fiesta ST
| 6839 CORALBERRY LN N, JACKSONVILLE, FL 32244 | P: 434-209-7166 | WWW.LIT-LOGOS.COM
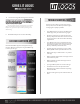
INCLUDED PARTS
1 -
1 -
1 -
1 -
1 -
Lit Logos Control Box
Lit Logos ST Badge
Lit Logos ST LED Housing
ST Stencil
Lit Logos decal
HOW TO INSTALL
1. Disconnect the car battery
4. Place the supplied paper stencil onto the grill where
the OEM ST badge was located. Your goal is to line it up so
that the inner portion is fully over solid plastic the whole
time. Mark the inside of the stencil with silver sharpie.
This marked area be used to ensure you are clearancing
enough space to allow the light to pass through the grill.
This stencil is the exact same dimensions as the front ST
badge we supply, so make sure you are happy with the
positioning, and that there is enough material remaining to
adhere to. Measure twice, cut once.
2. Remove the front bumper to gain access to the back-
side of the grill.
If you have a 2015+ Facelift Focus ST, you can remove the
front grill by pulling it out. Other years it is required to
remove the front bumper.
3. Remove the OEM ST badge from the front grill. It is
held on via mounting tape. You can use heat along with
shing wire or dental oss to run behind the badge to re-
move it. Be sure to clean o ALL of the remaining adhesive
from the grill prior to moving on to the next step.
5. Using a dremel, cut out only the section marked with
sharpie to allow light to pass through the grill.
The stencil is designed to be the exact size of the badge,
but you may need to remove slightly more material to
ensure the light is unobscured when passing through the
grill. Before adhering the badge to the front of the grill,
shine a light through the backside of the grill and place
the front badge up to where you plan to install it. Any dark
spots in the badge will show you where you need to cut a
little more room before nishing.
7. Find which power source you want to connect the
logo to. Any 12V power source will work so you can select
a fuse, headlight wire, or even wire it directly to the battery.
A 5A fuse is required for install regardless of power source.
6. Once the grill has enough clearance to allow light to
pass through unobscured to the front badge, install the
front badge using the supplied 3M tape.
Ensure that the surface you are adhering to is 100% clean
and free of any debris. Hold pressure on the left and right
side of the badge for 30 seconds - 1 minute to ensure the
badge gets a good bond with the plastic.
8. Route the power and ground wire from the
control box to the location you chose to power the
logo, avoiding any high heat areas or moving parts.
9. Tuck the Control Box out of the way, but still within
reach of the front bumper where you installed the logo.
Be sure to place this somewhere that wont be hit by
road debris, direct water, or high heat. This is the brains
of the Lit Logo. It is water and heat resistant, but high
pressure water or extreme temperatures can damage the
electronics.
CONTINUED BELOW...
7. Install the LED Housing to the backside of the grill
using the supplied 3M tape.
See previous step for instructions to ensure a solid bond is
made betwen the 3M and plastic.