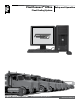
FleetConnectTM Office Setup and Operation Fleet Fueling System Liquid Controls Group An IDEX Fluid & Metering Business Installation: EM200-15
Table of Contents Introduction Operation Software License Agreement ................................... 3 FleetConnect Office Software Overview................... 4 FleetConnect Refueling System Overview ............... 5 FleetConnect System Components ......................... 6 FleetConnect System Data Flow ............................. 10 Button Tab................................................................ 29 Customer Tab........................................................... 29 Fueler Tab..
Software License Agreement Read this license carefully. You agree that by using the fieldized software package, you have agreed to the software license terms and conditions. This agreement constitutes complete and entire agreement between you and Liquid Controls with respect to this product. 1. Liquid Controls hereby grants to Licensee a nonexclusive license to use DMS Menu, LCP File Server, FleetConnect Office, and LCR Host Software (hereinafter referred to as “Licensed Software”) 8. Termination.
Introduction Purpose The purpose of this document is to instruct Liquid Controls customer in the installation, setup, and operation of FleetConnect office software. FleetConnect Office Software Overview The FleetConnect Office CD-ROM contains four executable programs, FCRead.exe, FCEdit.exe, FCLoad.exe and Officeuser.exe, plus a folder titled “iButton”. If your are using FleetConnect Office on multiple computers, one copy of FleetConnect Office is required for each computer.
Introduction FleetConnect Refueling System Overview FleetConnect is a Liquid Control’s in-cab fuel delivery and data collection application for the DMS i1000 that spans from the point of delivery to the office PC. FleetConnect is specially designed for businesses who have or fuel customers with large fleets of vehicles and equipment or fuel their own fleet.
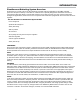
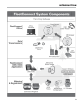
Introduction FleetConnect System Components Metering System Typically mounted to the back or side of a delivery vehicle, the metering system accurately measures, controls the flow, and preserves the purity of the product. A Liquid Controls metering system can include the meter, LCR electronic register, strainer, ETVC probe (temperature compensation), air eliminator, and control valve.
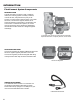
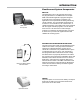
Introduction FleetConnect System Components DMS i1000 DMS i1000 and Lap Pad The DMS i1000 is an in-cab computer with a heavyduty lap pad interface. The DMS i1000 runs multiple DMS i1000 software application programs designed for specific types of fuel delivery companies. The applications record operational and fueling data during custody transfers. The recorded data is transferred to an office PC via a USB device, RF communication, or cellular transmission.
Introduction FleetConnect System Components DB Manager DB Manager is used to setup and manage wireless communication between DMS i1000s in the trucks and personal computers in your office. DB Manager contains two programs LCPSetup.exe and DBManager.exe. The first program, LCPSetup.exe, aligns communication parameters and conducts testing to confirm wireless communication between the office PC and the DMS i1000. The second, DBManager.
Introduction 9
Introduction 10
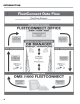
Introduction FleetConnect Data Flow DMS i1000 Applications to Fleetconnect office fleetconnect office to DMS i1000 Applications DMS i1000 FleetConnect Office (Begins at the bottom of the chart on page 10—DMS i1000 FleetConnect—and ends at the middle top of the diagram—FleetConnect Office.) After each delivery, the DMS i1000 compiles the metrological, transaction, customer, driver, and product data into transaction files (.trn).
Setup FleetConnect Refueling System Setup Overview There are three setup phases that must to be completed before your fuelers can begin delivering fuel with FleetConnect. The first phase, software installation, includes installing the software on the CD-ROM, creating folders and file paths for data transfers, and configuring FleetConnect Office’s settings.
Setup Phase #1 - Software Installation 1. Install FleetConnect Office Software To install FleetConnect Office software and the drivers for the USB RFID button reader, insert the CD-ROM into your computer. Installation should begin automatically. Follow the FleetConnect Office installation wizard directions until installation is complete. Then follow the directions in the 1-Wire Drivers Version 4.02 Setup windows to install the drivers for the USB RFID button reader. To install FleetConnect Office software.
Setup 2. Establish Settings and Directories After installing the software, you can adjust certain FCRead settings and directories to best suit your operations. • File Conversion Format Determines which file format FleetConnect Read will convert the transaction files into. • Edit Record Validation Setting Sets FleetConnect’s Record Validation feature.
Setup #2 - FleetConnect Office Software Setup 3. Populate Database After you have installed the FleetConnect Office CDROM, all of your company’s operational data can be entered into the FleetConnect database.
Setup 4. Print Stickers of Vehicle Directory In order to save time and avoid confusing the RFID buttons, Liquid Controls recommends printing out a sticker for each vehicle, putting the sticker on a small bag, and placing the button into the bag. FleetConnect Office provides the Vehicle List feature to help you print out these stickers. The following directions require Microsoft Word© and a 8½ x 11 inch sticker sheet. To create a text file of all the vehicles in your database 1.
Setup To convert the vehicle list to a Word 2007 table. 1. Open the vehicle list with Microsoft Word®, press Ctrl-A to select the entire document. 2. Click the Insert tab. 3. Click Table then click Convert Text to Table. 4. From the Convert Text to Table window, enter the following: a. Under Table size for Number of columns set to 1. b. Under AutoFit behavior, select the Fix column width radio button and set to Auto. Convert Text to Table Window c.
Setup 4. Print Stickers of Vehicle Directory (Cont.) To create a mail merge using Microsoft Word© 2003: 1. Open a new document in Microsoft Word© 2003 2. Click Tools >Letters and Mailings>Mail Merge... Inside the Windows© window, a column titled Mail Merge will appear to the right of the document. The Mail Merge column will lead you through six steps. The final step will print the vehicle list onto the stickers. 3. Select document type - Step 1 of 6 a.
Setup 6. Arrange your labels - Step 4 of 6: a. In the Mail Merge column, click More items.... When the Insert Merge Field window opens, select Database Fields, click Insert, and then click Close. b. Click Update all labels. c. At the bottom of the Mail Merge column, under Step 4 of 6, click Next: Preview your labels. 7. Preview your labels - Step 5 of 6: a. If the labels are in order, at the bottom of the Mail Merge column, under Step 5 of 6, click Next: Complete the merge. 8.
Setup 4. Print Stickers of Vehicle Directory (Cont.) To create a mail merge using Microsoft Word© 2007: 1. Open a new document in Microsoft Word© 2007 2. Click Mailing tab>Start Mail Merge>Step by Step Mail Merge Wizard..... Inside the Windows© window, a column titled Mail Merge will appear to the right of the document. The Mail Merge column will lead you through six steps. The final step will print the vehicle list onto the stickers. 3. Select document type - Step 1 of 6 a.
Setup 6. Arrange your labels - Step 4 of 6: a. In the Mail Merge column, click More items.... When the Insert Merge Field window opens, select Database Fields, click Insert, and then click Close. b. Click Update all labels. c. At the bottom of the Mail Merge column, under Step 4 of 6, click Next: Preview your labels. 7. Preview your labels - Step 5 of 6: a. If the labels are in order, at the bottom of the Mail Merge column, under Step 5 of 6, click Next: Complete the merge. 8.
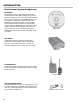
Setup #3 - Field Setup 6. Attach RFID Buttons to Vehicles After mapping the RFID buttons and identifying the vehicle each is mapped to, using the vehicle directory stickers, you can attach the RFID buttons to their respective buttons. When attaching the RFID buttons, find a smooth, flat surface above or the the side of the fuel spout where residual fuel will not be splashed on the button. Carefully clean the area of any dirt, grime, or oils.
Operation FCRead FCRead converts transaction files sent from DMS i1000s into files for use in FCEdit and your back office accounting software application. FleetConnect Read (FCRead) Icon Setting FCRead’s File Format Output FCRead’s output (.csv, .asr, or .xml) is determined by the TransFormat: option in the SysDefs tab (pg. 27) or the Edit Record Validation setting in the Target: field of the FCRead Properties window (pg. 14). Edit501.
Operation FCEdit FCEdit is FleetConnect Office’s user interface. There are seven tabs at the top of FleetConnect Office window. The Database tab in FCEdit provides commands for converting, reading, or writing CSV files, selecting a database, and validating records that have been changed in the field. The remaining tabs at the top of the FleetConnect Office window are interfaces for each FleetConnect database file.
Operation FCEdit - Database Tab Select Database Button Select Database If you setup multiple databases in DB Manager, FCEdit provides a Select Database button in the Database Management tab to allow you to switch from one FleetConnect database to another. Different databases are helpful to keep different customers, sites, or fuelers separated. To setup multiple databases, see the Register Application section in the DB Manager Installation and Setup manual EM200-21.
Operation FCEdit - File Tabs With the exception of the Database tab, all of the tabs in the FCEdit tool are FleetConnect file tabs. File tabs display the records saved to that file. A record is a unit of the file. For example, one record in the customer file represents one customer, and one record in the vehicle file represent one vehicle. Records are displayed in rows, and their fields are designated by columns.
Operation Button Tab The Button tab is FCEdit’s user interface for viewing, creating, editing, or deleting data saved to RFID buttons in FleetConnect’s Button database file. Button ID: The ID of the RFID button. 16 alphanumeric characters maximum. Account: The customer account associated with the RFID button. 12 alphanumeric characters maximum. Vehicle: The vehicle assigned to the RFID button. 12 alphanumeric characters maximum.
Operation Fueler Tab The Fueler tab is FCEdit’s user interface for viewing, creating, editing, or deleting fueler ID information saved in FleetConnect’s Fueler database file. Number: A user-defined number assigned to the fueler. 16 numeric digits maximum. ID: A user-defined ID assigned to the fueler ID. 16 alphanumeric digits maximum. Full Name: The fueler’s full name. 35 alphanumeric characters maximum. First Name: The fueler’s first name. 17 alphanumeric characters maximum.
Operation SysDefs Tab The SysDefs (Systems Definitions) tab is FCEdit’s user interface for viewing, creating, editing, or deleting FleetConnect system settings and information saved in FleetConnect’s SysDefs database file. Ticket Footer 1: The footer comment option 1 for fields printed onto delivery tickets. Thirty five alphanumeric characters maximum. Ticket Footer 2: The footer comment option 2 for fields printed onto delivery tickets. Thirty five alphanumeric characters maximum.
Operation Truck Tab The Truck tab is FCEdit’s user interface for viewing, creating, editing, or deleting fueling truck data saved in FleetConnect’s Truck database file. Unit ID: The unit ID code of the LectroCount register on the truck. 10 alphanumeric characters maximum. The LCR Unit ID field in the Truck File of the FleetConnect database must match the LCR Unit ID field in LCRHost’s General Setup (1/5) screen. See manual EM200-11. Name: The truck’s name. 16 alphanumeric characters maximum.
Operation Vehicle Tab The Vehicle tab is FCEdit’s user interface for viewing, creating, editing, or deleting vehicle data saved in FleetConnect’s Vehicle database file. Each record in the Vehicle file represents a fuelable vehicle or piece of equipment. Account: The customer’s account number. The value can be changed using the drop-down box. List is determined by records in Customer tab. Vehicle: The number of the fuelable vehicle. 12 alphanumeric characters maximum.
Bill of Materials Description Part Number USB Button Reader Adapter 71707 USB Button Reader Cable 71395 EZConnect Button Reader with RFID Button Reader Cable E4363 RFID Button and Mounting Kit (Qty.
Appendix Data Files Overview The first section of the appendix includes examples of ASCII text files (.csv and .txt) and tables describing each field. The text file name and the DMS file name are noted in parantheses. Numeric fields must contain a value. If the field does not have a value, use a “0”. If an alphanumeric fields does not have a value, put nothing between the quotes — “”. Field Types The number in the Field Type column represents the maximum number of characters allowed in the field.
Appendix Data Files Fueler.csv - Fueler File (Fueler.
Appendix Data Files SysDefs.csv - System Definitions File (SysDefs.
Appendix Data Files Truck.csv - Truck File (Truck.slf) “1”,“Tanker2”,“3”,“2” [CR/LF] Field # Field Name Description Field Type Example 1 LCRunitID Unit ID of LCR at node address 1 (Required) A10 1 2 name Name of the truck A16 Tanker2 3 number Operator defined truck number (Required) Integer (0-4294967295) 3 4 network Select 1-meter, 2-meter, 3-meter network (Required) Integer (0-65535) 2 Vehicle.csv - Vehicle File (Vehicle.502) “455”,“45”,“87.88”,“42.27”, “788”,“20.
Appendix Data Files Completed Transactions File (COMP502.TRN - CompTran.txt) Each record in the CompTran.txt file includes the first five field numbers listed in the table. The 5th field signifies the record type. Fields after the 5th field make up one of the 5 record types in the table. The following three records are listed out in the example coumn of the table for reference. "10/09/09 10:33:12","45","1","80","0","0.0","0.
Appendix Data Files Completed Transactions File (COMP502.TRN - CompTran.txt) Field # Field Name Description Field Type Example recordType = 4 (DOT Information) 6 odometer Odometer reading at the time of the DOT inspection. A11 --- 7 engine Yes/No indicating whether or not the engine was checked. A3 --- 8 transmission Yes/No indicating whether or not the transmission was checked. A3 --- 9 clutch Yes/No indicating whether or not the clutch was checked.
Appendix Data Files CompTran.xml - Completed Transactions File yy/mm/dd hh:mm:ss xxxx xxxxxxxxxx xxxxxxxxxxxxxxxx x xxxxxxxx.x xxxxxxxxx.
Appendix Data Files CompTran.xml - Completed Transactions File yy/mm/dd hh:mm:ss xxxx xxxxxxxxxx xxxxxxxxxxxxxxxx x xxxxxxxx.
105 Albrecht Drive Lake Bluff, IL 60044-2242 1.800.458.5262 • 847.295.1050 Fax: 847.295.1057 www.lcmeter.com © 2010 Liquid Controls Pub. No.