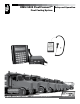
DMS i1000 FleetConnectTM Setup and Operation Fleet Fueling System Liquid Controls Group An IDEX Fluid & Metering Business Operation: EM200-14
Table of Contents Introduction Operation Software License Agreement ................................... 3 DMS i1000 FleetConnect Overview ......................... 4 FleetConnect System Components.......................... 5 FleetConnect System Overview................................ 7 FleetConnect Data Flow .......................................... 10 EZConnect Button Reader....................................... 12 Setup New Vehicles (Button Mapping).....................
Software License Agreement Read this license carefully. You agree that by using the itemized software package, you have agreed to the software license terms and conditions. This agreement constitutes complete and entire agreement between you and Liquid Controls with respect to this product. 1.
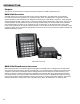
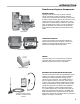
Introduction Purpose The purpose of this document is to explain the setup and operation of DMS i1000 FleetConnect. DMS i1000 Overview The DMS i1000 is an in-cab computer with a heavy-duty lap pad interface. The DMS i1000 connects directly to a LectroCount electronic register that is connected to a flow meter. The DMS i1000 runs application specific software programs, such as FleetConnent, designed for specific types of fuel delivery companies.
Introduction FleetConnect System Components Metering System Typically mounted to the back or side of a delivery vehicle, the metering system accurately measures, controls the flow, and preserves the purity of the product. A Liquid Controls metering system can include the meter, LectroCount electronic register, strainer, ETVC probe (temperature compensation), air eliminator, and control valve.
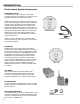
Introduction FleetConnect System Components FleetConnect Office The FleetConnect Office contains four executable programs FCRead.exe, FCEdit.exe, FCLoad.exe and an installation program for the USB button reader. FCEdit is a graphical user interface for office computers where users can manage operational data, validate any changes made in the field (for example adding a new customer), configure print tickets, and change system settings.
Introduction 8
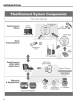
Introduction FleetConnect Fueling System Overview FleetConnect is an in-cab fuel delivery and data collection application for the DMS i1000 that spans from the point of delivery to the office PC. FleetConnect is specially designed for businesses who have or fuel customers with large fleets of vehicles and equipment or fuel their own fleet. Like other Liquid Control’s data management applications, FleetConnect runs in conjunction with flowmeters equipped with the LectroCount electronic registers.
Introduction 10
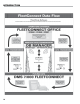
Introduction FleetConnect Data Flow DMS i1000 Applications to Fleetconnect office fleetconnect office to DMS i1000 Applications DMS i1000 FleetConnect Office (Begins at the bottom of the chart on page 10—DMS i1000 FleetConnect—and ends at the middle top of the diagram—FleetConnect Office.) After each delivery, the DMS i1000 compiles the metrological, transaction, customer, driver, and product data into transaction files (.trn).
Introduction EZConnect Button Reader The EZConnect button reader is a handheld device that reads the ID number of uniquely-numbered stainless steel buttons, called RFID buttons, and radios the number of the button back to the DMS i1000. Before delivery, the EZConnect button reader reads the button’s ID number, and a RF transceiver in the button reader radios the ID number to an antenna connected to the DMS i1000.
Setup FleetConnect DMS i1000 Setup Overview There are four steps that must be completed before fuelers can begin fuel delivery with FleetConnect. The first step, Load FleetConnect Database onto the DMS i1000, entails moving data from the office PC to the DMS i1000. The second step, Launch DMS i1000 FleetConnect, includes starting up the DMS i1000 FleetConnect application software.
Setup #1 -Load FleetConnect Database onto the DMS i1000 Liquid Controls recommends using a USB memory device for the initial loading of the FleetConnect database because of the large amount of data to be uploaded. Transmitting a large amount of data wirelessly can be time consuming and, for cellular transmissions, costly. To transfer the latest FleetConnect Office database to the DMS i1000s via USB device: 1. 2. Using the office PC, name a USB memory device DMS_ USB and create a folder named DMS in it.
Setup #2 -Launch DMS i1000 FleetConnect The DMS Application List is the launch point for DMS i1000 FleetConnect software. To open FleetConnect: 1. Press ALT+Esc. 2. Move the pointer to select FleetConnect and press Enter. #3 -Install the FleetConnect Antenna for the EZConnect Button Reader When the EZConnect button reader is attached to a RFID button, a RF transceiver inside the EZConnect transmits the RFID button number to the DMS i1000.
Setup #4 -Set EZConnect Radio Address If you are running more than one DMS i1000 FleetConnect in close proximity to another, the EZConnect button readers will not be able to transmit data on the same radio address without interference. The Set EZConnect Radio Address function can set a unique address where the DMS i1000 unit and the EZConnect can communicate without interference. To change the radio address of an EZConnect device: 1.
Operation Fueler Logon and Logoff The Fueler Logon screen allows operators to logon and logoff the DMS i1000 FleetConnect system. If the previous fueler has logged off, the Fueler Logon screen is the first screen displayed when the DMS i1000 is turned on. If the previous fueler has not logged off, the Fill Vehicles screen is the first screen displayed. To access the Fueler Logon screen from the Fill Vehicles screen, log off the previous fueler using the Miscellaneous Commands screen. See below.
Operation Data Transfer FleetConnect systems transfer data between the DMS i1000 and your office PC via a USB memory device or wirelessly using a cell modem. FleetConnect systems transferring data via USB devices require no additional setup outside of DMS i1000 FleetConnect and FleetConnect Office. Systems using cell modems require additional configuration and Liquid Controls’ DB Manager software. See DB Manager Installation and Setup Manual EM200-21.
Operation Miscellaneous Commands (Fueler Logon) In the Fueler Logon screen, the Misc (F4) opens a Miscellaneous Commands list box that includes access to the Database Management menu, the Reprint Shift Ticket command, two data transfer commands (Retrieve Database Updates and Send Transactions), and the Setup DMS/ EZConnect Link screen.
Operation Fill Vehicles (Fuel Delivery) Fill Vehicles is the lap pad screen from which fuelers can activate fuel deliveries. It appears on the lap pad display immediately after logging on. When the EZConnect reads an RFID button, the button ID, product type, delivery quantities, and account information will appear on in the Fill Vehicles screen. They will remain on the screen until the EZConnect is removed from the button. To make a delivery: 1. Attach the EZConnect button reader onto the RFID button. 2.
Operation Miscellanous Commands (Fill Vehicles) Fill Vehicles Screen The Fill Vehicles screen also has a Miscellaneous Commands menu. Press the Misc (F4) button on lap pad to open the Miscellaneous Commands list box. The Duplicate Ticket command reprints the last delivery ticket. The Print Account Summary command prints a summary of completed deliveries to a specific customer’s account over the course of the current shift. And the Logoff command logs off the current fueler and prints a shift ticket.
Operation Setup New Vehicle The Setup New Vehicle screen allows fuelers to add new vehicles to the FleetConnect database, so that when fuelers encounter a vehicle that doesn’t exist in the FleetConnect database, they can enter it into the FleetConnect database and fuel the vehicle on-the-spot in the field. The fueler will need a RFID button to map in the DMS i1000 and then attach to the new vehicle. It’s a good practice to carry a bag of RFID buttons in the delivery truck so they are on hand.
Operation To map a button for a new customer and a new vehicle that does not exist in the FleetConnect database: 1. 2. Press Misc (F4) in Fill Vehicles screen. Press PgDn (F4) to scroll the Miscellaneous Commands list down to the Setup New Vehicles Command. Home (F1) returns cursor to first space ← (F2) moves cursor back one space 3. Move the pointer to Setup New Vehicles and press Enter. 4. Attach the EZConnect button reader to the RFID button and press the power button.
Operation FleetConnect Database Management FleetConnect’s Database Management is DMS i1000 FleetConnect’s interface for managing customer and operational data in the FleetConnect database. Using field edit and list box windows in one of the seven Database Management files, fuelers can create new files and edit existing files. When the DMS i1000 FleetConnect sends transactions to the office PC, any changes to the database files made by the DMS i1000 will be sent as well.
Operation Button File The Button File allows you to view the account number and vehicle number mapped to a RFID button and to delete a RFID button from the database. Please use the Setup New Vehicles command to add a RFID button and a vehicle. Adding buttons in the Button File is not recommended. ID: (LB) New (F3) creates new Button File record Del (F4) deletes displayed Button File record Exit (F5) opens Database Management (1/2) The ID of the RFID button.
Operation Fueler File The Fueler File allows you to view, create, edit or delete information for all drivers in the FleetConnect database. Fueler records can be created by manually entering a Fueler # or with RFID buttons. Using a RFID button allows fuelers to logon by attaching the EZConnect button reader to a personally designated fueler RFID button. To add a fueler with a RFID button: 1. 2. Attach the EZConnect button reader to a RFID button and press the power button.
Operation Product File (cont.) Product Code: (LB) The product number in the LectroCount register that is calibrated for delivery of a product type. Name: (FE) The product names. 24 alphanumeric characters maximum. LCR Device Address: (FE) New (F3) creates new Product File record Del (F4) deletes displayed Product File record Exit (F5) opens Database Management (1/2) If Product File records exist in the database, choosing Product Code: brings up a list box window of existing records.
Operation System Definitions File Print LCR Header? (LB) LCR Header printed onto delivery tickets. Print Account Header? (LB) Account Header printed onto delivery tickets. Print Vehicle Header? (LB) Vehicle Header printed onto delivery tickets. Print Vehicle Footer? (LB) Vehicle Footer printed onto delivery tickets. Print Account Footer? (LB) Account Footer printed onto delivery tickets. Print LCR Footer? (LB) LCR Footer printed onto delivery tickets.
Operation Truck File The Truck File is used for viewing, creating, editing, or deleting truck ID information, aligning FleetConnect with the LCR Unit ID, selecting the network number used by the truck, and names and numbers of the truck. All fueling trucks will have a unique ID. The Truck Unit ID must match the value in the Unit ID of the LectroCount register on the truck.
Operation Machine Status The Machine Status screens display information regarding system status. There are two Machine Status screens. The Status (F3) key on the Fill Vehicles screen opens the Machine Status (1/2) screen. From the Machine Status (2/2) screen, you can open the Printer Status, Delivery Status, and Delivery Code screens. These screens display the current conditions of the FleetConnect system. These status screens are helpful for troubleshooting and maintenance purposes.
Operation Printer Status The Printer Status screen displays the current print/ticket conditions of the FleetConnect system. It is non-editable. The Printer Status screen is helpful for troubleshooting and maintenance purposes. There are two Printer Status screens. The Printer Status screens are accessible through the Machine Status (2/2) screen.
Operation Delivery Status Delivery Status (2/4) VCF Domain? Display Only Did the temperature of the product go outside the valid range for the compensation type of the product? Meter Calibration? Display Only Did an error occur while setting up the meter calibration for the current delivery? Pulser Failure? Display Only Did the current delivery terminate due to too many pulser faults? Preset Stop? Display Only Was the gross or net preset volume reached? Next (F1) opens Delivery Status screen 3/4 Pr
Operation Delivery Code The Delivery Code screen allows operators to review the operating status of the currently connected device. There are four Delivery Code screens. The Delivery Code screens are accessible through the Machine Status (2/2) screen.
Bill of Materials Description Part Number USB Button Reader Adapter 71707 USB Button Reader Cable 71395 EZConnect Button Reader with RFID Button Reader Cable E4363 RFID Button and Mounting Kit (Qty.
Appendix Ticket Layouts Delivery Ticket Detailed Shift Ticket Load Ticket Summary Shift Ticket Shift Ticket 35
105 Albrecht Drive Lake Bluff, IL 60044-2242 1.800.458.5262 • 847.295.1050 Fax: 847.295.1057 www.lcmeter.com © 2010 Liquid Controls Pub. No.