T���� A���� VD-300WR OWNER'S MANUAL Rev: 04.10.
TABLE OF CONTENTS System 3 3 3 4 5 5 6 7 8 9 9 11 11 12 12 12 12 12 12 13 13 13 13 14 14 15 Safety Information System Specifications System Controls System Wiring Ports System LCD Display Wireless Remote Controls Installation Speaker Wiring Harness Operation Remote Touch Audio Radio Mode Weather Band Programming TV System Power Resume Auto Play TV Type Rating Default Language Setup Audio Setup Video Setup Speaker Setup Troubleshooting Rev: 04.10.
System Safety Information The “WARNING” symbol above is a sign that a service or maintenance procedure has a safety risk involved and may cause death or serious injury if not performed safely and within the parameters set forth in this manual. Always wear eye protection when performing service or maintenance to the vehicle. Other safety equipment to consider would be hearing protection, gloves and possibly a full face shield, depending on the nature of the service.
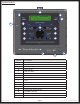
System Controls Fig. 1 G A I J C B D H K e L F M N Callout A B C D E F G H I J K L M N O P Rev: 04.10.
System Wiring Ports Fig. 2 e C B D F A Callout Description A Wiring Harness Port B Automotive Antenna Port (AM/FM/WB) C Wired Remote Port D Auxiliary IN (R) TV Audio Input E Auxiliary IN (L) TV Audio Input F CVBS (3 Video Output) NOTe: The wired remote with a 20ft cable is optional and plugs into Fig. 2C. System LCD Display A G H I J Fig. 3 Q P S T U B C V D O e F Callout A B C D E F G H I J K L Rev: 04.10.
Wireless Remote Controls A e I M Q U Y CC Callout A B C D E F G H I J K L M N O P Rev: 04.10.2014 B Fig.
Installation Fig. 5 7.2" 7.67 7.08" 2.16 " 5.9" 2.16 " " 8.86 " 5.86" Accessories included: • Wireless Remote • FM Antenna (Pig Tail) • RCA Cable (Video) • Batteries (x2) • Mounting Screws (x6) • Wiring Harness (DC Power and Speakers) • DC Power Extension (Red and Black Wires) Mounting the Touch Audio: 1. Remove the screw covers. 2. Connect all wires and test the radio. Connecting the speakers wrong will cause distortion and damage the power amplifier. 3.
Rev: 04.10.2014 Red A-Right (+) Yellow B-Right (-) Violet A-Left (-) Blue B-Left (+) Pink C-Right (-) Green B-Left (-) Page 8 Power 12VBlack Ground Power 12V+ Red +12V 15A Fuse Power In Red #16 AWG Power 12V (+) Yellow/Green A-Left (+) Grey B-Right (+) White C-Left (+) Brown C-Right (+) Power In Black #16 AWG Power 12V (-) Black A-Right (-) Orange C-Left (-) Speaker Wiring Harness NOTe: Wrong connection or reversed polarity (+/-) can cause distortion and damage the power amplifier.
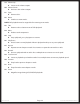
Operation Remote 1. Power A. Select power on or standby. 2. Setup A. The setup screen will appear for Touch Audio settings. Note: If pressed during DVD playback it will take you to the setup menu and auto pause the DVD. 3. Program A. Saves the desired program. 4. Mode A. Cycles through WB, auxiliary, radio and disc playback. 5. Band/Function A. Cycle through radio modes including; FM, AM, Tuner and auxiliary. 6. Language Select A.
19. Volume Up A. Increases the volume output. 20. Volume Down A. Decreases the volume output. 21. Eject A. Removes disc. 22. Menu A. Switches to menu mode. Note: DVD playback must be stopped before entering menu mode. 23. Title A. Returns to the selection menu of DVD playback. 24. Mute A. Reduces audio output to 0. 25. Stop A. Stops playback , press play/pause to resume. 26. Play/Pause A. Enters/returns normal playback. When in playback mode press to pause playback. 27. Repeat A.
Touch Audio 1. When radio is in stand-by mode, touch any button and the panel will light temporarily. 2. Press power to turn the unit on. 3. Touch mode to cycle through auxiliary, radio and disk playback. A. To use USB or SD, unit must be on disk playback mode, then press USB/SD. B. To switch between AM and FM, unit must be on radio mode, then press band to cycle. I. II. Press preset to view the stations saved on the unit. a.
Weather Band Once in weather band mode: 1. Press fast forward/rewind on the Touch Audio or up/down on the remote to cycle through the channels in your state. To set weather alarm: 1. Set the weather band to the local weather frequency. 2. Turn radio off. Note: When the radio is off the weather band will display on the LCD. When there is a weather alert the alarm will go off and the light and radio will turn on to the weather band's frequency. To turn off weather alarm: Note: Radio must be on. 1.
Rating The rating setting will limit the disks that are playable by the rating set by the user. The rating varies from "Kid Safe" to "Adult". The default setting is "View All" which nullifies the rating limit. Note: If the password option is locked, you cannot set the ratings limit; the rating limit does not work when the password option is unlocked. Default Choose this option to return all setup options to factory settings. Language Setup 1. On screen display language setup: A.
Video Setup 1. Brightness setup: A. Highlight the Brightness option and press enter on the remote. B. Use the up/down arrows on the remote to designate the brightness level desired. C. 2. Press enter on the remote to select the brightness level designated. Contrast setup: A. Highlight the Contrast option and press enter on the remote. B. Use the up/down arrows on the remote to designate the contrast level desired. C. 3. Press enter on the remote to select the contrast level designated. Hue setup: A.
Troubleshooting Problem Probable Cause Unit frozen/ Touch pad does not System overloaded respond Loose connection No sound No picture Setup does not support audio mode or speaker channel selected Unit in incorrect mode Loose connection Malfunctioning TV Disk does not play Wireless remote does not work Rev: 04.10.
All information contained within may be distributed as a full document only, unless otherwise permitted by explicit consent of Lippert Components Inc. to distribute individual parts. All information contained within is subject to change without notice. New editions will be posted on www.lci1. com and can be downloaded for free. Information contained within is considered factual until made obsolete by a *NEW* revision. Please recycle all obsolete materials.