S�����® S����� INSTALLATION MANUAL Rev: 09.05.
TABLE OF CONTENTS System and Safety Information 2 2 2 3 3 3 3 System Information Safety Information Prior to Installation Tools Required: Additional Resources Required Installation System and Safety Information System Information Solera Sliders are a high-quality, cost-effective way to help keep slide-outs free of dirt, leaves and debris. Solera Sliders permanently attach to the slide-out and retract/extend with the room.
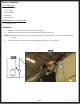
Prior to Installation Tools Required: • Electric screw gun • 5/16" socket • Square drill bit • Butyl tape • Tape measure Additional Resources Required • One extra person Installation 1. Apply butyl tape to the flat side of the cord rail (Fig. 1A). 2. Place the cord rail parallel to, and centered above, the slide-out (Fig. 2). NOTE: Cord rail should be a few inches higher than the fascia so that it creates a pitch for water and debris to run off. 3.
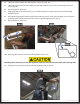
. Slide hex rod into roll bar arm and align the screw holes (Fig. 3A). 5. Slide end cap into other end of roll bar arm and align all three screw holes. Fasten using a pan head screw (Fig. 3B). 6. Repeat Step 5 for other side. 7. Apply butyl tape to bracket screw holes so that the butyl tape is against the coach when mounting bracket (Fig. 5A). 8. Place bracket against the bottom of the fascia at the top corner of the slide-out. Make sure to keep the bracket parallel with the cord rail/fascia.
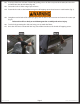
12. Feed one of the hex rods into a bracket. By pulling a hex rod all the way into the bracket, the other hex rod will fit into the other bracket (Fig. 6A). 13. Center the Solera® Slider using a tape measure. 14. Fasten the hex rods to the brackets using two self-tapping square head screws in each bracket (Fig. 7). 15. Straighten out the back of the cotter pin, grasp the roll bar to relieve tension and remove the cotter pin (Fig. 8).
The contents of this manual are proprietary and copyright protected by Lippert Components, Inc. (“LCI”). LCI prohibits the copying or dissemination of portions of this manual unless prior written consent from an authorized LCI representative has been provided. Any unauthorized use shall void any applicable warranty. The information contained in this manual is subject to change without notice and at the sole discretion of LCI. Revised editions are available for free download from www.lci1.com.