Solera® Power Awning with LED Lights INSTALL MANUAL Rev: 12.23.
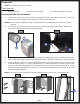
Preparation Note: This installation requires 3 people. Tools Required - Electric screw gun - #2 Square screwdriver bit - 3/8” nut driver bit and/or rivet gun Awning with LED Tube Installation 1. Insert drive head pin (Fig. 1A) into cap (Fig. 1B). Align holes and secure with waxed screw. Insert screw fully, but do not over-tighten. Repeat process for idler head at other end. Note: Be sure to align LED light wires (Fig. 2A) coming from idler head with the LED Light on roll tube (Fig. 2B). 2.
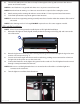
5. Take the LED tube power wire that is already fed through the idler leg and connect to the desired power wire from the coach. Note: Be sure black wire is to ground and white wire is to power source from coach. Note: Extend and retract awning 1 or 2 times to ensure that it is square before setting the screws. 6. Attach awning cord to awning rail with two screws #6-20 x 1/2" Hex to prevent lateral movement. 7. Seal all wall penetrations to protect against water intrusion.
The contents of this manual are proprietary and copyright protected by Lippert Components, Inc. (“LCI”). LCI prohibits the copying or dissemination of portions of this manual unless prior written consent from an authorized LCI representative has been provided. Any unauthorized use shall void any applicable warranty. The information contained in this manual is subject to change without notice and at the sole discretion of LCI. Revised editions are available for free download from www.lci1.com.