ELECTRIC SLIDEOUT SYSTEM OPERATION AND SERVICE MANUAL revB
TABLE OF CONTENTS SYSTEM……………………………………………........….…..3 Warning…………………………………........……....3 Description………………………………........……..3 Prior to Operation…………………….......……… 4 Preventative Maintenance……….......………..4 OPERATION…………………………………........……………5 Warning....................................................5 Extending Slideout Room….......…………. 5 Retracting Slideout Room…….......……... 5 Manual Operation……………….......………. 6 SERVICE…………………………..………………........………9 Adjustment Instructions……….......…………..
SYSTEM WARNING FAILURE TO ACT IN ACCORDANCE WITH THE FOLLOWING MAY RESULT IN SERIOUS PERSONAL INJURY OR DEATH. The Lippert Electric Slideout System is intended for the sole purpose of extending and retracting the slideout room. Its function should not be used for any other purpose or reason than to actuate the slideout room. To use the system for any reason other than what it is designed for may result in damage to the coach and/or cause serious injury or even death.
PRIOR TO OPERATION Prior to operating the Lippert Electric Slideout System, follow these guidelines: 1. Coach should be parked on the most level surface available. 2. Leveling or stabilizing system should be actuated to ensure coach will not move during operation of Slideout System. 3. Be sure battery is fully charged. 4. Be sure to keep all persons and pets clear of Slideout System during operation.
OPERATION WARNING FAILURE TO ACT IN ACCORDANCE WITH THE FOLLOWING MAY RESULT IN SERIOUS PERSONAL INJURY OR DEATH. ALWAYS MAKE SURE THAT THE SLIDEOUT ROOM PATH IS CLEAR OF PEOPLE AND OBJECTS BEFORE AND DURING OPERATION OF THE SLIDEOUT ROOM. ALWAYS KEEP AWAY FROM THE SLIDE RAILS WHEN THE ROOM IS BEING OPERATED. THE GEAR ASSEMBLY MAY PINCH OR CATCH ON LOOSE CLOTHING CAUSING PERSONAL INJURY. INSTALL TRANSIT BARS (IF SO EQUIPPED) ON THE SLIDEOUT ROOM DURING STORAGE AND TRANSPORTATION. EXTENDING SLIDEOUT ROOM 1.
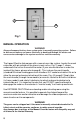
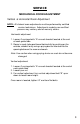
C B Fig.1 MANUAL OPERATION WARNING! Always disconnect battery from system prior to manually operating system. Failure to disconnect battery can cause electricity to backfeed through the motor and cause serious damage to the system as well as void the warranty. The Lippert Electric slide comes with a manual over ride system. Locate the crank extension with pin outside of the chassis main rail as, Fig.
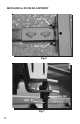
MANUAL OPERATION - THROUGH FRAME Through Frame Crank Extension w/ pin Fig. 2 Crank Handle Fig.
MANUAL OPERATION - IN FRAME Motor Hex Head Crank Extension Fig.4 Ratchet Fig.
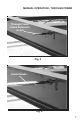
SERVICE MECHANICAL ROOM ADJUSTMENT Vertical & Horizontal Room Adjustment NOTE: All slideout room adjustments must be performed by certified service technicians. Adjustments made by non-certified persons may void any and all warranty claims. Horizontal adjustment 1. Loosen 2 carriage bolts “A” on each bracket located at the end of each guide tube. 2.
MECHANICAL ROOM ADJUSTMENT Bolt “A” Bolt “A” Fig.6 Jam Nut Bolt “B” Fig.
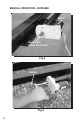
MECHANICAL ROOM ADJUSTMENT-CONT. Fig.8 Stop Can Jam Nut-1 Jam Nut-2 Nylock Nut Adjusting room so it seals in the IN position 1. Locate actuator coming through the frame 2. On the end of the actuator there is a threaded shaft mounted to the drive bracket with 3 nuts and a stop can. 3. Loosen the ¾” nut (Jam Nut-1) on the outside of the stop can. 4. Screw the can out or in, and then tighten down the nut – this will change the location of your seal going to the “in position”.
SYNCHRONIZING ROOM TRAVEL Fig.9 A B The Lippert Electric Slideout System room travel (both sides of the room traveling the same distance) can be adjusted with specially designed synchronizing bracket mounted on the passive slide tube. The passive slide tube is the one that is not powered. The active slide tube is the one that has the cylinder attached. If one side of the room fails to seal adjust as follows: 1. Loosen bolts (Fig. 9 A) on top of the passive slide tube (Fig. 9B) 2.
REMOVING AND REPLACING ACTUATOR To replace actuator: 1. 2. 3. 4. 5. 6. Disconnect manual crank shaft from end of motor assembly (Fig. A). Disconnect motor wires from source. (Fig. A). Take measurements A and B (Fig. B). Remove all jam nuts (3 total) and stop can from threaded shaft on actuator (Fig. B) Take note of mounting bolt locations and remove mounting bolts (Fig. C). After everything is disconnected, slide actuator out of frame. To replace with new actuator, follow previous directions in reverse.
TROUBLESHOOTING The Lippert Electric Slideout System is only one of four interrelated slideout room system components. These four components are: chassis, room, coach, and Lippert Electric Slideout System. Each one needs to function correctly with the others or misalignment problems will occur. Every travel trailer has its own personality and what may work to fix one trailer may not work on another even if the symptoms appear to be the same.
System Troubleshooting Chart The following troubleshooting chart outlines some common problems, their causes and possible corrective actions. When reference is made to “Power Unit” it is referring to the motor and actuator as a complete assembly. All Power Units are shipped from the factory with a serial number and date code, which should be given to the service technician when asking for assistance.
TROUBLESHOOTING – MOTOR Before attempting to troubleshoot the Motor, make sure an adequate power source is available. The unit batteries should be fully charged or the unit should be plugged into to A/C service with batteries installed. Do not attempt to troubleshoot the Motor without assuring a full 12V DC charge The following tests require only a DC voltmeter (or DC test light) and a jumper lead.
- MOTOR BLACK RED 10 GAUGE WIRE MINIMUM MOTOR MOTOR OUT IN BATTERY (-) WHITE BATTERY (+) BLACK BATTERY (-) WHITE Fig. 10 RED GREEN SWITCH CAUTION! HIGH VOLTAGE Fig.
ORDERING PARTS To assist the customer service when ordering parts, please provide the following information: 1. Your Name 2. Company Name 3. Phone Number 4. Shipping Address 5. Billing Address 6. Purchase Order Number 7. Coach A. Serial # and/or VIN # B. Make C. Model 8. Part Number 9. Description 10. Quantity Please take your coach to an authorized service center for repairs.