
User Guide
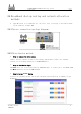
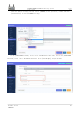
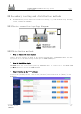
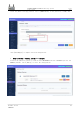
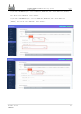
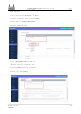
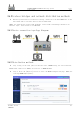
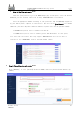
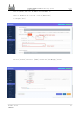
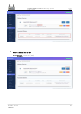
Table Of Contents
- Copyright © Personal Hobby
- Article Notes
- Legal notice
- The various types of software mentioned in the text are not developed by the author and come from the open source hardware community.
- The author only describes in this article the wired router, wireless router and wireless bridge setup tutorials that comply with national network security, and the Rexchip chip burn-in method.
- The author strongly advocates the maintenance of national cyber security and national information security.
- Bleeping
- 1 Hinlink-H68K Routing Basics
- 2 Hinlink-H68K router out of the box
- 3 Firmware upgrades
- The firmware is from a third party open source community and is not related to the author, this section is only intended as a burn-in tutorial for the RK Rexchip.
- 3.1 Tool preparation for card brushing
- 3.2 TF card swipe operation procedure
- 3.3 Tool preparation for eMMC wire brush
- 3.4 eMMC wire brush operation procedure
- 3.5 Android/Ubuntu Firmware Upgrade
- 4 About power supply and cooling
- 4.1 DC12V adapter option
- 4.2 USB adapter options
- 1 When your device is powered by TYPC and there is instability such as power loss and reboot, please use the DC12V adapter.
- 2 When using a fast charger adapter, a non-standard adapter may output 9 V. The white power light on the H68K will flash and the unit will not power up properly. The H68K will be burned out if you disconnect it as soon as possible and use a standard a...
- 3 H68K Deploy away from heat sources, sources of electromagnetic interference and radiation, and electromagnetic radiation sensitive equipment.
- 4 The TYPC-C wire should be as short and thick as possible to reduce the voltage drop across the 5V voltage, which can lead to unstable operation.

LinkStar-H68K-C D F Model Routing - Quick
Start Guide
Full
text
Document version
20220901
11
2.5
Secondary routing and distribution methods
⚫
Recommended for private LANs with second level routing, e.g. home bedroom study, building
rental, C D F (F with WIFI).
2.5.1
Device connection topology diagram
2.5.2
Distribution methods
●
Step 1: Connect the wire sequence
Connect the wire sequence as shown in the topology diagram above. Connect the LAN of the dial-
up optical cat or the main routing network port to ETH0 (WAN port).
●
Step 2: Back Office Login
The H68K waits for a successful power-up, the PC PC cable is connected to the ETH1 (LAN
port) and the H68K is wired to access the H68K backend.
● Step 3: Setting up the DHCP protocol
Click on the [Network] button, click on the [Interface] button and click on [Modify] at the
WAN port
Translator: GitHub@IcingTomato