LinkStar-H68K C/D/F Series Quick Start Guide Document version 20220901 Release Date 2022.09.
LinkStar-H68K-C D F Model Routing Preface Quick Start Guide Preface ÿ ÿÿÿ ÿ ÿ ÿÿ ÿ ÿ ÿÿ ÿÿ ÿÿ ÿÿ ÿ ÿÿ ÿ ÿÿ ÿ ÿ ÿ ÿ ÿ Model versions From official web material, the H68K-C D F model routing parameters are as follows Target Audience This document (this guide) is primarily intended for people who ⚫ Beginner, Intermediate, Advanced Players Document version 20220901 Copyright © Seeed Studio Translator: GitHub@IcingTomato i
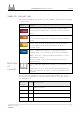
LinkStar-H68K-C D F Model Routing Prefa ce Quick Start Guide Symbolic Conventions The following symbols may appear in this document and what they represent is given below. Symbols Versions Used to warn of an urgent and dangerous situation which, if not avoided, would result in death or serious personal injury. Used to warn of potentially dangerous situations which, if not avoided, could result in death or serious personal injury.
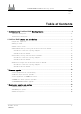
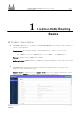
LinkStar-H68K-C D F Model Routing - Quick Start Guide Table of Conte nts Table of Contents 1 Introduction to LinkStar-H68K Routing Basics .................................................................... 2 1.1 Product description ..................................................................................................................................... 2 1.2 Interface description ...................................................................................................................
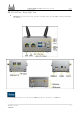
LinkStar-H68K-C D F Model Routing - Quick Start Guide 1 Full text LinkStar-H68K Routing Basics 1.1 Product description ⚫ The H68K-C D F router is equipped with Rexchip's RK3568 metal package chip, enabling a wealth of peripherals. Transmission: Dual Gigabit Ethernet, dual 2.5G Ethernet, where the F version has WIFI6 in wireless WIFI-AX mode, o n e USB3.0, two USB2.0 ports. Storage: Supports one way TYPC native SATA. Audio and video: HDMI 2.0 output, 3.
LinkStar-H68K-C D F Model Routing - Quick Start Guide Full text 1.2 Interface description ⚫ The H68K-F interface has only two more antennas than the C D. The following highlights the F model. 1 The TYPE-C interface is the native SATA hard drive interface in OP mode.
LinkStar-H68K-C D F Model Routing - Quick Start Guide Full text 2.2 Plug-in check ⚫ Step 1: Insert the TF card with firmware into the TF card slot on the side ⚫ Step 2: Plug the 12V adapter into the power supply, the H68K will power itself on and finish powering on ◼ Step 3: Observe the blinking of the No. 1 indicator light. If it stops blinking after about 20S of rapid blinking (stays on), the OP is on normally. If it is blinking otherwise, it is Android mode etc.
Full LinkStar-H68K-C D F Model Routing - Quick text Start Guide abnormally, there will be no light flashing on the power on and the OP will not start up, you need to change the card. The TF card s e n t b y default is supported. ⚫ Step 5: Press and hold the protruding illuminated power button and after approximately 5S, you can observe that the No. 1 light goes out and the power button light goes out. The hibernation shutdown is complete.
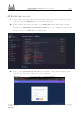
LinkStar-H68K-C D F Model Routing - Quick Start Guide Full text 2.3 Backstage access ⚫ Step 1: Insert the card, power on and self-start, wait until the No. 1 indicator light turns on, then the H68K OP mode is successfully powered on. ◼ Step 2: Connect one end of the cable to the H68K ETH1 and the other end to the PC network port; H68K ETH0 is the WAN port and ETH1 2 3 i s t h e LAN port. The PC PC needs to be set to DHCP mode (as shown below). ◼ Step 3: Type 192.168.100.
LinkStar-H68K-C D F Model Routing - Quick Start Guide Document version 20220901 Translator: GitHub@IcingTomato Full text 8
LinkStar-H68K-C D F Model Routing - Quick Start Guide Full text 2.4 Broadband dial-up routing and network allocation methods ● The C D version is recommended for the first level of routing to the home network, in the weak box, without WIFI. 2.4.1 Device connection topology diagram 2.4.2 Distribution methods ● Step 1: Connect the wire sequence Connect the wire sequence as shown in the topology diagram above. Connect the incoming optical cat or incoming network port to ETH0 (WAN port).
Full LinkStar-H68K-C D F Model Routing - Quick text Start Guide Click the [Basic Settings] button, select [PPPOE] in the [Protocol] column, and click [Switch Protocol] to enter the PPPOE settings. In the [PAP/CHAP Username] field, enter: Broadband Account Name, and in the [PAP/CHAP Password] field, enter: Broadband Password. Click [Hold & Apply], and you are done.
LinkStar-H68K-C D F Model Routing - Quick Start Guide Full text 2.5 Secondary routing and distribution methods ⚫ Recommended for private LANs with second level routing, e.g. home bedroom study, building rental, C D F (F with WIFI). 2.5.1 Device connection topology diagram 2.5.2 Distribution methods ● Step 1: Connect the wire sequence Connect the wire sequence as shown in the topology diagram above. Connect the LAN of the dialup optical cat or the main routing network port to ETH0 (WAN port).
Full LinkStar-H68K-C D F Model Routing - Quick text Start Guide Click the [Basic Settings] button, select [DHCP Client] in the [Protocol] column, and click [Hold & Apply] to complete the wired configuration. ● Step 4: For the F version, set the WIFI hotspot Click on the [Wireless] button to find out that the H68K-F will have a WIFI hotspot for the H68K by default. Click [Modify] to enter the configuration.
Full LinkStar-H68K-C D F Model Routing - Quick text Start Guide If you need a 5G WIFI hotspot: select 5GHz for [Bandwidth] and a fixed channel for [Channel]. Note: Do not select auto mode. Other default. If you need a 2.4G WIFI hotspot: select 2.4GHz for [Bandwidth] and a fixed channel for [Channel]. Note: Do not select auto mode. Other default.
LinkStar-H68K-C D F Model Routing - Quick Start Guide Full text Drop down page Select [Access Point AP]in[Mode] of [Basic Settings]. Configure your preferred WIFI hotspot name at [ESSID]. Select [lan] at [Network]. Finally tap [Save]. Select [WPA2-PSK]for[Encryption] in [Wireless Security]. Configure your preferred WIFI password at [Password]. Finally, tap [Save & Apply].
LinkStar-H68K-C D F Model Routing - Quick Start Guide Full text 2.6 Wireless bridges and network distribution methods ⚫ Wireless private LAN for second level routing, connected to the main WIFI route in the hotel home and to electronic devices such as mobile PCs WIFI, for applications such as home bedrooms, rented rooms in buildings and hotels on business trips, the F version is recommended. 2.6.1 Device connection topology diagram 2.6.
⚫ LinkStar-H68K-C D F Model Routing - Quick Start Guide Step 3: Find the main route WIFI Full text Click the [Scan] button to go to the WIFI Hotspot page in Scan Space, select the desired WIFI and join the network. There will be many WIFI SSID names listed below. Select the appropriate channel according to your preference and the WIFI mode supported by your mobile phone, computer or other device.
LinkStar-H68K-C D F Model Routing - Quick Start Guide Click on [Channel] and select the same as the main WIFI, no Full text other or AUTO can be selected. click on [Radio Power] to configure [Auto]. Click on [Network] and select [wwan]. Click on the [Save & Apply] button.
LinkStar-H68K-C D F Model Routing - Quick Start Guide ⚫ Full text Step 5: Add and set up the H68K hotspot.
LinkStar-H68K-C D F Model Routing - Quick Start Guide In the following [Basic Settings], Full text configure the following: click on [Radio Power] to configure [Auto] Click [Mode] to configure [Access Point AP] Click [ESSID] to configure [H68K_Test], enter the name you like as the name of the WIFI hotspot radiating from the H68K Click [Network Configuration] to configure [lan] Click [Save].
LinkStar-H68K-C D F Model Routing - Quick Start Guide In the following [Wireless Full text Security], configure as follows: click [Encryption] to configure [WPA2-PSK] Click on [Password] to configure [Password], a password of your choice, the phone computer wireless access WIFI need to enter the password click [Save & Apply] Document version 20220901 Translator: GitHub@IcingTomato 20
LinkStar-H68K-C D F Model Routing - Quick Start Guide 3 Full text Firm w are upgrades The firmware is from a third party open source community and is not related to the author, this section is only intended as a burn-in tutorial for the RK Rexchip. TF card boot principle ◼ TF boot principle: During the RK3568 boot seek loading process, the TF card has a higher priority than the eMMC, making the device l o a d t h e TF card firmware first.
LinkStar-H68K-C D F Model Routing - Quick Start Guide Full text 3.1 Tool preparation for card brushing ⚫ 1 Hardware tool: a computer PC ⚫ 2 Hardware tools: a TF card reader (not necessary if the computer has a TF card socket).
⚫ LinkStar-H68K-C D F Model Routing - Quick Start Guide Step 2: Firmware write card Full text Insert the [Card Reader + TF Card] into the PC PC, when the PC PC recognizes the TF card, the [Disk Character X] will pop up. Select the corresponding disk character [Disk Character X]at the [Device] button in the [Win32DiskImager] tool. Select the firmware package [OPxxx.img]at the [ ] button in the [Win32DiskImager] tool. Click the [Write] button in the [Win32DiskImager] tool to download it.
LinkStar-H68K-C D F Model Routing - Quick Start Guide Full text 3.3 Tool preparation for eMMC wire brush ⚫ 1 Hardware tool: a computer PC ⚫ 2 Hardware tool: one TYPC-C data cable (with data signal cable inside) ⚫ 3 Hardware: one card picker thimble (pin for inserting cards in mobile phones, used to poke holes) ⚫ 4 Software tool: RK chip driver tool [DriverAssitant_v5.12]. ⚫ 5 Software tool: RK firmware burning tool [RKDevTool_Release_v2.84 - for downloading OP firmware].
⚫ LinkStar-H68K-C D F Model Routing - Quick Start Guide Step 2: Erase the firmware Full text Double click [RKDevTool] in the [RKDevTool_Release_v2.84 - for downloading OP firmware] folder Click the [Upgrade Firmware] button Click on the [Firmware] button and select [H68K-Android-Firmware-0828-for-Erasing-Flash.img].
LinkStar-H68K-C D F Model Routing - Quick Start Guide ⚫ Full text Step 3: Upgrade the firmware by clicking [Download Image]. C l i c k on t h e Boot bar [...], the folder will pop up, select [H68K-Boot-Loader.bin] C l i c k o n the system bar [...], the folder will pop up, select [OPxxx.img].
LinkStar-H68K-C D F Model Routing - Quick Start Guide Full text 3.5 Android/Ubuntu Firmware Upgrade ⚫ Step 1: Same as in the previous section "Preparing the eMMC wire brush with tools". ⚫ Step 2: Erase the firmware Double click [RKDevTool] in the [RKDevTool_Release_v2.84 - for downloading OP firmware] folder Click the [Upgrade Firmware] button Click on the [Firmware] button and select [H68K-Android-Firmware-0828-for-Erasing-Flash.img].
LinkStar-H68K-C D F Model Routing - Quick Start Guide Plug one end of the [TYPC-C cable] into your computer USB Full text Insert the [card picker thimble] into the H68K [spanner hole], press the upgrade button inside the [spanner hole], there is a feeling of the button springing back the other end of the [TYPC-C data cable] into the H68K [TYPC-C connector] Keep the button pressed during power-up The download tool will bring up [Found a MASKROM device]. and wait for it to finish erasing.
LinkStar-H68K-C D F Model Routing - Quick Start Guide 4 Full text About pow er supply and cooling 4.1 DC12V adapter option ⚫ Power DC connector specification: 5.5mm outer diameter / 2.1mm inner diameter. ⚫ No external hard drive scenario: select 12V@1A adapter. ⚫ With external hard drive scenario: select 12V@2A adapter.
⚫ LinkStar-H68K-C D F Model Routing - Quick Start Guide The maximum input voltage of the H68K DC interface must not exceed 15V. Full text ⚫ H68K Deploy away from heat sources, sources of electromagnetic interference and radiation, and electromagnetic radiation sensitive equipment. ⚫ You can tell if the 12V is powered by the white light on the power button, the light is on for power and the light is not on for no power to the adapter.
LinkStar-H68K-C D F Model Routing - Quick Start Guide Full text 4.2 USB adapter options ⚫ For portable travel, the H68K supports USB adapter power, but does not support fast charging mode. ⚫ The USB adapter must meet: voltage 5V, current ≥ 2A. ⚫ TYPC-C cable Must meet: fast charging cable, cable length <1 m. 1 When your device is p o w e r e d b y TYPC and there is instability such as power loss and reboot, please use t h e DC12V adapter.