User Guide Thanks, Dear user, Thank you for purchasing the product of our company. This is an operation guide for users, in order to guarantee the fast and convenient use, please read the instructions carefully.
Contents 1 2 3 4 5 6 7 8 9 10 11 12 13 14 15 16 17 Notes Power on and Power off Desktop Key Main Menu System Settings Date & Time Settings Screen Brightness Apps Networks Play Music Play Video Browse Image Wallpapers Take Photo Battery External Device
Notes: ﹡ The product is high precision electronic product. Please do not disassembly by yourself. ﹡Avoid fiercely beating, colliding the product. ﹡Avoid using the product in the following environment: High and low temperature, moist, dustiness, powerful magnetic field and exposed under sunshine for long time. ﹡Please use the wringed wet cotton cloth to wipe the shell of the product light, other chemical solution is forbidden to use for washing.
﹡ For the memory loss generated because of product damage, maintenance or other reasons, the company accepts no responsibilities. Please operate normatively according to instruction manual and back up in time.
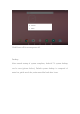
Power on and Power off: ﹡Power on: Press and hold power key, the system enters startup process, as shown below: Boot Logo in startup process… ﹡Power off: Press and hold power key, device option pops up, select power off, as shown below:
Click Power off for secure power off. Desktop: After normal startup of system completes, Android 7.0 system desktop can be seen (picture below). Default system desktop is composed of status bar, quick search bar, main menu label and other icons.
Status bar is used to display the network status, battery capacity, time and other information of current system. Fast search bar is used for network search through typing key words. Main menu label is in the middle of lower part of screen, click to expand the default main menu bar. Shortcut icon of browser is in the right of lower part of screen. Key: Keys required in the process of using Android system: Volume key: Volume +, Volume – in task bar realize the volume up and down.
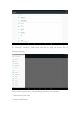
Home key: Return to or select main interface. Return key: Return to previous interface. Main Menu Operation: Click main menu label in main surface, as shown below: In main menu, system settings, operation of existing apps, installation of new apps, browse file, play music, play video, browse webpage and other operations can be processed.
In “Settings” interface, slide from left end to right on screen, list of settings pops up; Select related option for corresponding operation, for example: *Wireless & Networks: * Sound and Display
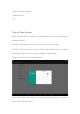
* Date and Time Settings * About Device etc. *Date & Time Settings: Select “Date & Time Settings” in settings interface to enter date and time settings interface: Automatic date & time can also be selected: Use network time. Set date, Select time zone, Set time, Time format, Date format and other information can also be selected according to requirements. Such as select Set date, as shown below: Cancel Automatic date & time to set required date & time by yourself, select OK.
Select “Settings”. Scroll to select morning or afternoon. Click “hour” to set hour, click “minute” to set minute.
* WIFI wireless connection: Click “Settings” icon in main menu to enter “System Settings” interface, click “WLAN” to enter “Wireless & Networks” settings interface, as shown below;
*HDMI The product supports HDMI output. * Use HDMI connecting line, connect MID and device with HDMI input interface. System changes to HDMI output after about 5 seconds, HDMI can output sound and image automatically. After using HDMI output, content displayed in LCD can zoom and output to external device. Apps 1 Enter menu, select “Settings”---“Apps” Click app to install or uninstall.
2 After clicking, following picture appears: 3 In “Apps”---“Configure apps”, set permission required for apps: Click permission required for apps for related settings, as shown below:
Set permission of application in corresponding permission option, as shown below:
Networks: Browse Webpage: After connecting network, open web browser and input website, browse webpage rapidly; or input website through search bar in main desktop, open website. Play Music: Click “Music” icon in main menu, enter music playing interface. Here all default audio files of user data area in system are listed.
We can introduce audio files through method of USB synchronization, or through inserting SD card with audio files to get audio files, or we can download audio files through network. Select corresponding label option, check “musician”, “album”, “song” and other interfaces. Select song to play. Play Video: Click “Video Player” in main menu, enter main interface of “Video Player”, all video files and picture files are listed here.
Select video file, enter interface of video playing, as shown below. Select “Play”, “pause”, “skid forward”, “skid back”, “progress bar” and other control keys to control the progress of playing. Browse Image: Click “Gallery” in main menu, enter main interface of “Gallery”, all image files and video files are listed here.
Wallpaper: System supports wallpaper of static image and 3D wallpaper. Press and hold screen in desk interface, following dialog box pops up: Select “Wallpapers”: Use wallpapers in system or customize images as wallpapers.
Select “My Image”: Select customized image as static wallpaper. Click “Wallpapers” settings, select wallpapers, and click Set wallpaper to confirm the settings at last. Click “Set wallpaper”, wallpaper can be applied to “Home screen”, “Lock screen”, “Home screen and lock screen”. Take Photo: Click “Camera” icon in main menu to enter main interface of “Camera”.
Battery: Select “Battery” in settings interface to enter battery settings interface, “Battery saver” option is in the top of screen; Battery saver turns on automatically when battery capacity is lower than
15%, user can also turn on it manually any time, as the interface shown below: External Device: *USB connection Use USB to connect MID and PC, default connecting method is “charging this device”, drag status bar and pull down, and following interface appears:
Select “Transfer files” manually. After loading, corresponding drive can be seen on PC end.
The pictures herein are for reference only, in case of any difference in the appearance and functions, the actual product shall prevail. Product rules and design are subject to change without prior notice.
FCC Notice This device complies with Part 15 of the FCC Rules. Operation is subject to the following two conditions: (1) This device may not cause harmful interference, and (2) this device must accept any interference received, including interference that may cause undesired operation. NOTE 1: This equipment has been tested and found to comply with the limits for a Class B digital device, pursuant to part 15 of the FCC Rules.