
User's Manual
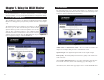
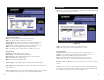
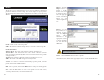
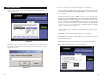
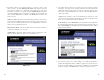
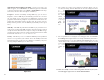
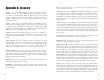
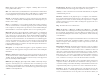
Table Of Contents
- Regulatory Information
- Table of Contents
- Chapter 1: Introduction
- Chapter 2: Planning Your Wireless Network
- Chapter 3: Getting to Know the Wireless-G USB Network Adapter
- Chapter 4: Software Installation and Configuration for Windows 2000
- Chapter 5: Hardware Installation
- Chapter 6: Driver Installation for Windows XP
- Chapter 7: Using the WLAN Monitor
- Appendix A: Troubleshooting
- Appendix B: Glossary
- Appendix C: Specifications
- Appendix D: Warranty Information
- Appendix E: Contact Information

The Link Information screen, shown again in Figure 7-3, displays the signal
strength and link quality information about the current connection and provides
a button to click for additional status information.
Ad-Hoc Mode or Infrastructure Mode - The screen indicates whether the
Adapter is currently working in ad-hoc or infrastructure mode.
Signal Strength - The Signal Strength bar indicates the signal strength.
Link Quality - The Link Quality bar indicates the quality of the wireless net-
work connection.
Click the More Information button to view more information about the wire-
less network connection, shown on the following page and in Figure 7-4..
Click the X (Close) button in the upper right corner to exit the WLAN Monitor.
1514
Link Information
Figure 7-3
Chapter 7: Using the WLAN Monitor
Use the WLAN Monitor to check the link information, search for available
wireless networks, or create profiles that hold different configuration settings.
After installing the Adapter, the Wireless-G USB Network Adapter WLAN
Monitor icon will appear in your system tray. Double-click the icon (see Figure
7-1).
The Link Information screen will appear. (See Figure 7-2.) From
this screen, you can find out how strong the current wireless
signal is and how good the connection’s quality is. You can also
click the More Information button to view additional status
information about the current wireless connection. To search for
available wireless networks, click the Site Survey tab. To per-
form configuration changes, click the Profiles tab.
Figure 7-1
Figure 7-2
Accessing the WLAN Monitor
Overview