
- LinkSys Wireless-G Broadband Router User Guide
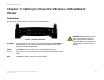
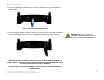
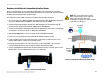
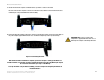
Table Of Contents
- Chapter 1: Introduction
- Chapter 2: Planning Your Wireless Network
- Chapter 3: Getting to Know the Wireless-G Broadband Router
- Chapter 4: Connecting the Wireless-G Broadband Router
- Chapter 5: Setting up the Wireless-G Broadband Router
- Chapter 6: Configuring the Wireless-G Broadband Router
- Appendix A: Troubleshooting
- Appendix B: Wireless Security
- Appendix C: Upgrading Firmware
- Appendix D: Windows Help
- Appendix E: Finding the MAC Address and IP Address for Your Ethernet Adapter
- Appendix F: Glossary
- Appendix G: Specifications
- Appendix H: Warranty Information
- Appendix I: Regulatory Information
- Appendix J: Contact Information

9
Chapter 4: Connecting the Wireless-G Broadband Router
Hardware Installation for Connection to Your Broadband Modem
Wireless-G Broadband Router
5. Connect your network PCs or Ethernet devices to the Router’s numbered ports using standard Ethernet
network cabling.
6. Connect the AC power adapter to the Router's Power port and the other end into an electrical outlet. Only use
the power adapter supplied with the Router. Use of a different adapter may result in product damage.
Now that the hardware installation is complete, proceed to “Chapter 5: Setting up the Wireless-G
Broadband Router,” for directions on how to configure the Router using the Setup Wizard (this chapter
has covered the instructions up to Step 7 in the Wizard).
To set up the Router using its Web-based Utility, proceed to “Chapter 6: Configuring the Wireless-G
Broadband Router”.
Figure 4-2: Connecting Your Network Devices
Figure 4-3: Connecting the Power
IMPORTANT: Make sure you use the power
adapter that is supplied with the Router. Use of a
different power adapter could damage the Router.