
User's Manual

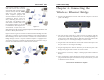
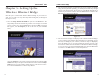
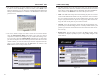
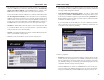
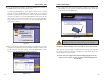
Table Of Contents
- Chapter 1: Introduction
- Chapter 3: Planning Your Wireless Network
- Chapter 4: Connecting the Wireless Ethernet Bridge
- Chapter 5: Setting Up the Wireless Ethernet Bridge
- Chapter 6: Using the Wireless Ethernet Bridge Web-based Utility
- Appendix A: Troubleshooting
- Appendix B: Glossary
- Appendix C: Specifications
- Appendix D: Warranty Information
- Appendix E: Contact Information

Wireless Ethernet Bridge
8. The Security Settings screen, shown in Figure 5-8, appears next. Set the
Wired Equivalent Privacy (WEP) encryption for your wireless network by
selecting a WEP configuration method.
• WEP (Disabled/64-bit WEP/128-bit WEP) - In order to utilize WEP
encryption, select 64-bit or 128-bit WEP from the drop-down menu. If you
do not want to use WEP encryption, keep the default setting, Disabled. The
Bridge’s WEP encryption is unique to Linksys and may conflict with other
manufacturers’ WEP encryption.
If you select 64-bit or 128-bit WEP, you can create a WEP key automati-
cally or manually. Go to step 9a to generate a WEP key automatically. Go
to step 9b to create a WEP key manually.
9a. Enter a passphrase.
• Passphrase - This is the code used when logging a wireless device onto the
wireless network. The passphrase is case-sensitive and should not be longer
than 16 alphanumeric characters. Based upon the passphrase created by
you, WEP key settings are automatically generated. This passphrase is only
compatible with other Linksys wireless products.
Click the Next button to continue or the Back button to return to the previ-
ous screen. Then on the WEP Key Settings screen, you will see the automat-
ically generated WEP key. Click the Next button, and proceed to step 10.
13
Instant Wireless
®
Series
7. The IP Settings screen will appear next, shown in Figure 5-7. If your net-
work has a DHCP server, click the radio button next to Automatically
obtain an IP address (DHCP). Click the Next button to continue or the
Back button to return to the previous screen. Then proceed to step 8.
If your network does not have a DHCP server, click the radio button beside
Set IP configuration manually to select this option. Enter an IP Address,
IP Mask, and Gateway appropriate to your network. You must specify an IP
address on this screen. If you are unsure about the IP Mask and Gateway, it
is better to leave these two fields blank. Click the Next button to continue or
the Back button to return to the previous screen. Then proceed to step 8.
• IP Address - This IP address must be unique to your network. Because this
is a private IP address, there is no need to purchase a separate IP address
from your Internet Service Provider (ISP).
• IP Mask - The Bridge’s IP Mask (also known as Subnet Mask) must be the
same as your Ethernet (wired) network.
• Gateway - Enter the IP address of your network’s Gateway here.
12
Figure 5-8
Figure 5-7