
User's Manual


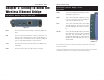
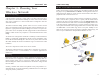
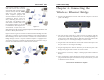
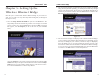

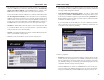
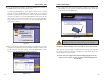
Table Of Contents
- Chapter 1: Introduction
- Chapter 3: Planning Your Wireless Network
- Chapter 4: Connecting the Wireless Ethernet Bridge
- Chapter 5: Setting Up the Wireless Ethernet Bridge
- Chapter 6: Using the Wireless Ethernet Bridge Web-based Utility
- Appendix A: Troubleshooting
- Appendix B: Glossary
- Appendix C: Specifications
- Appendix D: Warranty Information
- Appendix E: Contact Information

Wireless Ethernet Bridge
7
Instant Wireless
®
Series
If the wireless network is relatively
small and needs to share resources
only with the other computers on the
wireless network, then the Ad-Hoc
mode can be used. Ad-Hoc mode
allows computers equipped with
wireless transmitters and receivers to
communicate directly with each
other, eliminating the need for an
access point. The drawback of this
mode is that in Ad-Hoc mode, wire-
less-equipped computers are not able
to communicate with computers on a
wired network. And, of course, com-
munication between the wireless-equipped computers is limited by the distance and
interference directly between them.
Figure 3-2 shows a typical scenario of four Wireless Ethernet Bridges in ad-hoc
mode. Figure 3-3 shows a typical wireless bridging scenario using two Wireless
Ethernet Bridges. Each wireless network is connected to a Wireless Ethernet
Bridge through a switch. A separate notebook computer is equipped with a
wireless PC card and can communicate with both wireless networks as long as
it has the same SSID and channel as both wireless networks.
6
Chapter 4: Connecting the
Wireless Ethernet Bridge
1. Plug the included Ethernet network cable into the LAN port on the back
panel of the Bridge.
2. The X-II selection switch offers a choice between two settings. Slide the
X-II selection switch to the X position if you are connecting the Bridge to a
network card or other Ethernet device. Slide the X-II selection switch to the
II position if you are connecting the Bridge to a hub or switch.
3. Plug the other end of the Ethernet network cable into the RJ-45 port on the
PC you wish to use to configure the Bridge.
4. Plug the supplied power cable into the Power port on the back panel of the
Bridge. Then plug the other end into an electrical outlet.
5. Proceed to the next section, “Chapter 5: Setting Up the Wireless Ethernet
Bridge.”
6. After configuration, unplug the Ethernet network cable from the PC, and
plug it into the RJ-45 port on the Ethernet-ready network device you wish
to add to the wireless network.
The hardware installation is complete.
Figure 4-1
Figure 3-3
Figure 3-2