
User's Manual

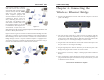
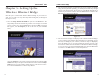
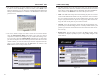
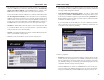
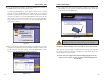
Table Of Contents
- Chapter 1: Introduction
- Chapter 3: Planning Your Wireless Network
- Chapter 4: Connecting the Wireless Ethernet Bridge
- Chapter 5: Setting Up the Wireless Ethernet Bridge
- Chapter 6: Using the Wireless Ethernet Bridge Web-based Utility
- Appendix A: Troubleshooting
- Appendix B: Glossary
- Appendix C: Specifications
- Appendix D: Warranty Information
- Appendix E: Contact Information

Wireless Ethernet Bridge
11. The configuration using the Setup Wizard is complete. To configure any
other Bridges on your network, run this Setup Wizard again. To exit the
Setup Wizard, click the Exit button.
The Wireless Ethernet Bridge is now successfully set up for your network.
After you have reset the Bridge, unplug the Ethernet network cable from the
PC, and plug it into the RJ-45 port of the Ethernet-ready network device you
wish to add to the wireless network.
For more advanced configuration, keep the Bridge plugged into the PC,
and proceed to “Chapter 6: Using the Wireless Ethernet Bridge Web-
based Utility.”
15
Instant Wireless
®
Series
9b. Leave the Passphrase field blank, and click the Next button to continue or
the Back button to return to the previous screen.
If you selected 64-bit WEP, you will see Figure 5-9 (you will see a similar
screen if you choose 128-bit WEP). Enter a WEP key. If you are using 64-
bit WEP encryption, then the key must consist of exactly 10 hexadecimal
characters in length. If you are using 128-bit WEP encryption, then the key
must consist of exactly 26 hexadecimal characters in length. Valid hexa-
decimal characters are “0”-“9” and “A”-“F”. Then click the Next button,
and proceed to step 10.
10. Review your settings. Write down the Bridge’s IP Address if you want to
configure advanced settings through the Bridge’s Web-based Utility. Click
the Ye s button to save these settings. Click the Back button to make
changes. Click the Exit button to exit the Setup Wizard.
14
Figure 5-11
Important: To activate the new settings, reset the Bridge. Turn off
the Bridge, and wait a few seconds. Then power on the Bridge.
Figure 5-9
Figure 5-10