USER GUIDE Wireless-G ADSL2+ Gateway Model: WAG54G2
About This Guide About This Guide Icon Descriptions While reading through the User Guide you may see various icons that call attention to specific items. Below is a description of these icons: NOTE: This check mark indicates that there is a note of interest and is something that you should pay special attention to while using the product. WARNING: This exclamation point indicates that there is a caution or warning and it is something that could damage your property or product.
Table of Contents Chapter 1: Product Overview 1 Front Panel. . . . . . . . . . . . . . . . . . . . . . . . . . . . . . . . . . . . . . . . . . . . . . . . . . 1 Back Panel . . . . . . . . . . . . . . . . . . . . . . . . . . . . . . . . . . . . . . . . . . . . . . . . . . 1 Placement Positions . . . . . . . . . . . . . . . . . . . . . . . . . . . . . . . . . . . . . . . . . . . . 1 Chapter 2: Wireless Security Checklist 3 General Network Security Guidelines . . . . . . . . . . . . . . . . . . . . . . .
Table of Contents Appendix C: Warranty Information 30 Limited Warranty . . . . . . . . . . . . . . . . . . . . . . . . . . . . . . . . . . . . . . . . . . . . . .30 Appendix D: Regulatory Information 32 United States of America . . . . . . . . . . . . . . . . . . . . . . . . . . . . . . . . . . . . . . . . .32 Canada . . . . . . . . . . . . . . . . . . . . . . . . . . . . . . . . . . . . . . . . . . . . . . . . . . . .33 Wireless Disclaimer . . . . . . . . . . . . . . . . . . . . . . . . . . . . . . .
Product Overview Chapter 1 Chapter 1: Product Overview Thank you for choosing the Linksys Wireless-G ADSL2+ Gateway. The Gateway lets you access the Internet via a wireless connection or through one of its four switched ports. You can also use the Gateway to share resources such as computers, printers and files. A variety of security features help to protect your data and your privacy while online. Security features include WPA2 security, a Stateful Packet Inspection (SPI) firewall and NAT technology.
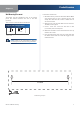
Product Overview Chapter 1 Wall-Mounting Placement Follow these instructions: The Router has two wall-mount slots on its bottom panel. The distance between the slots is 152 mm (6 inches). 1. Determine where you want to mount the Router. Make sure that the wall you use is smooth, flat, dry, and sturdy. Also make sure the location is within reach of an electrical outlet. Two screws are needed to mount the Router. 2. Drill two holes into the wall. Make sure the holes are 152 mm (6 inches) apart.
Wireless Security Checklist Chapter 2 Chapter 2: Wireless Security Checklist Wireless networks are convenient and easy to install, so homes with high-speed Internet access are adopting them at a rapid pace. Because wireless networking operates by sending information over radio waves, it can be more vulnerable to intruders than a traditional wired network. Like signals from your cellular or cordless phones, signals from your wireless network can also be intercepted.
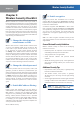
Installation Chapter 3 Chapter 3: Installation NOTE: To avoid interference, you may need to place a microfilter or splitter between the phone cable and wall jack. Contact your ISP to determine if one is required. (UK residents need to connect the microfilter to the wall phone jack with ADSL service and then connect one end of the provided phone cable to the DSL port on it.
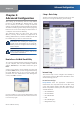
Advanced Configuration Chapter 4 Chapter 4: Advanced Configuration Setup > Basic Setup The first screen that appears is the Basic Setup screen. This allows you to change the Gateway’s general settings. After setting up the Gateway with the Setup Wizard (located on the CD-ROM), the Gateway will be ready for use. However, if you’d like to change its advanced settings, use the Gateway’s web-based utility. This chapter describes each web page of the utility and each page’s key functions.
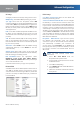
Advanced Configuration Chapter 4 VC Settings PPPoA Settings Configure your Virtual Circuit (VC) settings in this section. User Name and Password Enter the User Name and Password provided by your ISP. Multiplexing Select LLC or VC, depending on your ISP.
Advanced Configuration Chapter 4 RFC 2516 PPPoE RFC 1483 Routed Some DSL-based ISPs use PPPoE (Point-to-Point Protocol over Ethernet) to establish Internet connections. If you are connected to the Internet through a DSL line, check with your ISP to see if they use PPPoE. If they do, you will have to enable PPPoE. If you are required to use RFC 1483 Routed, then select RFC 1483 Routed.
Advanced Configuration Chapter 4 IP Settings Bridged Mode Only Your ISP provides these settings. If you are using your Gateway as a bridge, which makes the Gateway act like a stand-alone modem, select Bridge Mode Only. All NAT and routing settings are disabled in this mode. Internet IP Address Enter the Gateway’s IP address, as seen from the Internet. Subnet Mask Enter the Gateway’s Subnet Mask, as seen from the Internet (including your ISP). Default Gateway Enter the IP address of the ISP server.
Advanced Configuration Chapter 4 Network Setup The Network Setup section changes the settings on the network connected to the Gateway’s Ethernet ports. Wireless setup is performed through the Wireless tab. Gateway IP The values for the Gateway’s Local IP Address and Subnet Mask are shown here. In most cases, keeping the default values will work. Gateway IP Local IP Address The default value is 192.168.1.1. Subnet Mask The default value is 255.255.255.0.
Advanced Configuration Chapter 4 Setup > DDNS TZO.com The Gateway offers a Dynamic Domain Name System (DDNS) feature. DDNS lets you assign a fixed host and domain name to a dynamic Internet IP address. It is useful when you are hosting your own website, FTP server, or other server behind the Gateway. Before you can use this feature, you need to sign up for DDNS service with a DDNS service provider, www.dyndns.org or www.TZO.com. If you do not want to use this feature, keep the default, Disable.
Advanced Configuration Chapter 4 Click Save Settings to apply your changes, or click Cancel Changes to cancel your changes. Setup > Advanced Routing The Advanced Routing screen is used to set up the Gateway’s advanced routing functions. It contains three sections: Operating Mode, Dynamic Routing, and Static Routing. Destination IP Address The Destination IP Address is the IP address of the remote network or host to which you want to assign a static route.
Advanced Configuration Chapter 4 Basic Wireless Settings Wireless Configuration Keep the default selection, Manual, to configure your wireless network manually. Select Wi-Fi Protected Setup to set up your wireless network using Wi-Fi Protected Setup. Manual If you set the Wireless Configuration to Manual, the Basic Wireless Settings screen displays the following fields. Network Mode Select the wireless standards running on your network.
Advanced Configuration Chapter 4 WPA-Personal WPA2-Enterprise WPA2-Enterprise features WPA2 used with a RADIUS server. (This method should only be used when the device is connected to a RADIUS server.) Security Mode > WPA-Personal Encryption The method is TKIP or AES. Pre-Shared Key Enter a key of 8 to 63 characters. Key Renewal Enter a Key Renewal period, which instructs the Gateway how often it should change the encryption keys. The default is 3600 seconds.
Advanced Configuration Chapter 4 Key Renewal Enter the Key Renewal period, which tells the device how often it should change the dynamic encryption keys. Click Save Settings to apply your changes, or click Cancel Changes to cancel your changes. 26 hexadecimal characters in length. Valid hexadecimal characters are “0”-“9” and “A”-“F”. TX Key To indicate which WEP key to use, select a default Transmit (TX) Key number.
Advanced Configuration Chapter 4 Wireless > Wireless MAC Filter MAC Address Filter List Wireless access can be filtered by using the MAC addresses of the wireless devices transmitting within your network’s radius. Click Wireless Client List to display the Wireless Client List screen. This screen lists the computers and other devices on the wireless network sorted by IP address. You can also sort the list by Client Name, Interface, MAC Address, or Status, by using the To Sort By drop-down menu.
Advanced Configuration Chapter 4 Transmission Rate The rate of data transmission should be set depending on the speed of your wireless network. You can select from a range of transmission speeds, or you can select Auto to have the device automatically use the fastest possible data rate and enable the Auto-Fallback feature. Auto-Fallback will negotiate the best possible connection speed between the device and a wireless client. The default setting is Auto.
Advanced Configuration Chapter 4 Security > VPN Passthrough Access Restrictions > Internet Access Policy The VPN Passthrough screen allows you to enable VPN tunnels using IPSec, PPTP, or L2TP protocols to pass through the Gateway’s firewall. The Internet Access Policy screen allows you to block or allow specific kinds of Internet usage and traffic, such as Internet access, designated services, and websites during specific days and times.
Advanced Configuration Chapter 4 Status Policies are disabled by default. To enable a policy, select its number from the drop-down menu, and select Enable. Applications and Gaming > Single Port Forwarding To create a policy, follow steps 1-10. Repeat these steps to create additional policies, one at a time. The Single Port Forwarding screen allows you to customize port services for common applications. 1. Select a number from the Internet Access Policy dropdown menu. 2.
Chapter 4 Click Save Settings to apply your changes, or click Cancel Changes to cancel your changes. Applications and Gaming > Port Range Forwarding The Port Range Forwarding screen allows you to set up public services on your network, such as web servers, ftp servers, e-mail servers, or other specialized Internet applications. (Specialized Internet applications are any applications that use Internet access to perform functions such as videoconferencing or online gaming.
Advanced Configuration Chapter 4 Applications and Gaming > DMZ Applications and Gaming > QoS The DMZ feature allows one network computer to be exposed to the Internet for use of a special-purpose service such as Internet gaming or videoconferencing. DMZ hosting forwards all the ports at the same time to one PC.
Advanced Configuration Chapter 4 Category Select one of these categories: Applications, Online Games, MAC Address, Ethernet Port, or Voice Device. Then proceed to the instructions below for your selection. For each category, you can set the bandwidth priority to one of four levels: High, Medium, Normal, or Low. Be careful not to set all your applications to High priority, as this will defeat the purpose of allocating the available bandwidth. For below-normal bandwidth, select Low.
Advanced Configuration Chapter 4 Click the Add button to save your changes. Your new entry will appear in the Summary list. Administration > Management Voice Device This screen allows the network’s administrator to manage specific Gateway functions for access and security. Voice Device Enter a Name Enter a name for your voice device. MAC Address Enter the MAC address of your voice device. Priority Select the appropriate priority: High, Medium, Normal, or Low. The default is Medium.
Advanced Configuration Chapter 4 NOTE: To manage the Gateway remotely, enter https://:port substituting the Gateway’s Internet IP address for , and the Management Port number for port. Reporting Log To disable the Log function, keep the default, Disable. To monitor traffic between the network and the Internet, select Enable. With logging enabled, you can choose to view temporary logs. E-Mail Alerts To enable E-Mail Alerts, select Enable.
Advanced Configuration Chapter 4 Administration > Diagnostics Administration > Back Up & Restore The ping test allows you to check the connections of your network devices, including connection to the Internet. The Back Up & Restore screen allows you to back up or restore the Gateway’s settings using a configuration file.
Advanced Configuration Chapter 4 Factory Defaults Language Restore Factory Defaults To reset settings to the default values, click this button and follow the on-screen instructions. Any custom Gateway settings you have saved will be lost when the default settings are restored. Language To use a different language, select one from the drop-down menu. The web-based utility will switch to the new language five seconds after your selection is made.
Advanced Configuration Chapter 4 Status > Local Network The Local Network screen displays information about the local wired network. Address, and Expires time (how much time is left for the current IP address). To remove a DHCP client, click Delete. To retrieve the most up-to-date information, click Refresh. To exit this screen and return to the Local Network screen, click Close. ARP/RARP Table Click this button to view the current IP and MAC addresses of the Gateway’s local network clients.
Advanced Configuration Chapter 4 Channel The channel setting selected on the Basic Wireless Settings screen is displayed. Autodetect The Autodetect setting selected on the Basic Setup screen is displayed. Security The wireless security method is displayed. VPI The VPI value entered on the Basic Setup screen is displayed. SSID Broadcast displayed. The status of SSID Broadcast is VCI The VCI value entered on the Basic Setup screen is displayed.
Appendix A Appendix A: Troubleshooting Your computer cannot connect to the Internet. Follow the instructions until your computer can connect to the Internet: s Make sure that the Gateway is powered on. The Power LED should be green and not flashing. s If the Power LED is flashing, then power off all of your network devices, including the Gateway and computers. Then power on each device in the following order: s 1. Gateway 2.
Specifications Appendix B Appendix B: Specifications Model WAG54G2 Standards 802.11g, 802.11b, 802.3u, g.992.1 (g.dmt), g.992.2 (g.lite), g.992.3, g.992.5, T1.
Appendix C Appendix C: Warranty Information Limited Warranty Linksys warrants that this Linksys hardware product will be substantially free of defects in materials and workmanship arising under normal use during the Warranty Period, which begins on the date of purchase by the original enduser purchaser and lasts for the period specified below: s Two (2) years for new product s Ninety (90) days for refurbished product This limited warranty is non-transferable and extends only to the original end-user pu
Appendix C Warranty Information and a copy of your dated proof of original purchase when returning your product. Products received without a RMA number and dated proof of original purchase will be rejected. Do not include any other items with the product you are returning to Linksys. Defective product covered by this limited warranty will be repaired or replaced and returned to you without charge.
Regulatory Information Appendix D Appendix D: Regulatory Information United States of America The following information applies if you use the product within the United States of America. FCC Statement This device complies with Part 15 of the FCC Rules. Operation is subject to the following two conditions: (1) This device may not cause harmful interference, and (2) this device must accept any interference received, including interference that may cause undesired operation.
Appendix D you remove the equipment from the network until the problem is resolved. This equipment cannot be used on telephone company provided coin service. Connection to Party Line Service is subject to state tariffs. Safety Notices s Caution: To reduce the risk of fire, use only No.26 AWG or larger telecommunication line cord. s Do not use this product near water, for example, in a wet basement or near a swimming pool. s Avoid using this product during an electrical storm.
Regulatory Information Appendix D L’émetteur ne doit pas être placé près d’une autre antenne ou d’un autre émetteur, ou fonctionner avec une autre antenne ou un autre émetteur. Wireless Disclaimer Това оборудване отговаря на съществените Български изисквания и приложими клаузи на [Bulgarian] Директива 1999/5/ЕС. Česky [Czech]: Toto zařízení je v souladu se základními požadavky a ostatními odpovídajícími ustanoveními Směrnice 1999/5/EC.
Regulatory Information Appendix D Malti [Maltese]: Dan l-apparat huwa konformi mal-ħtiġiet essenzjali u l-provedimenti l-oħra rilevanti tad-Direttiva 1999/5/EC. Magyar [Hungarian]: Ez a készülék teljesíti az alapvető követelményeket és más 1999/5/EK irányelvben meghatározott vonatkozó rendelkezéseket. Norsk [Norwegian]: Dette utstyret er i samsvar med de grunnleggende krav og andre relevante bestemmelser i EU-direktiv 1999/5/EF.
Regulatory Information Appendix D National Restrictions France This product may be used in all EU countries (and other countries following the EU directive 1999/5/EC) without any limitation except for the countries mentioned below: For 2,4 GHz, the product should not be used outdoors in the band 2454 - 2483,5 MHz. There are no restrictions when used in other parts of the 2,4 GHz band when used indoors. Check http://www.arcep.fr/ for more details.
Appendix D Product Usage Restrictions This product is designed for indoor usage only. Outdoor usage is not recommended, unless otherwise noted. 2,4 GHz Restrictions This product is designed for use with the standard, integral or dedicated (external) antenna(s) that is/are shipped together with the equipment. However, some applications may require the antenna(s), if removable, to be separated from the product and installed remotely from the device by using extension cables.
Appendix D Regulatory Information Ceština (Czech) - Informace o ochraně životního prostředí pro zákazníky v zemích Evropské unie Eesti (Estonian) - Keskkonnaalane informatsioon Euroopa Liidus asuvatele klientidele Evropská směrnice 2002/96/ES zakazuje, aby zařízení označené tímto symbolem na produktu anebo na obalu bylo likvidováno s netříděným komunálním odpadem. Tento symbol udává, že daný produkt musí být likvidován odděleně od běžného komunálního odpadu.
Appendix D Regulatory Information Français (French) - Informations environnementales pour les clients de l’Union européenne Lietuvškai (Lithuanian) - Aplinkosaugos informacija, skirta Europos Sąjungos vartotojams La directive européenne 2002/96/CE exige que l’équipement sur lequel est apposé ce symbole sur le produit et/ou son emballage ne soit pas jeté avec les autres ordures ménagères. Ce symbole indique que le produit doit être éliminé dans un circuit distinct de celui pour les déchets des ménages.
Appendix D Regulatory Information Nederlands (Dutch) - Milieu-informatie voor klanten in de Europese Unie Português (Portuguese) - Informação ambiental para clientes da União Europeia De Europese Richtlijn 2002/96/EC schrijft voor dat apparatuur die is voorzien van dit symbool op het product of de verpakking, niet mag worden ingezameld met niet-gescheiden huishoudelijk afval. Dit symbool geeft aan dat het product apart moet worden ingezameld.
Appendix D Regulatory Information Slovenčina (Slovene) - Okoljske informacije za stranke v Evropski uniji Evropska direktiva 2002/96/EC prepoveduje odlaganje opreme, označene s tem simbolom – na izdelku in/ali na embalaži – med običajne, nerazvrščene odpadke. Ta simbol opozarja, da je treba izdelek odvreči ločeno od preostalih gospodinjskih odpadkov. Vaša odgovornost je, da to in preostalo električno in elektronsko opremo odnesete na posebna zbirališča, ki jih določijo državne ustanove ali lokalna uprava.