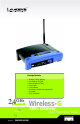
® A Division of Cisco Systems, Inc. Package Contents • • • • • • Wireless-G ADSL Gateway User Guide on CD-ROM Ethernet Network Cable Phone Cable Power Adapter Microfilter or splitter (not supplied with all models) • Quick Installation 2,4GHz Wireless-G 802.11g ADSL Gateway Wireless Model No. WAG54G (UK/EU) Model No.
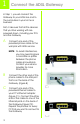
1 Connect the ADSL Gateway In Step 1, you will connect the Gateway to your ADSL line and to the computers in your home or business. First, make sure that all the devices that you’ll be working with are powered down, including your PCs and the Gateway. A Connect one end of the provided phone cable to the wall jack with ADSL service. NOTE: To avoid interference, you may need to place a microfilter or splitter between the phone cable and wall jack. Contact your service provider for more information.
If you are connecting more than four PCs to the Gateway, you will also need to connect a hub or switch to the Gateway. NOTE: If your PC’s Ethernet adapter is not set up, refer to the Ethernet adapter’s user guide for more information. D E Connect the power adapter to the Gateway. Connect the power adapter to the electrical outlet. (Figure D) Turn on the Gateway. Then, turn on the first PC that you want to use to configure the Gateway.
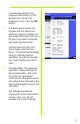
2 Configure the ADSL Gateway In Step 2, you will configure your Linksys Wireless-G ADSL Gateway to be able to gain access to the Internet through your Internet Service Provider (ISP). You will need the setup information provided by your ADSL ISP. If you do not have this information, please contact them before proceeding. The instructions from your ISP tell you how to set up your PC for Internet access.
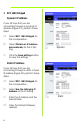
in lowercase letters in the Password field (admin is the default user name and password.) Then, click the OK button. C The Basic Setup screen will appear with the Setup tab selected. (Figure C) Based on the setup instructions from your ISP, you may need to provide the following information. Virtual Circuit (VPI and VCI): These fields consist of two items: VPI (Virtual Path Identifier) and VCI (Virtual Channel Identifier). Your ISP will provide the correct settings for each field.
1 RFC 1483 Bridged Dynamic IP Address If your ISP says that you are connecting through a dynamic IP address (Figure D1), perform these steps: a b c Select RFC 1483 Bridged for the Encapsulation. Select Obtain an IP Address Automatically for the IP Setting. D1 Dynamic Quick Installation Click the Save Settings button to save the settings.
e f Enter the DNS in the Primary and/or Secondary fields. You need to enter at least one DNS address. Click the Save Settings button to save the settings. 2 RFC 2516 PPPoE or RFC 2364 PPPoA If your ISP says that you are connecting through PPPoE (Figure D3) or PPPoA (Figure D4), or if you normally enter a user name and password to access the Internet, perform these steps: a b c d e f Select PPPoE or PPPoA as appropriate for the Encapsulation. If you selected PPPoE, enter the Service Name (if required).
E F G H If you haven’t already done so, click the Save Settings button to save your Setup settings. Close the web browser. For Wireless Configuration: Refer to the User Guide (English only) for detailed instructions on how to configure your Gateway for your wireless network. Linksys recommends changing your wireless settings from the defaults and enabling the appropriate security options. Congratulations! You’ve successfully configured the Gateway.
® A Division of Cisco Systems, Inc. Pakkens indhold • • • • • • Trådløs-G ADSL-gateway Brugervejledning på cd-rom Ethernet-kabel Telefonledning Strømforsyning Mikrofilter eller fordeler (følger ikke med alle modeller) • Installationsvejledning 2,4GHz Trådløs-G 802.11g ADSL-gateway Trådløs Modelnr. WAG54G (DK) Modelnr.
1 Tilslutning af ADSL-gatewayen I trin 1 tilslutter du gatewayen til ADSL-linjen og til computerne i dit hjem/din virksomhed. Kontroller først, at alle de involverede enheder er slukket, herunder dine pc'er og gatewayen. A Tilslut den ene ende af den medfølgende telefonledning til ADSL-vægstikket. BEMÆRK: Det kan være nødvendigt at placere et mikrofilter eller en fordeler mellem telefonledningen og vægstikket for at undgå interferens. Kontakt din tjenesteudbyder for at få yderligere oplysninger.
Hvis du tilslutter mere end fire pc'er til gatewayen, skal du også tilslutte en hub eller switch til gatewayen. BEMÆRK: Hvis pc'ens Ethernetadapter ikke er konfigureret, skal du se brugervejledningen til Ethernet-adapteren for at få yderligere oplysninger. D E Tilslut strømforsyningen til gatewayen. Tilslut strømforsyningen til stikkontakten. (Figur D) Tænd gatewayen. Tænd derefter den første pc, som du vil bruge til konfiguration af gatewayen.
2 Konfiguration af ADSL-gatewayen I trin 2 konfigurerer du Linksys Trådløs-G ADSL-gatewayen, så du kan oprette adgang til internettet via din internetudbyder. Du skal have konfigurationsoplysningerne af din ADSL-udbyder. Hvis du ikke har disse oplysninger, skal du kontakte udbyderen, før du fortsætter. I vejledningen fra din internetudbyder kan du læse, hvordan du konfigurerer pc'en til internetadgang.
admin med små bogstaver i feltet Password (Adgangskode) (admin er standardbrugernavnet og -adgangskoden.) Klik derefter på knappen OK. C Skærmbilledet Basic Setup vises med fanen Setup valgt. (Figur C) Afhængigt af konfigurationsvejledningen fra din internetudbyder skal du muligvis angive følgende oplysninger. VPI og VCI (Virtual Circuit): Disse felter består af to punkter: VPI (Virtual Path Identifier) og VCI (Virtual Channel Identifier). Få de korrekte indstillinger til felterne hos din internetudbyder.
1 RFC 1483 Bridged Dynamisk IP-adresse Hvis din internetudbyder har oplyst, at du opretter forbindelse via en dynamisk IP-adresse (Figur D1), skal du følge nedenstående fremgangsmåde: a b c Vælg RFC 1483 Bridged som indkapslingsmetode. Vælg Obtain an IP Address Automatically som IP-indstilling. D1 Dynamisk Hurtig installation Klik på knappen Save Settings for at gemme indstillingerne.
e f Indtast DNS-adressen i feltet Primary og/eller Secondary. Du skal indtaste mindst én DNS-adresse. Klik på knappen Save Settings for at gemme indstillingerne.
E F G H Hvis du ikke allerede har gjort det, skal du klikke på knappen Save Settings for at gemme dine konfigurationsindstillinger. Luk webbrowseren. Trådløs konfiguration: Se brugervejledningen (kun på engelsk) for at få detaljerede oplysninger om, hvordan du konfigurerer gatewayen til dit trådløse netværk. Linksys anbefaler, at du ændrer de trådløse indstillinger, så du ikke bruger standardindstillingerne, og aktiverer de relevante sikkerhedsindstillinger.
® A Division of Cisco Systems, Inc. Contenu de l'emballage • • • • • • Passerelle ADSL sans fil G Guide de l'utilisateur sur CD-ROM Câble réseau Ethernet Câble téléphonique Adaptateur d'alimentation Microfiltre(s) (ne sont pas livrés avec certains modèles) • Guide d'installation rapide 2,4GHz Sans fil-G 802.11g Passerelle ADSL Wireless Sans fil Model WAG54GNo. (FR) Model No.
1 Connexion de la passerelle ADSL L'étape 1 consiste à connecter la passerelle à votre ligne ADSL ainsi qu'aux ordinateurs installés à domicile ou sur votre lieu de travail. Assurez-vous d'abord de la mise hors tension de tous les périphériques que vous allez utiliser, ordinateurs et passerelle inclus.
Si vous raccordez plus de quatre ordinateurs à la passerelle, vous devrez également raccorder un concentrateur ou un commutateur à la passerelle. REMARQUE : Si la carte Ethernet de votre ordinateur n'est pas configurée, reportez-vous au guide de l'utilisateur de cette carte pour plus d'informations. D E Reliez l'adaptateur électrique à la passerelle. Branchez l'adaptateur électrique sur une prise secteur. (Figure D) Mettez la passerelle sous tension.
2 Configuration de la passerelle ADSL A l'étape 2, vous configurerez votre passerelle ADSL sans fil G Linksys afin qu'elle puisse accéder à l'Internet par l'intermédiaire de votre Fournisseur d'accès Internet (FAI). Vous devrez avoir à votre disposition les informations de configuration fournies par votre FAI. Si vous ne possédez pas ces informations, contactez votre FAI avant de continuer. Les instructions de votre FAI indiquent comment configurer votre ordinateur pour accéder à Internet.
User Name (Nom d'utilisateur), puis admin en minuscules dans le champ Password (Mot de passe) (admin correspond aux nom d'utilisateur et mot de passe par défaut). Cliquez sur le bouton OK. C L'écran Basic Setup (Configuration de base) apparaîtra en affichant son onglet Setup (Configuration). (Figure C) Selon les instructions de configuration de votre FAI, vous devrez peut-être fournir les informations ci-après. Circuit virtuel (VPI et VCI).
1 RFC 1483 Bridged Adresse IP dynamique Si votre FAI vous indique que vous vous connectez par l'intermédiaire d'une adresse IP dynamique (Figure D1), exécutez la procédure ci-après : a b c Sélectionnez RFC 1483 Bridged pour l'encapsulation. Sélectionnez Obtain an IP Address Automatically (Obtenir automatiquement une adresse IP) pour définir l'adresse IP. Cliquez sur le bouton Save Settings (Enregistrer paramètres) pour enregistrer les modifications apportées aux paramètres.
secondaire). Vous devez entrer au moins une adresse DNS. f Cliquez sur le bouton Save Settings (Enregistrer paramètres) pour enregistrer les modifications apportées aux paramètres.
les modifications apportées aux paramètres. E F G H Si ce n'est déjà fait, cliquez sur le bouton Save Settings (Enregistrer paramètres) pour enregistrer vos paramètres de configuration. Fermez le navigateur Web. Configuration sans fil : reportez-vous au Guide de l'utilisateur (en anglais uniquement) pour obtenir des instructions détaillées de configuration de votre passerelle en fonction de votre réseau sans fil.
® A Division of Cisco Systems, Inc. Lieferumfang • • • • • • Wireless-G ADSL-Gateway Benutzerhandbuch auf CD-ROM Ethernet-Netzwerkkabel Telefonkabel Netzstromadapter Mikrofilter (nicht im Lieferumfang aller Modellnummern enthalten) • Kurzanleitung 2,4GHz Wireless-G 802.11g ADSL-Gateway Wireless Model No. WAG54G (DE) Model No.
1 Anschließen des ADSL-Gateways In Schritt 1 schließen Sie das Gateway an Ihre ADSL-Verbindung und die Computer in Ihrer Heim- oder Unternehmensumgebung an. Überprüfen Sie zuerst, ob alle Geräte, mit denen Sie arbeiten (einschließlich PCs und Gateway), ausgeschaltet sind. A Schließen Sie ein Ende des beigelegten Telefonkabels an die Wandbuchse mit dem ADSLDienst an. HINWEIS: Zur Vermeidung von Störungen sollten Sie u. U.
Wenn mehr als vier PCs an das Gateway angeschlossen werden sollen, müssen Sie außerdem einen Hub oder Switch an das Gateway anschließen. HINWEIS: Wenn der EthernetAdapter des Computers nicht eingerichtet ist, finden Sie dazu weitere Informationen im Benutzerhandbuch zum Ethernet-Adapter. D E Schließen Sie den Netzstromadapter an das Gateway an. Stecken Sie den Netzstromadapter in die Steckdose (Abbildung D). Schalten Sie das Gateway ein.
2 Konfigurieren des ADSL-Gateways In Schritt 2 konfigurieren Sie das Linksys Wireless-G ADSL-Gateway für den Zugriff auf das Internet über Ihren ISP. Sie benötigen hierzu die SetupInformationen Ihres ADSL-ISPs. Wenn Sie nicht über diese Informationen verfügen, wenden Sie sich an Ihren ISP, bevor Sie beginnen. Die Anweisungen von Ihrem ISP geben an, wie Sie Ihren Computer für den Internetzugriff einrichten müssen.
C Das Fenster Basic Setup (Grundlegende Einrichtung) wird mit ausgewählter Registerkarte Setup angezeigt (Abbildung C). Je nach den Setup-Informationen von Ihrem ISP müssen Sie unter Umständen die folgenden Informationen eingeben: Virtual Circuit (Virtueller Kreis): Für diese Option sind zwei Einstellungen erforderlich, VPI (Virtual Path Identifier; Virtueller Pfadidentifizierer) und VCI (Virtual Channel Identifier; Virtueller Kanalidentifizierer). Die korrekten Einstellungen erhalten Sie von Ihrem ISP.
1 RFC 1483 Bridged (RFC 1483Überbrückung) Dynamische IP Adresse Wenn Sie laut ISP über eine dynamische IPAdresse verbunden sind (Abbildung D1), führen Sie die folgenden Schritte aus: a b c Wählen Sie als Kapselungsmethode RFC 1483 Bridged (RFC 1483Überbrückung) aus. Wählen Sie Obtain an IP Address Automatically (IP-Adresse automatisch beziehen) als IPEinstellung aus.
e f Geben Sie die DNS-Adressen in die Felder Primary DNS (Primärer DNS) und Secondary DNS (Sekundärer DNS) ein. Sie müssen mindestens eine DNS-Adresse eingeben. Klicken Sie auf die Schaltfläche Save Settings (Einstellungen speichern), um die Einstellungen zu speichern.
speichern), um die Einstellungen zu speichern. E F G H Klicken Sie ggf. auf die Schaltfläche Save Settings (Einstellungen speichern), um die SetupEinstellungen zu speichern. Schließen Sie den Web-Browser. Wenn Sie eine drahtlose Konfiguration durchführen, finden Sie genaue Anweisungen zur Konfiguration des Gateways für Ihr Wireless-Netzwerk im Benutzerhandbuch (nur auf Englisch verfügbar).
® A Division of Cisco Systems, Inc. Contenuto della confezione • • • • • • Wireless-G ADSL Gateway User Guide (Guida per l'utente) su CD-ROM Cavo di rete Ethernet Cavo telefonico Adattatore di corrente Microfiltri (non forniti con tutti i numeri di modello) • Guida di installazione rapida 2,4GHz Wireless-G 802.11g ADSL Gateway Wireless Model WAG54GNo. (IT) Model No.
1 Collegamento del gateway ADSL Nella fase 1 il gateway viene collegato alla linea ADSL e ai computer di casa o dell'ufficio. Per prima cosa, verificare che tutti i dispositivi da utilizzare siano spenti, compresi i PC e il gateway. A Collegare un'estremità del cavo telefonico alla presa a muro per il servizio ADSL. NOTA B C Per evitare interferenze, potrebbe essere necessario inserire un microfiltro o un ripartitore tra il cavo telefonico e la presa a muro.
Se si collegano più di quattro PC al gateway, occorre collegare anche un hub o uno switch al gateway. NOTA D E Se l'adattatore Ethernet del PC non è configurato, consultare la relativa documentazione per istruzioni. Collegare l'adattatore di corrente al gateway. Collegare l'adattatore di corrente a una presa elettrica (Figura D). Accendere il gateway. Successivamente, accendere il primo PC che si desidera utilizzare per configurare il gateway.
2 Configurazione del gateway ADSL Nella fase 2 viene configurato il Gateway ADSL Wireless-G di Linksys in modo che sia in grado di accedere a Internet attraverso il provider di servizi in uso. È necessario disporre delle informazioni sulla configurazione fornite dal provider di servizi Internet ADSL. Se non si dispone di tali informazioni, contattarlo prima di continuare. Il provider di servizi fornisce le istruzioni su come configurare il PC per l'accesso a Internet.
Name (Nome utente) e Password (admin È il nome utente e la password predefinita). Quindi, fare clic sul pulsante OK. C Viene visualizzata la schermata Basic Setup (Configurazione di base) in cui è selezionata la scheda Setup (Configurazione) (Figura C). In base alle istruzioni fornite dal provider di servizi Internet, è necessario specificare le seguenti informazioni.
1 RFC 1483 Bridged (Bridging RFC 1483) Indirizzo IP dinamico Se il provider di servizi Internet fornisce una connessione tramite un indirizzo IP dinamico (Figura D1), attenersi alla seguente procedura: a b c Selezionare RFC 1483 Bridged (Bridging RFC 1483) per l'incapsulamento. Selezionare Obtain an IP Address Automatically (Ottieni automaticamente un indirizzo IP) come impostazione IP. D1 Dinamico D2 Statico Fare clic sul pulsante Save Settings (Salva impostazioni) per salvare le impostazioni.
e f Immettere gli indirizzi DNS nei campi Primary DNS (DNS primario) e Secondary DNS (DNS secondario). È necessario specificare almeno un indirizzo DNS. Fare clic sul pulsante Save Settings (Salva impostazioni) per salvare le impostazioni.
base al tempo effettivo di connessione al provider. f E F G H 8 Fare clic sul pulsante Save Settings (Salva impostazioni) per salvare le impostazioni. Se non è stato ancora fatto, fare clic sul pulsante Save Settings (Salva impostazioni) per salvare le impostazioni relative alla configurazione. Chiudere il browser Web. Per la configurazione wireless: consultare la User Guide (Guida per l'utente, solo in inglese) per istruzioni dettagliate su come configurare il gateway per la rete wireless.
® A Division of Cisco Systems, Inc. Conteúdo da embalagem • • • • • • Gateway ADSL sem fios G Manual do Utilizador em CD-ROM Cabo de rede Ethernet Cabo telefónico Transformador Microfiltro(s) (não fornecido(s) com todos os números de modelos) • Manual de Instalação Rápida 2,4GHz Sem fios-G 802.11g Gateway ADSL Wireless Model No. WAG54G (PT) Model No.
1 Ligar o Gateway ADSL No Passo 1, ligará o Gateway à linha ADSL e aos computadores em casa ou na empresa. Primeiro, certifique-se de que todos os dispositivos com que irá trabalhar estão desligados, incluindo os computadores e o Gateway. A Ligue uma das extremidades do cabo telefónico fornecido à ficha com serviço ADSL. NOTA: Para evitar interferências, poderá ser necessário colocar um microfiltro ou divisor entre o cabo telefónico e a ficha.
Se estiver a ligar mais de quatro computadores ao Gateway, também será necessário ligar um concentrador ou comutador ao Gateway. NOTA: Se a placa Ethernet do computador não estiver configurada, consulte o manual do utilizador da placa Ethernet para obter mais informações. D E Ligue o transformador ao Gateway. Ligue o transformador à tomada. (Figura D) Ligue o Gateway. Em seguida, ligue o primeiro computador que pretende utilizar para configurar o Gateway.
2 Configurar o Gateway ADSL No Passo 2, configurará o Gateway ADSL sem fios G da Linksys para conseguir aceder à Internet através do Fornecedor de serviços Internet (ISP). Necessitará das informações de configuração fornecidas pelo ISP do serviço de ADSL. Caso não tenha estas informações, contacte o ISP antes de continuar. As instruções do ISP indicam como configurar o computador para aceder à Internet.
User Name (Nome de utilizador) e introduza admin em minúsculas no campo Password (Palavra-passe) (admin é o nome de utilizador e palavra-passe predefinidos). Em seguida, clique no botão OK. C Será apresentado o ecrã Basic Setup (Configuração básica) com o separador Setup (Configurar) seleccionado. (Figura C) Com base nas instruções de configuração do ISP, poderá necessitar de fornecer as seguintes informações.
1 RFC 1483 Bridged Endereço IP dinâmico Se o ISP indicar que está a estabelecer ligação através de um endereço IP dinâmico (Figura D1), execute os seguintes passos: a b c Seleccione RFC 1483 Bridged como Encapsulation (Encapsulamento). Seleccione Obtain an IP Address Automatically (Obter automaticamente um endereço IP) em IP Setting (Definição de IP). D1 Dinâmico Instalação rápida Clique no botão Save Settings (Guardar definições) para guardar as definições.
d e f Introduza o Default Gateway address (Endereço predefinido do gateway). Introduza o DNS nos campos Primary (Primário) e/ou Secondary (Secundário). É necessário introduzir pelo menos um endereço de DNS. Clique no botão Save Settings (Guardar definições) para guardar as definições.
seleccione Connect on Demand (Ligar mediante pedido) se for cobrado pelo tempo que está ligado ao ISP. f E F G H 8 Clique no botão Save Settings (Guardar definições) para guardar as definições. Caso ainda não o tenha feito, clique no botão Save Settings (Guardar definições) para guardar as definições de configuração. Feche o Web browser.
® A Division of Cisco Systems, Inc. Contenido del paquete • • • • • • Puerta de enlace ADSL Wireless-G Guía del usuario en CD-ROM Cable de red Ethernet Cable telefónico Adaptador de corriente Microfiltro(s) (no proporcionados con todos los números de modelo) • Instalación rápida 2,4GHz Wireless-G 802.11g Puerta de enlace ADSL Wireless Model WAG54G No. (ES) Model No.
1 Conecte la puerta de enlace ADSL En el paso 1, debe conectar la puerta de enlace a la línea ADSL y a los ordenadores de casa o de la oficina. En primer lugar, asegúrese de que todos los dispositivos con los que va a trabajar están apagados, incluyendo los PC y la puerta de enlace. A Conecte un extremo del cable telefónico proporcionado al jack de pared provisto del servicio ADSL.
Si va a conectar más de cuatro PC a la puerta de enlace, también deberá conectar un concentrador o conmutador a la misma. NOTA: Si el adaptador Ethernet del ordenador no está configurado, consulte la guía del usuario del mismo para obtener más información. D E Conecte el adaptador de corriente a la puerta de enlace. Conecte el adaptador de corriente a la toma de corriente. (Figura D) Encienda la puerta de enlace. A continuación, encienda el primer PC que utilizó para configurar la puerta de enlace.
2 Configure la puerta de enlace ADSL En el paso 2, debe configurar la puerta de enlace ADSL Wireless-G de Linksys para poder acceder a Internet mediante un proveedor de servicios de Internet (ISP). Necesitará la información proporcionada por el ISP de ADSL. Si no la tiene, póngase en contacto con el ISP antes de continuar. Las instrucciones del ISP?le indican cómo configurar el acceso a Internet.
Nombre de usuario y de nuevo en el campo Contraseña (admin es el nombre de usuario y la contraseña predeterminados). A continuación, haga clic en el botón Aceptar. C Aparece la pantalla Basic Setup (Configuración básica) con la ficha Setup (Configurar) seleccionada. (Figura C) Según las instrucciones de configuración del ISP, quizá necesite proporcionar la siguiente información.
1 RFC 1483 Bridged (RFC 1483 con puente) Dynamic IP Address (Dirección IP dinámica) Si el ISP indica que su conexión se realiza mediante una dirección IP dinámica (figura D1), siga estos pasos: a b c En Encapsulation (Encapsulación), seleccione RFC 1483 Bridged (RFC 1483 con puente). En IP Settings (Parámetros IP), seleccione Obtain an IP Address Automatically (Obtener una dirección IP automáticamente). D1 Haga clic en el botón Save Settings (Guardar parámetros) para guardar los parámetros.
d e f Introduzca la dirección de la puerta de enlace predeterminada (Default Gateway). Introduzca la dirección DNS en los campos correspondientes a las direcciones DNS principal (Primary) y secundaria (Secondary). Debe introducir por lo menos una dirección DNS. Haga clic en el botón Save Settings (Guardar parámetros) para guardar los parámetros.
cuando se solicite) si debe pagar todo el tiempo que esté conectado al ISP. f E F G H 8 Haga clic en el botón Save Settings (Guardar parámetros) para guardar los parámetros. Si aún no lo ha hecho, haga clic en el botón Save Settings (Guardar parámetros) para guardar los parámetros. Cierre el explorador Web. Para configuración inalámbrica: consulte la guía del usuario (sólo en inglés) para obtener instrucciones sobre la configuración de la puerta de enlace en una red inalámbrica.
® A Division of Cisco Systems, Inc. Innehåll i förpackningen • • • • • • Wireless-G ADSL Gateway Användarhandbok på cd-skiva Ethernet-nätverkskabel Telefonkabel Strömadapter Mikrofilter eller signaldelare (medföljer inte alla modeller) • Snabbinstallation 2,4GHz Wireless-G 802.
1 Ansluta ADSL-gatewayen I steg 1 ansluter du gatewayen till ADSL-linjen och till datorerna hemma eller på jobbet. Börja med att kontrollera att alla aktuella enheter är avstängda, inklusive dator och gateway. A Anslut den ena änden av medföljande telefonkabel till det vägguttag där ADSL-tjänsten installerats. OBS! B C 2 Du undviker störningar genom att placera ett mikrofilter eller en signaldelare (splitter) mellan telefonkabeln och vägguttaget.
Om du ansluter fler än fyra datorer måste du också ansluta en hub eller switch till gatewayen. OBS! D E Om datorns Ethernetadapter inte har konfigurerats finns mer information om hur du går tillväga i användarhandboken till Ethernet-adaptern. Anslut strömadaptern till gatewayen. Anslut strömadaptern till eluttaget (bild D). Slå på strömmen till gatewayen. Starta därefter den första datorn som du vill konfigurera gatewayen med.
2 Konfigurera ADSL-gatewayen I steg 2 konfigurerar du Linksys WirelessG ADSL Gateway så att du får åtkomst till Internet genom din Internetleverantör. Du behöver inställningsinformationen från din ADSL-leverantör. Om du inte har tillgång till denna information bör du kontakta leverantören innan du fortsätter. I instruktionerna från Internetleverantören kan du läsa hur du ställer in datorn för Internet-åtkomst.
Lösenord. (admin är det standardinställda användarnamnet och lösenordet.) Klicka på OK. C Skärmen Basic Setup (Grundläggande inställningar) visas med fliken Setup (Inställningar) vald (bild C). Beroende på inställningsanvisningarna från Internet-leverantören kan du behöva uppge följande information: Virtual Circuit (VPI och VCI) (Virtuell krets): Dessa fält består av två delar: VPI (Virtual Path Identifier) och VCI (Virtual Channel Identifier).
1 RFC 1483 Bridged (Bryggkopplad) Dynamisk IP-adress Om Internet-leverantören anger att du ska ansluta till Internet via en dynamisk IP-adress (bild D1) ska du följa dessa steg: a b c Välj RFC 1483 Bridged (Bryggkopplad) vid Encapsulation (Inkapsling). Välj Obtain an IP Address Automatically (Hämta IP-adress automatiskt) vid IP Settings (IP-inställningar). D1 Dynamisk Snabbinstallation Spara inställningarna genom att klicka på Save Settings (Spara inställningar).
e f Skriv DNS-adressen i fältet Primary (Primär) eller Secondary (Sekundär). Du måste ange minst en DNS-adress. Spara inställningarna genom att klicka på Save Settings (Spara inställningar).
E F G H Du sparar dina inställningar, om du inte redan har gjort det, genom att klicka på Save Settings. Stäng webbläsaren. För trådlös konfigurering: Detaljerade anvisningar om hur du konfigurerar gatewayen för trådlösa nätverk finns i användarhandboken (på engelska). Linksys rekommenderar att du ändrar standardinställningarna för trådlös anslutning och anger lämpliga säkerhetsalternativ. Grattis! Du har nu konfigurerat din gateway.