QUICK INSTALLATION ADSL Gateway There are two ways to set up the Gateway, run the Setup CD-ROM or use this Quick Installation. Linksys strongly recommends that you run the Setup CD-ROM. Run the Setup CD-ROM Insert the Setup CD‑ROM into the CD-ROM drive, and follow the on‑screen instructions. Use this Quick Installation Follow the instructions in this Quick Installation. This method should only be used if you cannot run the Setup CD-ROM.
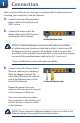
1� Connection Make sure that all the devices that you are working with are powered down, including your computer(s) and the Gateway. A. B. Connect one end of the provided phone cable to the wall jack with ADSL service. Connect the other end of the phone cable to the DSL/Line port on the back of the Gateway. Connect the Phone Cable NOTE: To avoid interference, you may need to place a microfilter or splitter between the phone cable and wall jack. Contact your ISP to determine if one is required.
D. Connect the power adapter to the Gateway’s power port and the electrical outlet. Power on the Gateway. E. Connect the Power Adapter Power on the computer that you want to use to configure the Gateway. NOTE: If you have more than one phone and you experience static on the line after installing the Gateway, then you will need an additional microfilter for each phone or fax that you use. Proceed to Step 2: Configuration.
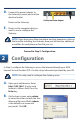
C. The Basic Setup screen appears. Refer to the settings provided by your ISP. Select the Encapsulation method your ISP has specified. D. E. F. For the Multiplexing setting, select LLC or VC. For the Virtual Circuit, enter the VPI and VCI settings. Proceed to the appropriate instructions for your Encapsulation method. NOTE FOR UK RESIDENTS ONLY: Select or enter the following settings unless otherwise instructed by your ISP.
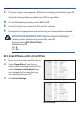
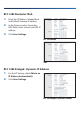
RFC 1483 Routed or IPoA 1. Enter the IP Address, Subnet Mask, and Default Gateway IP address. 2. In the Primary and/or Secondary DNS fields, enter at least one DNS IP address. 3. Click Save Settings. RFC 1483 Routed IPoA RFC 1483 Bridged - Dynamic IP Address 1. For the IP Setting, select Obtain an IP Address Automatically. 2. Click Save Settings.
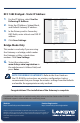
RFC 1483 Bridged - Static IP Address 1. For the IP Setting, select Use the Following IP Address. 2. Enter the IP Address, Subnet Mask, and Default Gateway IP address. 3. In the Primary and/or Secondary DNS fields, enter at least one DNS IP address. 4. Click Save Settings. Bridge Mode Only RFC 1483 Bridged - Static IP Address This mode is used only if you are using the Gateway as a bridge, which makes the Gateway act like a stand-alone modem. Click Save Settings. G. To test the setup, enter www.