HomeLink™ Series Phoneline 10M Ethernet Bridge Use this User Guide to install the following Linksys product: HomeLink Phoneline 10M Ethernet Bridge (Model No.
COPYRIGHT & TRADEMARKS Copyright © 2000 Linksys, All Rights Reserved. HomeLink is a registered trademark of Linksys. Microsoft, Windows, and the Windows logo are registered trademarks of Microsoft Corporation. All other trademarks and brand names are the property of their respective proprietors. LIMITED WARRANTY Linksys guarantees that every HomeLink Phoneline 10M Ethernet Bridge is free from physical defects in material and workmanship under normal use for one (1) year from the date of purchase.
Linksys HomeLink™ Series Table of Contents Phoneline 10M Ethernet Bridge Introduction The HomeLink Phoneline 10M Ethernet Bridge Introduction The HomeLink Phoneline 10M Ethernet Bridge Features Package Contents 1 1 2 2 Getting to Know the HomeLink Phoneline 10M Ethernet Bridge Rear Panel Ports Front Panel LEDs 3 3 4 Using the HomeLink Phoneline 10M Ethernet Bridge 5 Installation Overview 5 Connecting Your Devices to the Bridge 6 Daisy-chaining to a HomeLink Network 7 Resetting the Phoneline Ethernet
Linksys HomeLink™ Series Features • • • • • • • Share High-Speed Internet Access On Your Network Using Your Existing Telephone Line Share a Cable Modem or DSL Service Without Interrupting Normal Telephone Service Seamlessly Integrates an Ethernet Network with a Home Phoneline Network Stand-alone Unit with Two 10BaseT/100BaseTx RJ-45 Ports and one RJ-11 Modular Telephone Port Bridges a 10Mbps Cable Modem or DSL Connection and a 1Mbps HomeLink Connection Fully HomePNA 1.0 and 2.
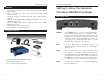
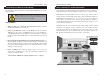
Linksys HomeLink™ Series Front Panel LEDs Phoneline 10M Ethernet Bridge Using the HomeLink Phoneline 10M Ethernet Bridge Installation Overview Power The Power LED will light up when the HomeLink Bridge is powered on. Note that there is no ON/OFF switch; simply plug in the power adapter. Link A Link LED will light up above a specific port number (1, 2 or 3) if the corresponding port is successfully connected to a network device.
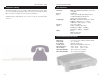
Linksys HomeLink™ Series Phoneline 10M Ethernet Bridge Connecting Your Devices to the Bridge Daisy-chaining to a HomeLink Network The following instructions will have your HomeLink 10M Bridge up and running in minutes. Daisy-chaining your HomeLink PCs and peripherals can create a simple network that acts in the same way an Ethernet network acts on your PC's desktop. Note : Power everything off before connecting PCs to the HomeLink 10M Bridge.
Linksys HomeLink™ Series Resetting the Broadband Network Bridge If your network connections begins acting erratically, you may want to reset the bridge. To reset your Bridge, do the following: 1. Shut down all of your network components. 2. Disconnect the Bridge's power supply and wait five seconds. 3. Plug the Bridge’s power supply back into the power outlet. Phoneline 10M Ethernet Bridge Appendix Twisted Pair Cabling There are different grades, or categories, of twisted-pair cabling.
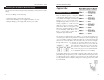
Linksys HomeLink™ Series Phoneline 10M Ethernet Bridge Telephone Cabling Specifications The telephone cables you use to build your HomeLink network can be either crossover or straight-through cables. The connectors on phone cables are called RJ-11 connectors, and have four wires inside the plastic tips. Standards Protocol Ports Standard telephone cables like the ones you use every day in your home should do the job. Cabling Type Topology Speed LEDs IEEE 802.3, IEEE 802.3u, HPNA 1.0 and 2.
Linksys HomeLink™ Series Linksys Warranty Information BE SURE TO HAVE YOUR PROOF OF PURCHASE AND A BARCODE FROM THE PRODUCT'S PACKAGING ON HAND WHEN CALLING. RETURN REQUESTS CANNOT BE PROCESSED WITHOUT PROOF OF PURCHASE. IN NO EVENT SHALL LINKSYS’ LIABILITY EXCEED THE PRICE PAID FOR THE PRODUCT FROM DIRECT, INDIRECT, SPECIAL, INCIDENTAL, OR CONSEQUENTIAL DAMAGES RESULTING FROM THE USE OF THE PRODUCT, ITS ACCOMPANYING SOFTWARE, OR ITS DOCUMENTATION. LINKSYS DOES NOT OFFER REFUNDS FOR ANY PRODUCT.